# Introduction

A high-level overview of what THORChain is, does, encourages, and pursues.

{% hint style="info" %}
**New to THORChain?** Check out [What is THORChain and RUNE?](/what-is-thorchain-and-rune) for an easy-to-understand introduction.
{% endhint %}

## Introduction

### What is THORChain?

THORChain is a decentralized exchange (DEX) enabling native cross-chain swaps without wrapped assets or bridges. All trades occur on-chain and are permissionless. Built on the [Cosmos SDK](https://docs.cosmos.network), it utilises the CometBFT consensus engine, the Cosmos-SDK state machine, and the GG20 Threshold Signature Scheme (TSS) to execute its purpose, which is to allow users to swap native assets across multiple chains with zero reliance on centralised third parties. In doing so, it stands as one of the few exchanges that verifiably ensures transparent and fair prices for cross-chain swaps of native assets.

THORChain's design renders no need for wrapped or pegged assets. Instead, the protocol deploys what are called continuous liquidity pools (CLPs), which—with highly complex algorithms—maximise the efficiency of its transactions. These CLPs allow for THORChain to manage funds directly in on-chain vaults, and it secures those funds via an economic security model. For all this, THORChain might be best described as a "cross-chain automated market maker (AMM), like Uniswap", or even a "decentralised Binance".

### THORChain's Financial Offerings

Building on the foundation of liquidity pools, THORChain pursues two important financial primitives:

1. Allow a user to [**Swap**](/technical-documentation/thorchain-finance/continuous-liquidity-pools) {*Asset X on Chain A*}, to {*Asset Y on Chain B*}.
2. Allow a user to [**Pool**](/technical-documentation/thorchain-finance/runepool) RUNE across liquidity pools,

### Building on THORChain

THORChain welcomes developers who want to build applications and interfaces for users. Whether you're creating wallets, exchanges, or innovative DeFi applications, THORChain provides the infrastructure for cross-chain liquidity.

For technical integration guides, API documentation, and developer resources, visit the [THORChain Developer Documentation](https://dev.thorchain.org/).

For a detailed understanding of THORChain's technical innovations, design principles, and protocol mechanics, see the Technical Deep Dive section below.

To learn how THORChain works, feel free to jump here:

{% content-ref url="/pages/K9qI3quGrONhi97sUDWI" %}
[Technical Deep Dive](/technical-documentation/technical-deep-dive)
{% endcontent-ref %}

### THORNodes

THORNodes are anonymous individuals who bond their RUNE to the network in order to provide validation services. As a fully permissionless network, THORChain allows anyone with the required funds to do this—all while maintaining user security. To further elevate network security, THORChain maintains a high churn schedule for these validators, every three days kicking out the oldest, slowest, and lowest bonded. This high-churn model ensures that THORChain remains resistant to centralization, capture, and censorship.

Each individual THORNode is comprised of several independent servers in a cluster, which run full-nodes for each connected chain. Initially intended to max out capacity at 100 nodes, the protocol is able scale to 250+ nodes.

### CONTRIBUTING

THORChain is an open-source, public project with a vibrant and growing ecosystem. Whether you’re a user, an interface developer, or an app builder on top of the network, there’s a way to get involved.

#### 1. Join the Community

Be part of the THORChain ecosystem by joining the [THORChain Community Discord](https://discord.com/invite/c4EhDZdFMA). It’s the best place to ask questions, learn how things work, and discuss all things THORChain with other users, builders, and contributors.

#### 2. Build on THORChain

Developers can create applications and interfaces that leverage THORChain's cross-chain liquidity infrastructure. This includes wallets, exchanges, DeFi applications, and innovative financial products that benefit users across multiple blockchains.

For comprehensive developer resources, technical guides, and community support, visit the [THORChain Developer Documentation](https://dev.thorchain.org/).


# What is THORChain and RUNE?

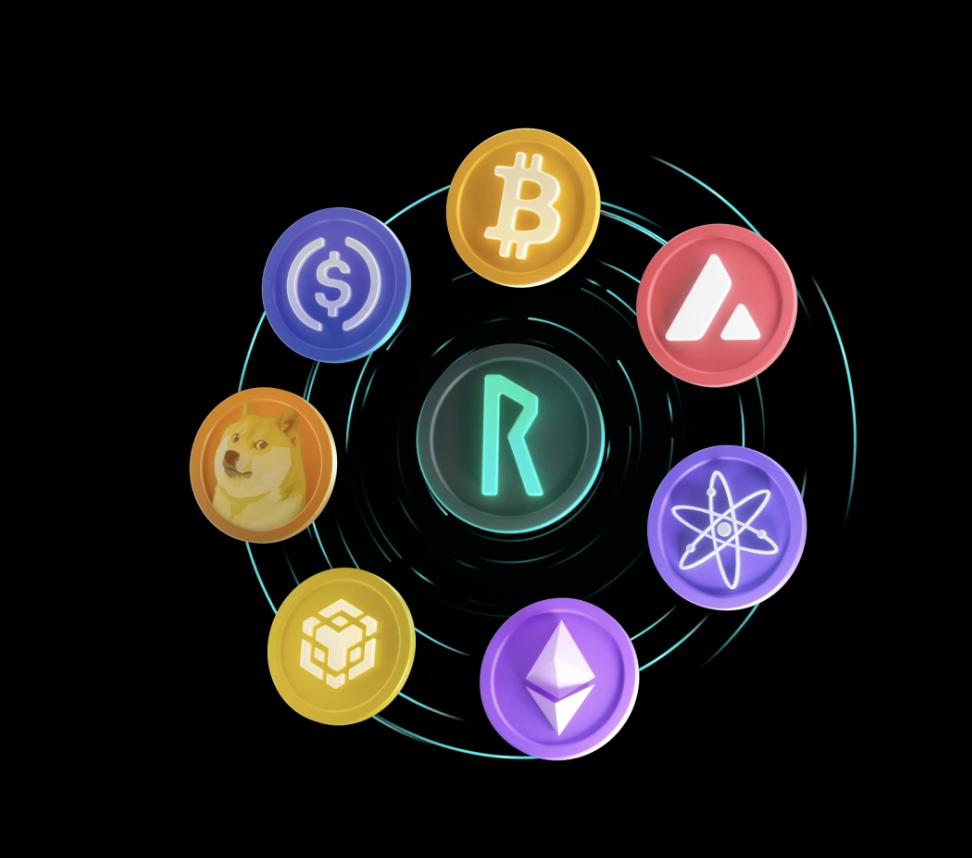
THORChain is a Layer-1 blockchain that enables different cryptocurrencies to work together. It acts as a decentralized exchange (DEX) that allows you to swap coins across different blockchains in a single step.

Every swap on THORChain happens directly from your wallet in a safe and permissionless way. THORChain doesn't hold your funds—though it does retain your inbound asset briefly during the swap before immediately sending you the output asset. You never give up custody to a centralized entity.

Unlike centralized exchanges:

* You don't need an account
* There is no KYC or paperwork
* You don't have to trust a company to hold your funds

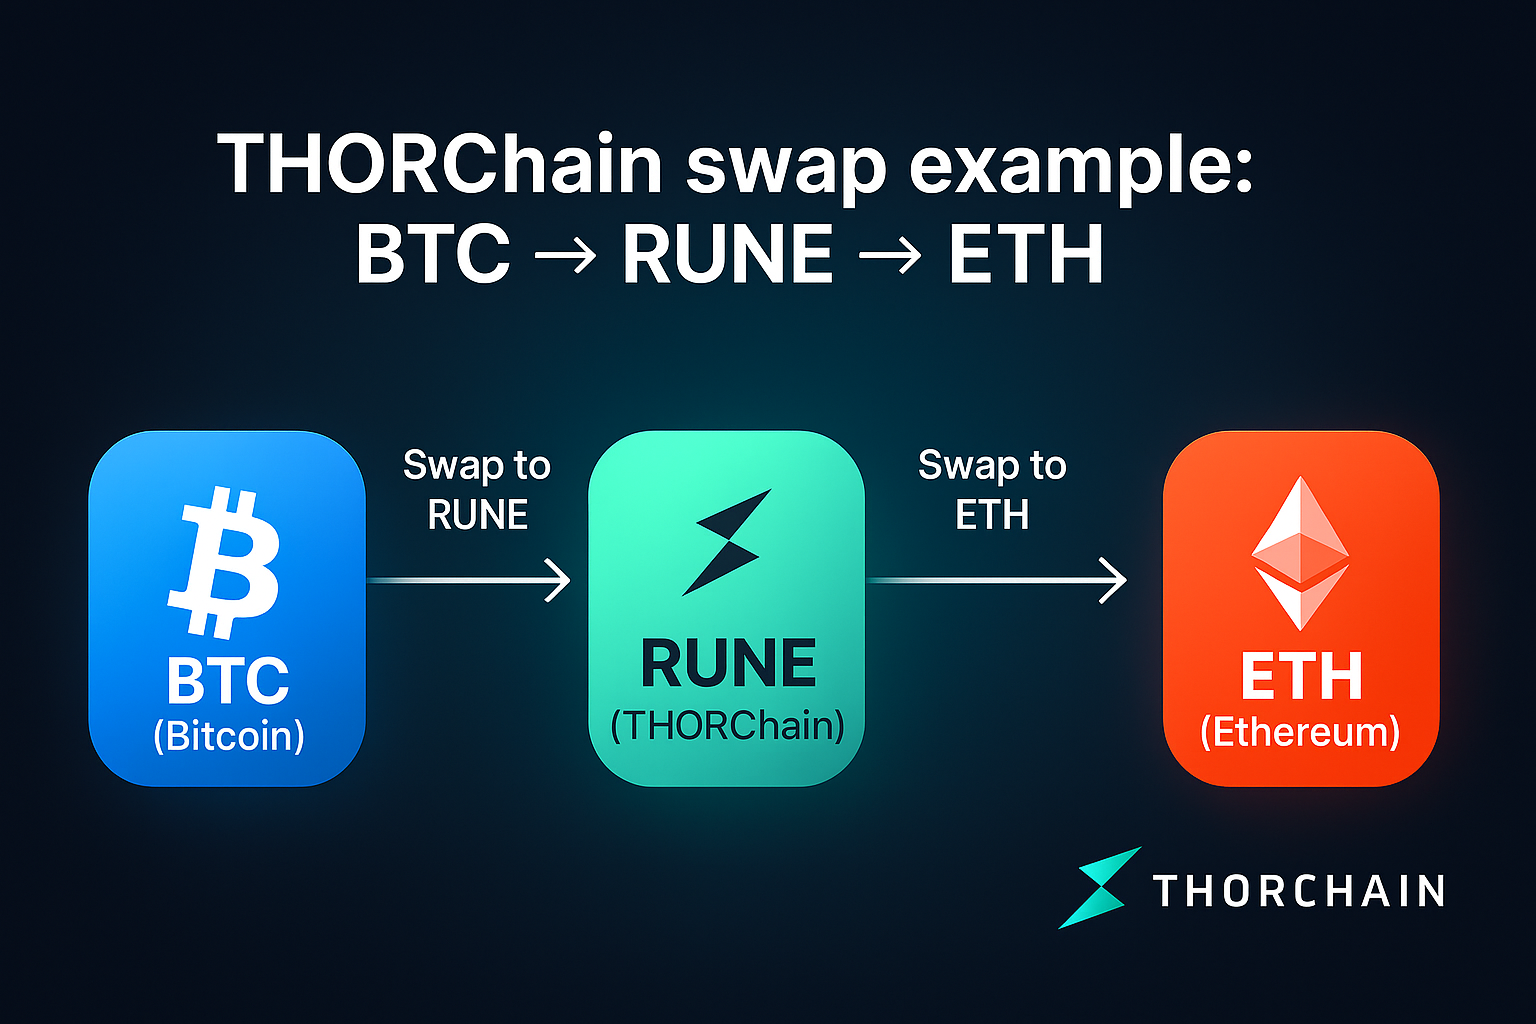
Example: If you own Bitcoin and want Ethereum, you just send Bitcoin from your wallet and receive Ethereum back in a single transaction — no exchange accounts, no middlemen.

<div align="center"><img src="https://3337783180-files.gitbook.io/~/files/v0/b/gitbook-x-prod.appspot.com/o/spaces%2FfvaTNxU33ciP7UstKtwU%2Fuploads%2Fgit-blob-16602a275ec1c12f69fb28cd38ad7e7eb596a722%2Fthorchain-dex.png?alt=media" alt="THORChain DEX diagram showing RUNE at the center connected to various blockchains including Bitcoin, Ethereum, Avalanche, Cosmos, and others" width="400"></div>

## Supported Blockchains

THORChain enables native swaps between the following major blockchains:

* Bitcoin (BTC)
* Ethereum (ETH)
* Ripple (XRP)
* BNB Smart Chain (BNB)
* Bitcoin Cash (BCH)
* Litecoin (LTC)
* Dogecoin (DOGE)
* Avalanche (AVAX)
* Base (BASE)
* Cosmos Hub (ATOM)
* Tron (TRX)

THORChain will continue to evolve and add more chains over time, so users will be able to swap even more popular cryptocurrencies—all without wrapped tokens or intermediaries.

THORChain is a full blockchain (like Ethereum or Solana). This means that, in addition to swapping, developers can build smart contracts and decentralized apps (dApps) on top of it. This makes THORChain not only a trading tool but also a foundation for the next generation of DeFi projects.

## What is RUNE?

RUNE is the native utility token of THORChain that serves four critical functions:

### 1. Settlement Asset

* All transactions and swaps in the network are settled in RUNE
* RUNE acts as the bridge connecting all supported blockchains

### 2. Network Security (Bonding)

* Validators must bond RUNE to participate in consensus
* More bonded RUNE makes the network harder to attack
* Running a node allows earning a share of THORChain's revenue

### 3. Liquidity

* RUNE is present in every liquidity pool (BTC–RUNE, ETH–RUNE, etc.)
* This ensures unified pricing and constant demand for RUNE

### 4. Governance and Incentives

* Validators and liquidity providers earn rewards in RUNE
* These rewards come from real network fees, not token inflation
* RUNE holders participate in network governance through validator delegation

***

## Next Steps

Now that you understand what THORChain and RUNE are, explore how it works:

* [**Native Cross-chain Swaps**](/native-cross-chain-swaps) - Learn how THORChain enables direct swaps between different blockchains
* [**How to Use THORChain**](/how-to-use-thorchain) - Step-by-step guide to start swapping
* [**Tokenomics**](/tokenomics-rune-tcy) - Deep dive into RUNE's economics and revenue model


# Native Cross-chain Swaps

How THORChain enables decentralized swaps between native L1 assets without wrapping or centralized intermediaries

THORChain is a decentralized protocol that enables cryptocurrencies to be swapped across different blockchains natively – without using wrapped tokens and without relying on centralized exchanges. This means you can directly exchange one Layer-1 coin (e.g., Bitcoin) for another (e.g., Ethereum) in a single, seamless transaction. The entire process happens without intermediaries – you don’t need to trust any company or institution.

## How Swaps Work in THORChain

### Liquidity Pools and RUNE

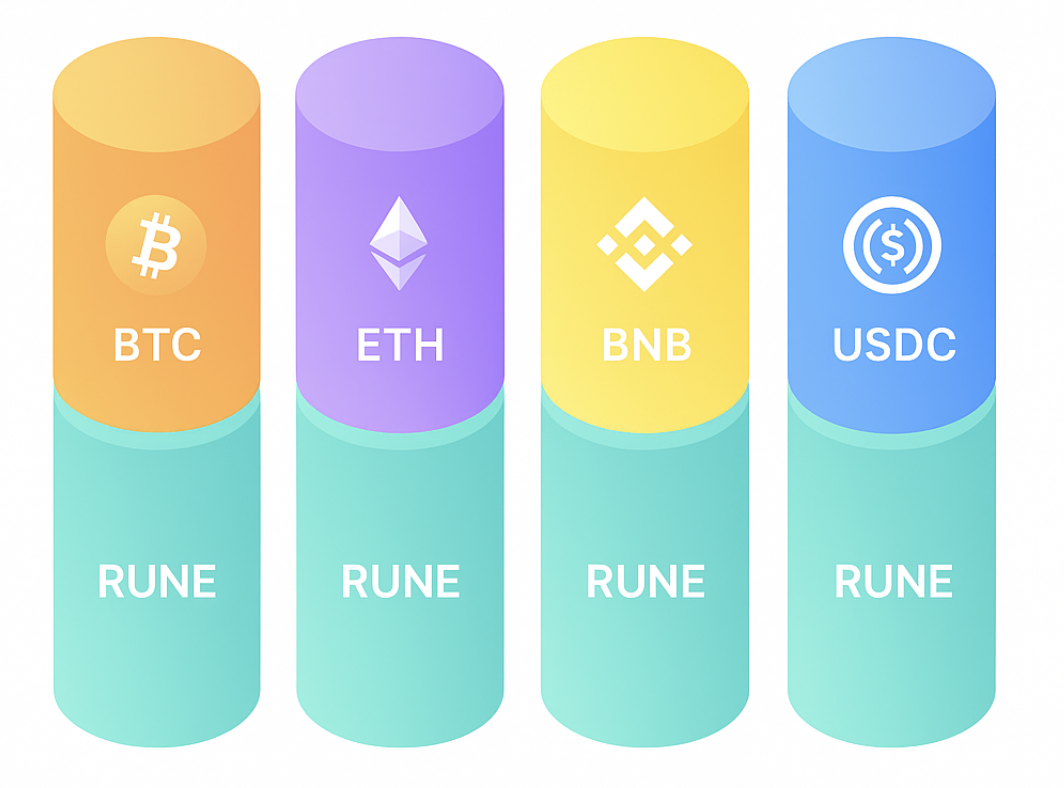
Every cryptocurrency supported by THORChain is paired with RUNE in liquidity pools. RUNE acts as a hub that connects all pools into one continuous network. When you swap one coin for another, two steps happen under the hood: your coin is first swapped into RUNE, and then RUNE is swapped into the target coin. For the user, this appears as one simple swap – you don't need to hold or manage RUNE yourself.

### Decentralized Vaults

Each blockchain has its own vault, operated collectively by THORChain's node network. Your funds are deposited there, and after the network confirms the transaction, they are released as the native coin on the destination chain. Thanks to threshold signatures (a type of multi-signature technology), no single node has full control over the funds.

<div align="center"><img src="https://3337783180-files.gitbook.io/~/files/v0/b/gitbook-x-prod.appspot.com/o/spaces%2FfvaTNxU33ciP7UstKtwU%2Fuploads%2Fgit-blob-bc924bb0b85ffc018b4ba6f00ac012db59531c9b%2Fliquidity-pools-with-rune.png?alt=media" alt="Liquidity pools with RUNE showing how different cryptocurrencies connect through RUNE as the settlement asset" width="500"></div>

## Example: Swapping BTC to ETH

1. In your wallet, you choose the swap BTC → ETH and send, for example, 1 BTC to a THORChain vault address on the Bitcoin network.
2. The THORChain network detects the deposit and internally swaps BTC into RUNE in the BTC:RUNE pool.
3. RUNE is then immediately swapped into ETH in the RUNE:ETH pool.
4. The network releases the equivalent amount of native ETH directly to your Ethereum address.
5. In practice, you send BTC and shortly after see ETH in your wallet.

<div align="center"><img src="https://3337783180-files.gitbook.io/~/files/v0/b/gitbook-x-prod.appspot.com/o/spaces%2FfvaTNxU33ciP7UstKtwU%2Fuploads%2Fgit-blob-8b1cbb95da8bc26561beab4d0431310c560e9cb5%2FExample-Swap-BTC-ETH.png?alt=media" alt="Example of BTC to ETH swap process showing the step-by-step flow through THORChain" width="500"></div>

## Why THORChain is Different

In most cases, swapping assets across blockchains requires either a centralized exchange or cross-chain bridges with wrapped tokens like WBTC. Both approaches involve trusting a third party or custodian that holds your funds. THORChain eliminates these issues:

* You swap real coins (e.g., BTC, ETH, LTC), not synthetic versions
* You never hand over custody of your funds to a company
* The process is secured by a decentralized network of nodes, each required to bond large amounts of RUNE, incentivizing honest behavior

As a result, THORChain enables true cross-chain swaps: you can easily exchange native BTC for native ETH (and vice versa) in a fully decentralized, secure, and trustless way - with no intermediaries.


# How to Use THORChain

A practical walkthrough of connecting a wallet, selecting assets, executing swaps, and accessing supported networks

1. Create a wallet on your preferred interface (e.g., Vultisig, Keystore, Ledger, etc.).

   Go to the [Ecosystem](/ecosystem#integrated-wallets-and-exchanges) page to find a wallet provider.
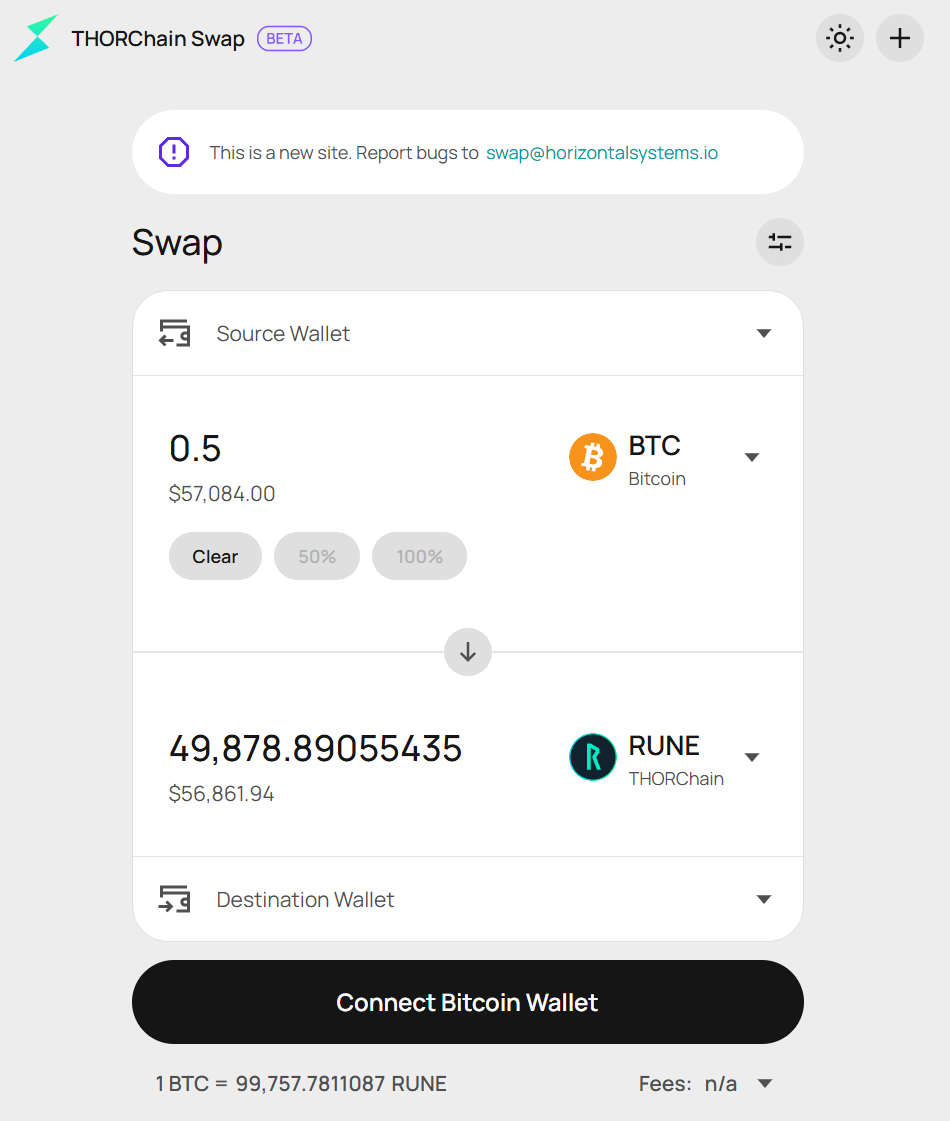
2. Go to [THORChain's Swap website](https://swap.thorchain.org/)

   <img src="https://3337783180-files.gitbook.io/~/files/v0/b/gitbook-x-prod.appspot.com/o/spaces%2FfvaTNxU33ciP7UstKtwU%2Fuploads%2Fgit-blob-a1339276a2c5a0de3bd2934696339fba3c3111d6%2Fswap.thorchain-screenshot.png?alt=media" alt="Thorchain swap website" width="500">
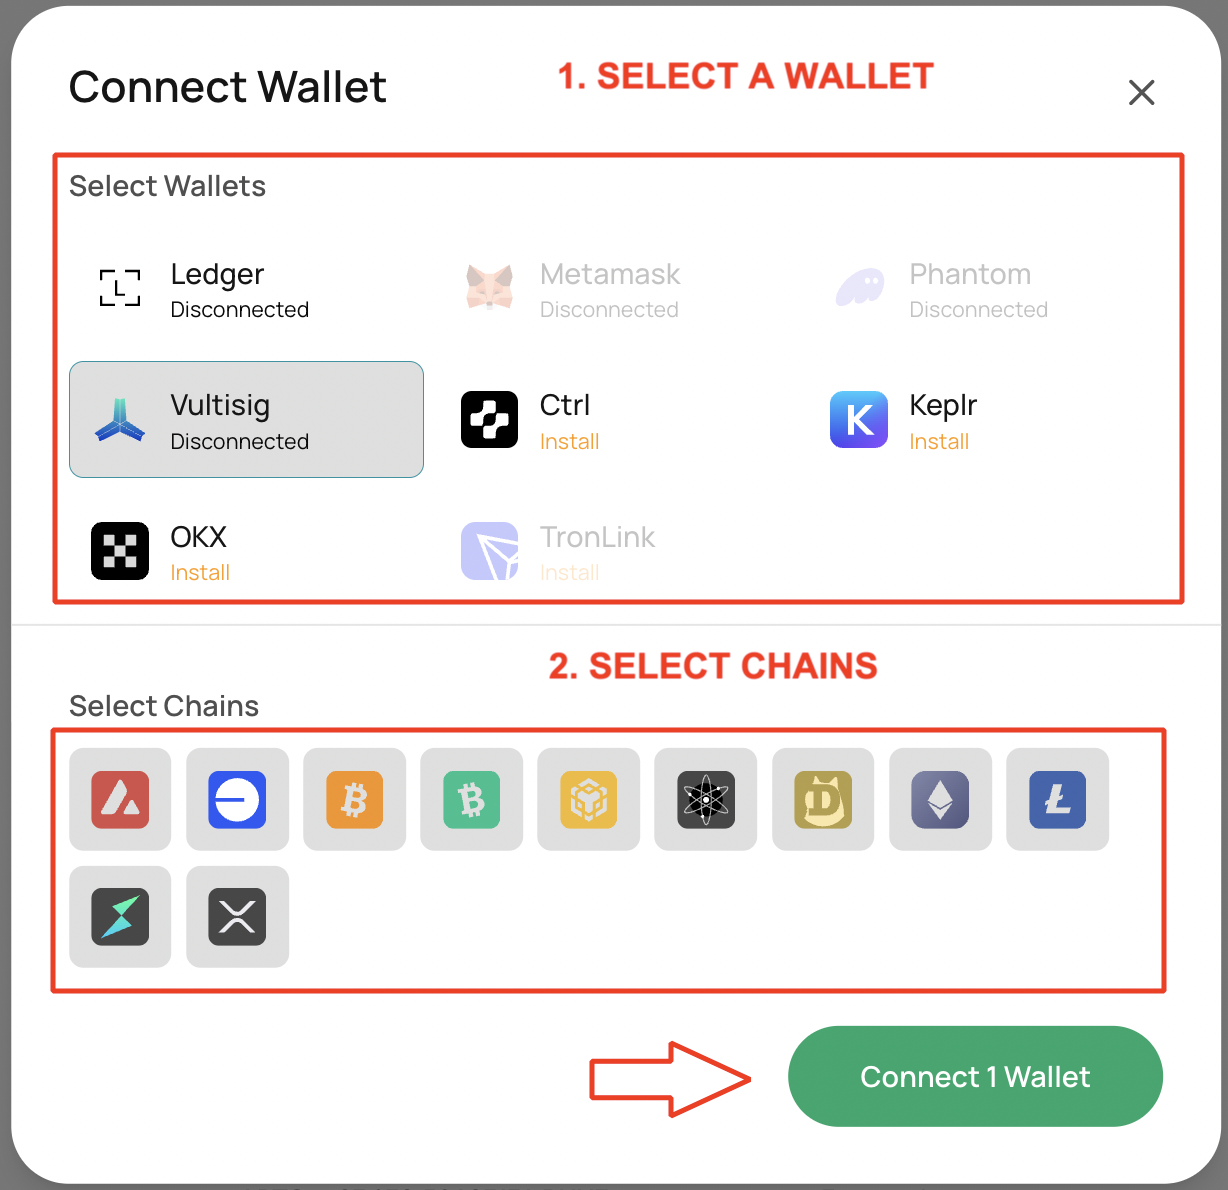
3. Connect your wallet

   <img src="https://3337783180-files.gitbook.io/~/files/v0/b/gitbook-x-prod.appspot.com/o/spaces%2FfvaTNxU33ciP7UstKtwU%2Fuploads%2Fgit-blob-58cd2060b4e051626a181fb2ec2eec7914bd17ce%2Fswap.thorchain-connect-wallet.png?alt=media" alt="Connect wallet interface" width="500">
4. Choose the asset you want to exchange
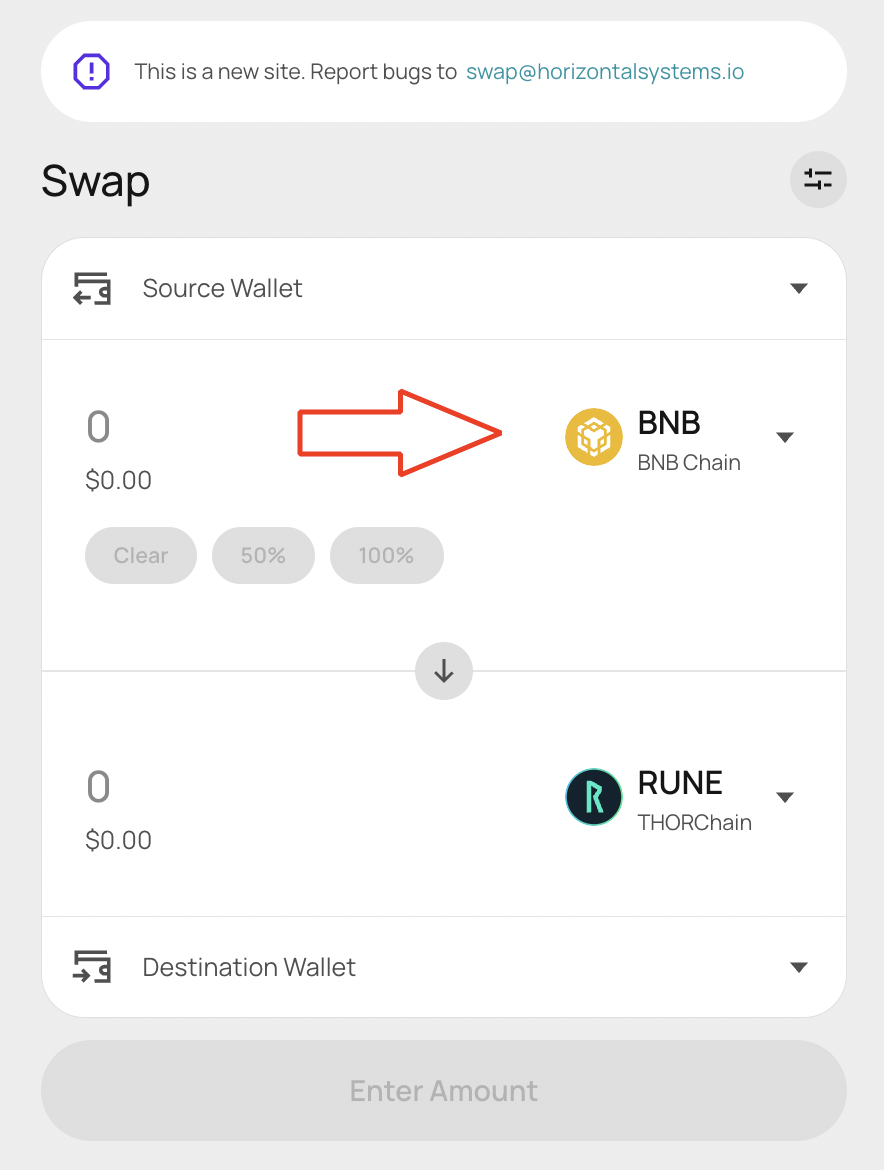
   <img src="https://3337783180-files.gitbook.io/~/files/v0/b/gitbook-x-prod.appspot.com/o/spaces%2FfvaTNxU33ciP7UstKtwU%2Fuploads%2Fgit-blob-6d6bf04dfd2bdc993ea37934951ca079576a72c8%2Fswap.thorchain-select-source-asset.png?alt=media" alt="Select source asset button" width="500">

   Search for the source coin you want to swap from.
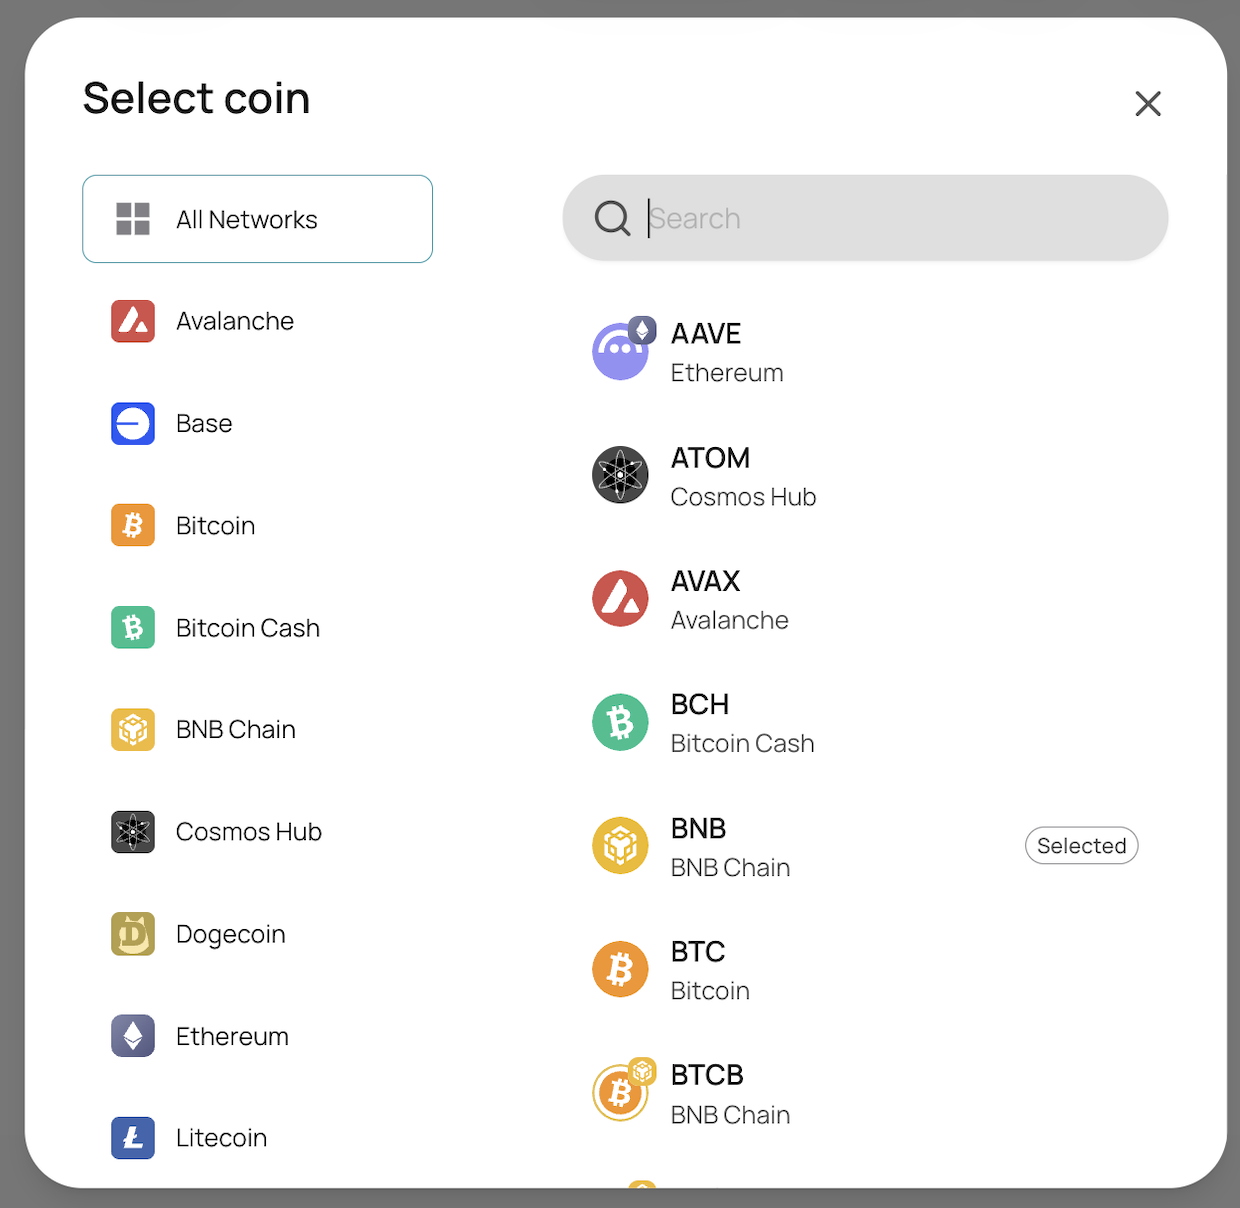
   <img src="https://3337783180-files.gitbook.io/~/files/v0/b/gitbook-x-prod.appspot.com/o/spaces%2FfvaTNxU33ciP7UstKtwU%2Fuploads%2Fgit-blob-9bdebcb0d42f4506dfd8c42f180100ad979c1c63%2Fswap.thorchain-select-coin-dialog.png?alt=media" alt="Asset selection dialog" width="500">
5. Choose the asset you want to receive Same process as selecting a source asset
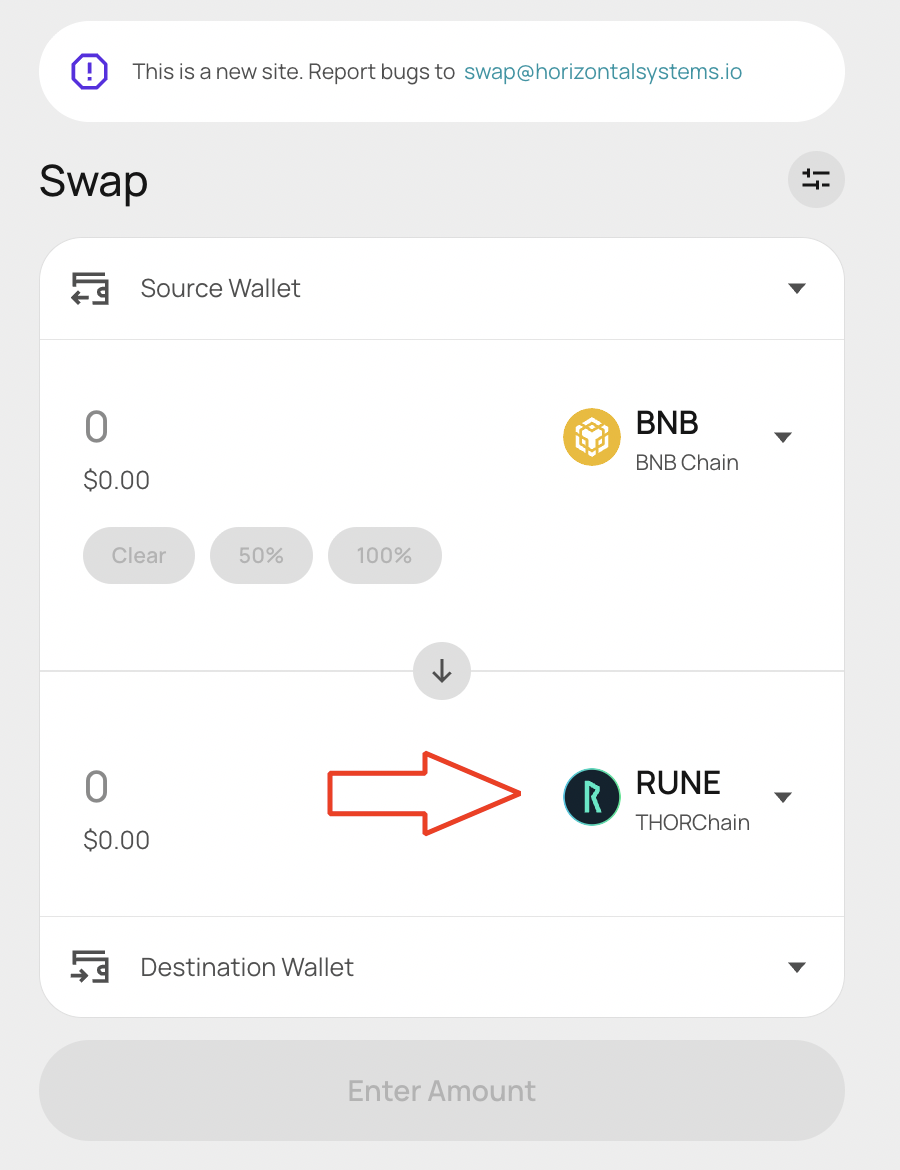
   <img src="https://3337783180-files.gitbook.io/~/files/v0/b/gitbook-x-prod.appspot.com/o/spaces%2FfvaTNxU33ciP7UstKtwU%2Fuploads%2Fgit-blob-a7672a4879f151f73743937d33bb5f5bb194a9c7%2Fswap.thorchain-select-destination-asset.png?alt=media" alt="Select destination asset" width="500">
6. Review & confirm: check amount, route, fees, and slippage, then press the Swap button.
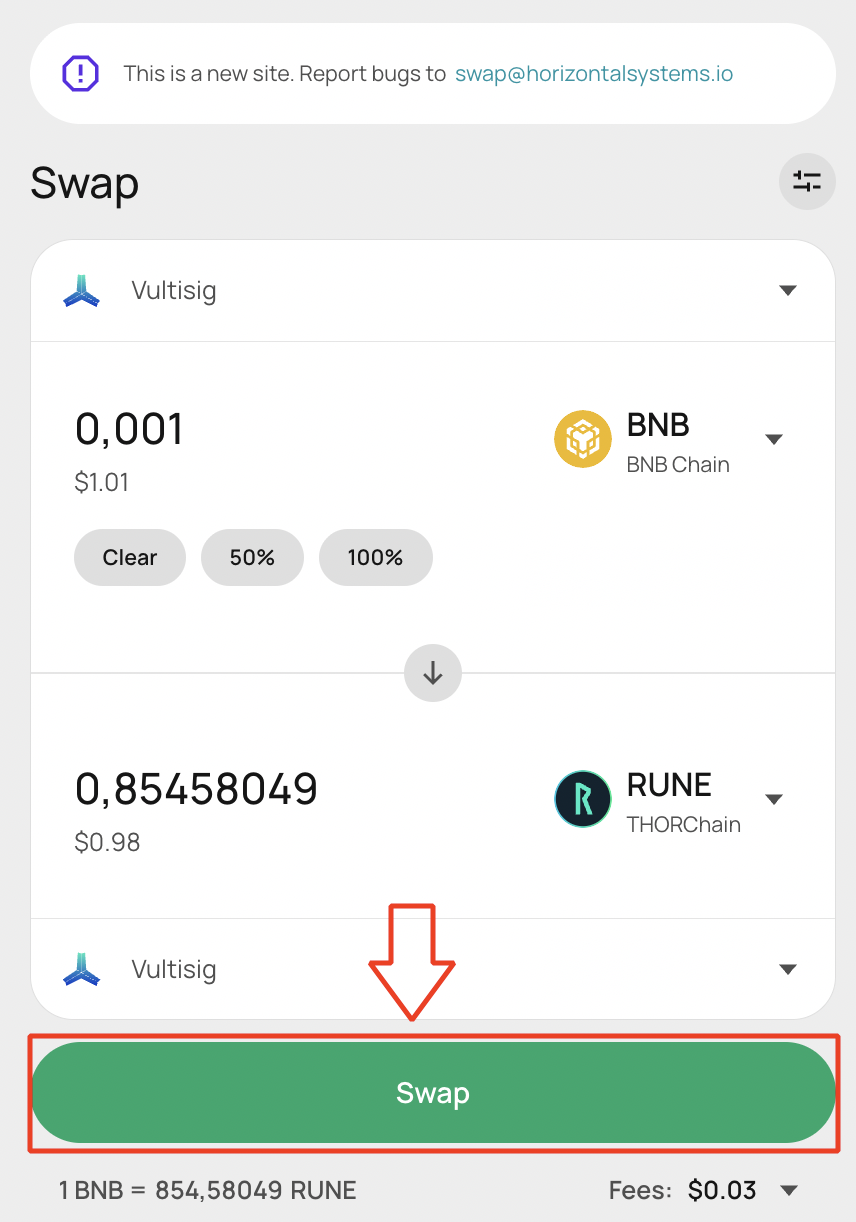
   <img src="https://3337783180-files.gitbook.io/~/files/v0/b/gitbook-x-prod.appspot.com/o/spaces%2FfvaTNxU33ciP7UstKtwU%2Fuploads%2Fgit-blob-78fb60b782d668b55048b33b42663ce5f4ca52c2%2Fswap.thorchain-swap-button.png?alt=media" alt="Swap button confirmation" width="500">

   Approve the transaction in your wallet if prompted. (Tip: The first time you swap a given token like an ERC-20, you may see two prompts: Approve one-time and then Swap.)
7. Well done! Your transaction is complete.


# Application Layer

Overview of the ecosystem of apps, wallets, and interfaces built on top of THORChain

## Introduction

The App Layer transforms THORChain from being just a cross-chain decentralized exchange into a full ecosystem of financial applications. It provides an environment for developers to build and deploy decentralized applications (dApps) and financial services, leveraging the security and liquidity of the THORChain base layer.

The **THORChain Base** Layer serves as the foundation – it is responsible for:

* Secure storage and transfer of value
* Native asset swaps across different blockchains (e.g. BTC ↔ ETH)
* Maintaining consensus and network security

The **App Layer** extends these capabilities by giving developers tools to:

* Write and deploy smart contracts (powered by CosmWasm)
* Build applications that directly use the liquidity and functions of the base layer
* Create advanced financial products such as orderbook exchanges, lending protocols, perpetual trading systems, launchpads, or liquidation platforms

In practice, the App Layer works like a "construction site" on top of the THORChain foundation: instead of just simple swaps, it enables the creation of an entire DeFi ecosystem that leverages the security and cross-chain capabilities of the base layer.

## Base Layer (THORChain)

* Manages liquidity pools
* Enables cross-chain swaps (BTC ↔ ETH ↔ ATOM, etc.)
* Provides security and validation

## Application Layer (App Layer = Rujira)

* Built on THORChain, using its liquidity
* Powered by CosmWasm smart contracts → apps can be written in Rust/WASM
* Enables the creation of DeFi tools such as:
  * Orderbook exchanges
  * Perpetuals (leverage)
  * Lending/borrowing
  * Launchpads, liquidations, etc.

## Rujira Economics

The App Layer has its own economic model, centered around the RUJI token:

* RUJI is the native token of the App Layer,
* a portion of application fees is distributed to RUJI stakers,
* revenues are shared between THORChain 50% and Rujira 50%.
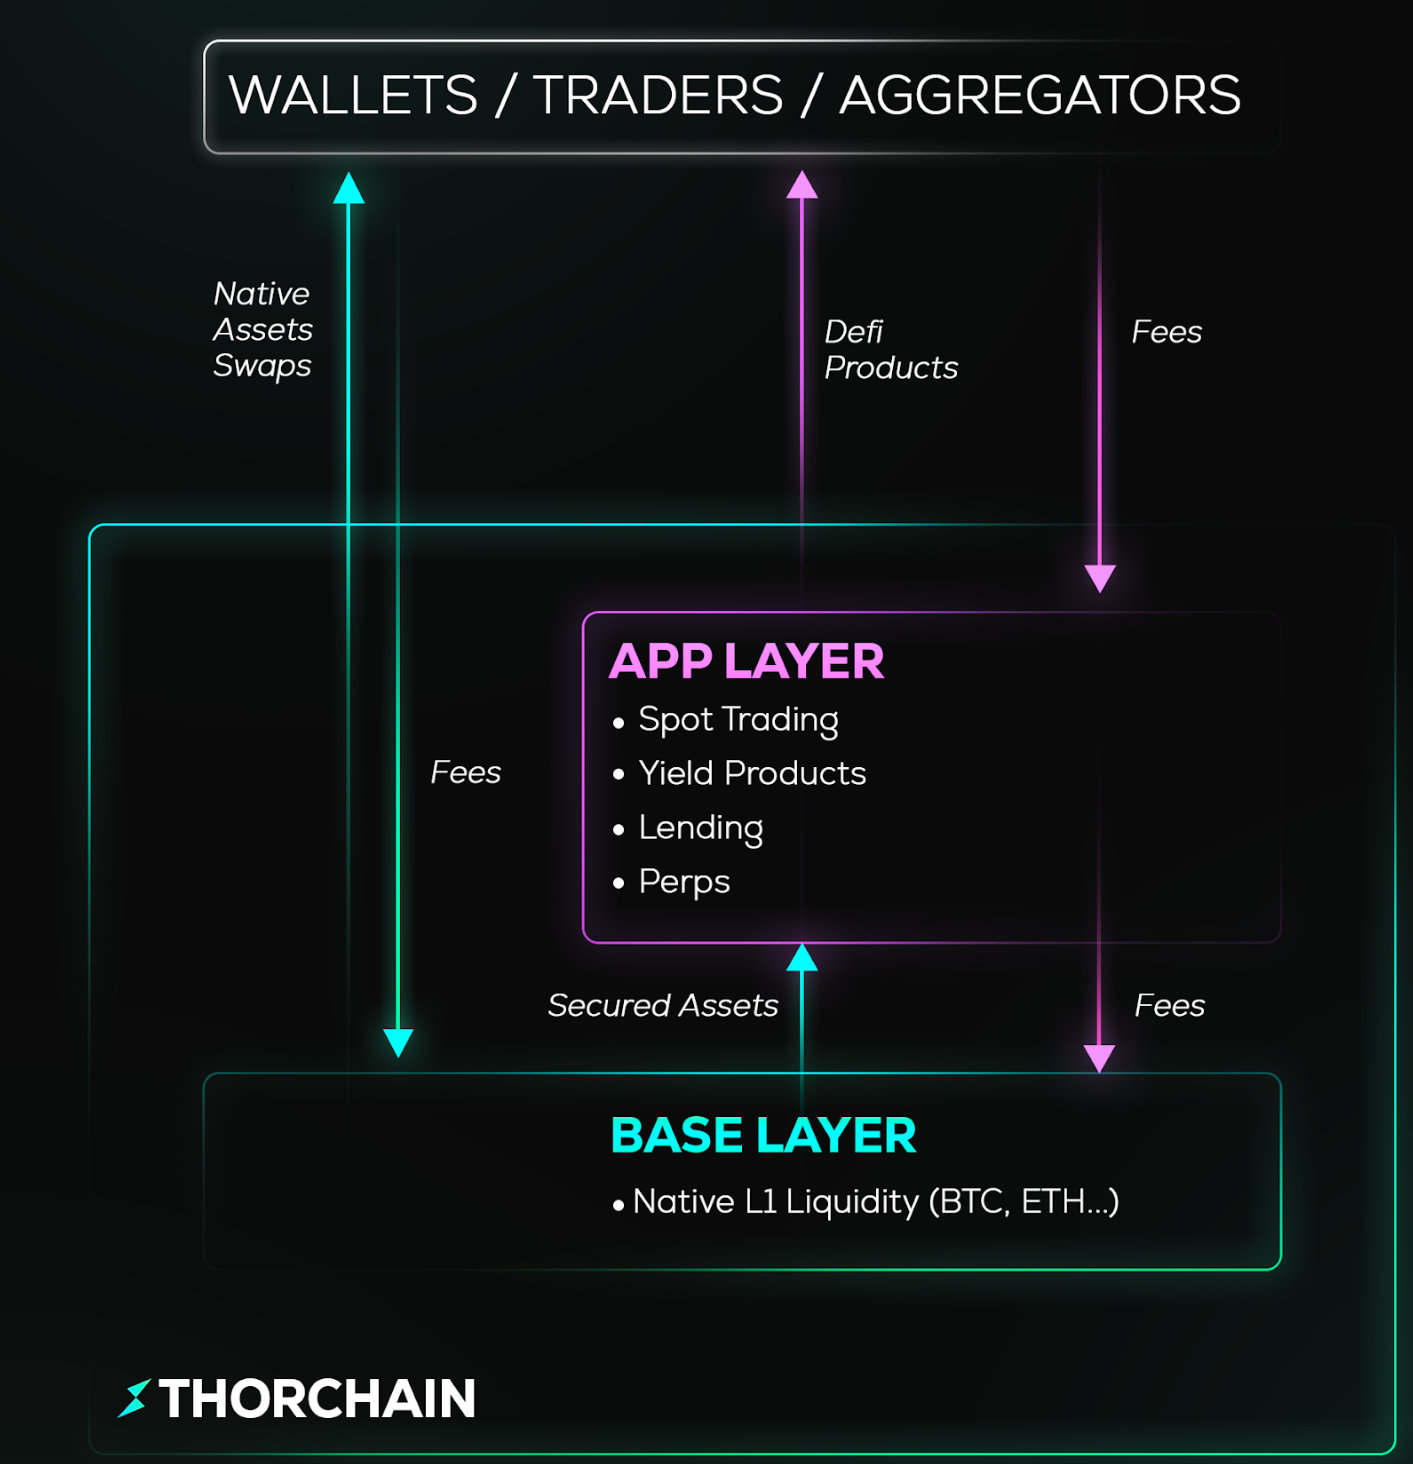
<div align="center"><img src="https://3337783180-files.gitbook.io/~/files/v0/b/gitbook-x-prod.appspot.com/o/spaces%2FfvaTNxU33ciP7UstKtwU%2Fuploads%2Fgit-blob-23a073a74a3cd6c434db674f22b93d073f2d34c1%2FFee-Movements.png?alt=media" alt="Fee movements diagram showing how revenues are shared between THORChain and Rujira App Layer" width="500"></div>

## Simple Analogy

THORChain (Base Layer) = highway → provides core infrastructure, traffic, and security. App Layer (Rujira) = gas stations, shops, and services along the highway → adds extra functionality and convenience.

The highway itself is essential, but it’s the services around it that make people want to use it. Similarly, Rujira expands THORChain’s appeal by enabling a full ecosystem of applications.


# Liquidity

THORChain's slip-based fees, streaming swaps, and how arbitrage protects against MEV and sandwich attacks

## Introduction

Most traditional exchanges (e.g., Binance or Coinbase) operate using an order book – buyers and sellers place their offers, and the system matches them. THORChain works differently: instead of an order book, it uses Continuous Liquidity Pools (CLP).

What does this mean in practice?

* Each token pair (e.g., BTC-RUNE) has a shared capital pool
* Users can swap one token for another at any time at a price determined by the ratio of assets in the pool
* This ensures that liquidity is always available, and swaps occur without intermediaries or centralized price oracles
* Pool prices are additionally "maintained" by arbitrageurs to keep them aligned with external markets

## Slip-based Fees – liquidity-dependent fees

A slip-based fee is a transaction fee model tied to the size of a swap relative to pool depth. Simply put: the larger the transaction relative to available liquidity, the higher the slip (price impact within the pool during the swap), and therefore the higher the fee paid to liquidity providers.

This mechanism ensures that the fee corresponds to the demand for pool capital:

* Large trades pay more
* Small trades pay less

As a result:

* The protocol penalizes impatient traders who execute large, sudden swaps
* Liquidity providers are rewarded for making their capital available
* Users who insist on forcing massive instant swaps cause high slip and pay significant fees to the pool

Meanwhile, smaller or gradual swaps create minimal slip, leading to lower fees – in extreme cases, with little demand, slip fees approach zero, allowing swaps to occur almost at market price without extra cost.

### How does it work?

Every swap in THORChain changes the ratio of assets in the pool. The larger the swap relative to pool depth, the greater the price movement (slip). Slip generates a fee that goes directly to liquidity providers (LPs).

* Small transactions – barely move the price → negligible slip → minimal fee
* Large transactions – significantly move the price → high slip → high fee

### Why is this important?

* Protects against price manipulation – sudden large price moves cost attackers heavily
* Forces traders to choose between:
  * Speed (one large swap at once, with a high fee)
  * Better price (many smaller swaps, slower, but cheaper)
* Pool prices gain natural inertia – they cannot be easily manipulated in one move

### Example 1: Small Swap

* BTC-RUNE pool: 1,000 BTC and equivalent RUNE
* User swaps 0.1 BTC → only 0.01% of the pool
* Price barely changes, slip fee ≈ 0, symbolic fee

### Example 2: Large Swap

* Same pool
* User swaps 100 BTC → 10% of the pool
* Price in the pool drops significantly, slip fee amounts to several percent of trade value

## Streaming Swaps – time-sliced swaps

Streaming Swaps is a THORChain mechanism that allows users to split a large swap into a series of smaller transactions (sub-swaps), executed sequentially at defined intervals.

This feature was introduced to help users optimize pricing – performing swaps with minimal slip – without manually breaking orders into smaller chunks.

Normally, a single large swap leads to high slip fees, while splitting it manually would mean paying multiple network fees (inbound/outbound fees for each part).

Streaming Swaps solve this by letting users control the swap's timeframe: one deposit internally creates many sub-swaps without additional L1 network fees beyond those of a single swap.

### The Problem

When a user wants to swap a large amount (e.g., 1,000 ETH), a one-off swap causes:

* Huge slip
* Very high fees

Manually splitting into 100 smaller trades would require 100× network fees – uneconomical.

### The Solution: Streaming Swaps

THORChain automatically splits a large swap into smaller sub-swaps executed one after another at set intervals. This works similarly to the TWAP (Time-Weighted Average Price) strategy.

### Why is this better?

* Slip on each part is minimal
* Total slip fees can drop from several percent to \~0.1% (or whatever minimum slip set by the protocol)
* User pays only one network fee, not per sub-swap
* Arbitrageurs between sub-swaps rebalance the pool, improving execution prices for later parts

### Example

* Swap: 1,000 ETH → BTC.
* Option A: one-off → slip fee \~5% (50 ETH cost).
* Option B: Streaming Swap – 100 sub-swaps of 10 ETH each, every minute.
* Slip per sub-swap ≈ 0.05%.
* Total slip fee ≈ 0.5 ETH instead of 50 ETH.
* User can also set a price limit (e.g., min. 0.09 BTC per ETH). If the price falls below, unexecuted sub-swaps are refunded.
* Result: cheaper, safer, automated.

## Arbitrage – balancing pool prices

Unlike many DeFi systems, THORChain does not rely on price oracles – instead, it depends on market forces. Pool prices are maintained by profit-seeking arbitrageurs.

### Why is arbitrage needed?

THORChain pools derive prices solely from asset ratios. This can sometimes create gaps compared to external markets.

### How arbitrage works

* If a token in a pool is undervalued, an arbitrageur buys it from the pool and sells it on the external market for profit.
* If a token in a pool is overvalued, an arbitrageur sells it into the pool and buys it cheaper externally.
* Repeated arbitrage trades propagate price information between THORChain and external markets until equilibrium is reached. This removes the need for centralized oracles – arbitrage continuously adjusts pool prices.

### Arbitrage Example

* ETH-RUNE pool: 1 ETH = 100 RUNE.
* On Binance: 1 ETH = 110 RUNE.
* Arbitrageur buys ETH in the pool for 100 RUNE, sells it on Binance for 110 RUNE → profit 10 RUNE.
* Pool price shifts upward.

Thanks to arbitrage, THORChain pool prices always reflect real market values.

## Protection against MEV and sandwich attacks

THORChain is designed with built-in protection against common DEX vulnerabilities such as MEV (Maximal Extractable Value) – the manipulation of transaction ordering within blocks by privileged actors (validators or bots) to extract profit.

Examples of MEV attacks include:

* **Front-running** – inserting one's own trade right before a victim's large transaction to profit from price movement.
* **Sandwich attack** – placing two trades around a victim's swap (one before, one after) to profit from the induced price change.

### THORChain solutions

* **Swap Queue** – transactions are finalized and sorted deterministically by impact on price (slip fee).
  * Large swaps are executed before small ones.
  * A bot cannot front-run a large trader with a symbolic transaction.
* **Slip-based fee** – attempting to front-run requires a large transaction, which itself incurs massive slip fees, destroying profitability.
* **Streaming Swaps** – large trades are broken into many smaller ones. A bot would need to front-run each part separately (impractical), while arbitrageurs rebalance between sub-swaps.

### MEV Protection Example

* A user submits a large ETH → BTC swap.
* A bot tries to front-run with a small trade.
* THORChain sorts swaps by slip fee: large swap goes first.
* The bot is executed after and gains nothing.

**MEV attacks on THORChain are unprofitable or outright impossible.**


# Network Security and Governance

## Introduction

THORChain is a cross-chain protocol that enables the exchange of assets across different blockchains, with RUNE as its native token.

The network relies on several mechanisms to ensure security, decentralization, and economic balance: validator bonding, TSS (Threshold Signature Scheme), threshold-signed vaults, inbound and outbound vaults, node churn, the Mimir governance system, and the Incentive Pendulum.

## Validator Bonding

* **Staking as collateral**: Each validator (node) must lock a significant amount of RUNE (currently over 300,000 RUNE) as a bond in order to become an active validator
* **Securing liquidity pools**: Bonded RUNE secures the assets held in liquidity pools and acts as an economic deposit. If a validator attempts to steal funds, their bond is slashed - making dishonest behavior highly unprofitable
* **Economic target**: The network aims to maintain a ratio where the total bonded RUNE is approximately twice the value of all non-RUNE assets in the liquidity pools. This makes attacks extremely costly and impractical

Note: Network parameters can override this ratio and are controlled by the nodes. See the [Technical Documentation](https://dev.thorchain.org) for more information.

## TSS – Threshold Signature Scheme

Imagine a vault with multiple locks. Each validator has only one key. To open the vault and sign a transaction, several validators must agree - one key alone is not enough.

This is how TSS works in THORChain:

* The private key is never stored in full on any single node
* Each validator holds only a fragment of the key
* Only when a sufficient threshold of validators combine their fragments can a transaction be signed

### Benefits of TSS

* Greater security - no single validator can steal funds
* Lower costs and broader applicability than traditional multisig, since TSS operates at the cryptographic level rather than via application-layer smart contracts

## Threshold-Signed Vaults

* **Multiple validator approvals**: Funds in THORChain are stored in vaults controlled by a group of validators. To release funds, a supermajority (e.g., ⅔) of validators must sign the transaction
* **No single point of failure**: Since no full private key exists, even if one validator is compromised, they cannot move funds alone. This eliminates single points of failure and significantly increases security

## Node Churn

* **Cyclical validator rotation**: THORChain regularly rotates its active nodes. Some validators leave, and new ones take their place
* **Resistance to capture**: This rotation prevents the network from being dominated by a fixed group of validators, enhancing decentralization and protecting against censorship or collusion

## Governance – The Mimir System

* **Validator voting**: Governance in THORChain is managed through Mimir, where active validators vote on network parameters
* **Consensus requirements**: Operational parameters require a small number of validator votes (typically 3+), while economic parameters require supermajority consensus (approximately 2/3 of validators)
* **Dynamic adaptation**: This allows the protocol to make quick operational adjustments while ensuring economic changes have broad validator support

## Incentive Pendulum

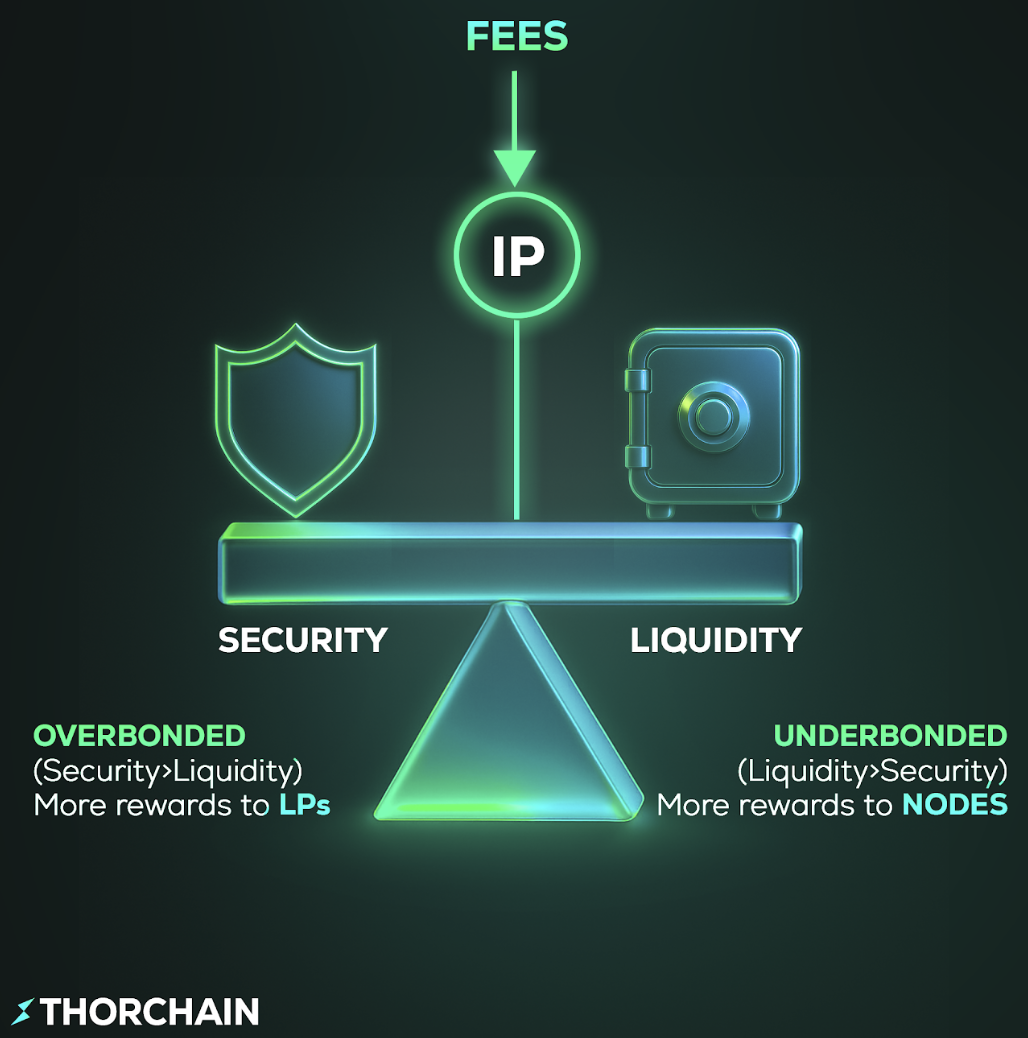
* **Balancing mechanism**: The Incentive Pendulum is an economic system that balances rewards between validators and liquidity providers (LPs)
* **Automatic adjustment**: The system monitors the ratio of bonded RUNE to pooled liquidity:
  * If there is too much liquidity relative to security, the network becomes unsafe - so more rewards are directed to validators
  * If there is too much bonded RUNE relative to liquidity, the system becomes inefficient - so more rewards flow to liquidity providers
* **Target ratio**: The goal is to maintain a 2:1 ratio of bonded RUNE to liquidity, the foundation of THORChain's security and efficiency model


# Tokenomics of RUNE and TCY

RUNE's supply, utility, and fee distribution, plus TCY's role in sharing protocol revenue

RUNE is the native utility token of the THORChain ecosystem, and it sits at the core of how the network functions. Unlike many other crypto assets, RUNE has no vesting schedules or locked allocations – the full supply is already released, and thanks to its burn mechanism, the circulating amount decreases over time. This makes RUNE both the economic backbone and the primary incentive driver of THORChain.

## RUNE Tokenomics

* **Maximum supply:** \~360M RUNE ([ADR-023](https://dev.thorchain.org/architecture/adr-023-rune-supply-restructure.html))
* **Circulating / total supply:** decreases with burns — see [rune.tools/supply](https://rune.tools/supply) for exact figures
* **Reserve:** reduced under ADR-023; current balance on [RuneScan](https://runescan.io/address/thor1dheycdevq39qlkxs2a6wuuzyn4aqxhve4qxtxt)
* **Protocol detail:** [Economic Model](/technical-documentation/technical-deep-dive/economic-model)

All RUNE tokens have been released – there are no vesting schedules or locked allocations.

## Main Functions of RUNE in THORChain

### Settlement Asset

* All transactions and swaps in the network are settled in RUNE.

### Network Security (Bonding)

* Validators (nodes) must bond RUNE to participate in consensus.
* The more RUNE is bonded, the more economic security the network has.
* Running a node allows you to earn a share of THORChain's revenue.
* Delegating RUNE to nodes lets you participate in revenue distribution.

### Liquidity

* RUNE is present in every liquidity pool (e.g., BTC–RUNE, ETH–RUNE).
* This ensures a unified pricing system and constant demand for RUNE.

### Burn

* A portion of fees collected by THORChain is burned.
* This gradually reduces RUNE supply and gives it a deflationary character.

### Incentives

* Validators and liquidity providers earn rewards in RUNE.
* These rewards come from network-generated fees, not from new token emissions.

## Revenue in THORChain

One of THORChain's biggest advantages is that it generates **real yield** – 100% derived from network activity, not from token inflation.

The network processes thousands of cross-chain swaps and transfers daily, producing on average **$50,000 - $100,000 per day** in fees.

These fees are the foundation of real yield in the ecosystem.

🔗 **Latest revenue data:** [raynalytics.net/analytics/thorchain/financials](https://raynalytics.net/analytics/thorchain/financials)

## Revenue Distribution

The current fee distribution in THORChain is as follows:

* **1%** → burned
* **5%** → developer fund
* **5%** → marketing
* **10%** → TCY holders (explained below)
* **20%** → protocol-owned-liquidity liquidity pool (POL-LP) position
* **59%** → validators (nodes) and liquidity providers (LPs)
  * The exact split between them is determined by the Incentive Pendulum

## TCY Token

TCY was created to resolve THORChain's debt issue (\~$210M after the ThorFi crisis).

Each $1 of debt was converted into 1 TCY. This way, creditors received tokens instead of a total loss, giving them the right to a share of the network's future revenue. This helps stabilize the ecosystem and align the community's interests with the protocol.

### How to Get TCY

* **TCY can be claimed** through the official interface: [tcy.thorchain.org](https://tcy.thorchain.org/)
* A THORChain address is required to claim.
* Claimed tokens are automatically staked and immediately start generating daily yield.
* TCY can also be bought from the open market e.g. via swap.thorchain.org

### TCY Supply

* **Total Supply:** 210M
* **Circulating Supply:** 176M

🔗 **Latest numbers:** [raynalytics.net/analytics/thorchain/tcy](https://raynalytics.net/analytics/thorchain/tcy)

### How does TCY work?

* **TCY holders receive 10% of all network revenue** (paid in RUNE).
* Stakers retain their yield, while the yield from unclaimed or unstaked TCY is forfeited and redirected to buyback TCY back into the TCY Staking Module (i.e protocol-owned TCY).
* A RUNE/TCY liquidity pool was created, so the token can be freely traded. Fees from this pool are also used to buy back as protocol-owned TCY.
* ⚠️ **TCY does not provide voting rights** or influence in the governance of the THORChain network – it is solely an income-generating economic token.


# Ecosystem

THORChain Ecosystem is community-based and anyone can join.

## **THORChain Website and Socials**

All the following are community-run resources. There are no "official" channels.

**Website:** [**thorchain.org**](http://thorchain.org/)

**Socials**: [**Telegram**](https://t.me/thorchain_org) **|** [**Dev Discord**](https://discord.gg/u6wMSKHpD4) **|** [**Twitter**](https://twitter.com/THORchain) **|** [**Blog**](https://blog.thorchain.org/)

**Documentation:** [**Docs**](https://docs.thorchain.org/) **|** [**Dev Docs**](https://dev.thorchain.org/) **|** [**White Paper**](https://github.com/thorchain/Resources/blob/master/Whitepapers/THORChain-Whitepaper-May2020.pdf) **|** [**Audits**](https://github.com/thorchain/Resources/tree/master/Audits)

**Development**: [**GitLab**](https://gitlab.com/thorchain) **|** [**GitHub**](https://github.com/thorchain) **|** [**Bounty Program**](https://gitlab.com/thorchain/thornode/-/blob/develop/bugbounty.md) **|** [**Dev Discord**](https://discord.gg/u6wMSKHpD4)

**Security:** [**Layers of Security**](https://medium.com/thorchain/thorchains-layers-of-security-e308d537acf1) **|** [**Hardening the Protocol**](https://medium.com/thorchain/hardening-the-thorchain-protocol-f80164de7685)**|** [**Halt Controls**](https://dev.thorchain.org/concepts/network-halts.html)

**Block Explorers**: [**RuneScan**](https://runescan.io) **|** [**THORChain.net**](https://thorchain.net/#/txs) **|** [**THORChain Tx Tracker**](https://track.thorchain.org/) **|** [**xScanner**](https://www.xscanner.org/)

## **Official Swap Interface**

[**STO (swap.thorchain.org)**](https://swap.thorchain.org/)

## **Community Projects**

Below is a list of active THORChain community projects. If you would like to be funded to build something in the THORChain ecosystem, please build something first, then reach out.

## Exchanges with THORChain-only Routes

[**Rujira Swap**](https://rujira.network/swap/)

[**RUNEBond Swap**](https://swap.runebond.com/)

[**THORChain Leodex**](https://thorchain.leodex.io/)

[**THORSwap RUNE Edition**](https://rune.thorswap.finance/)

## Exchanges Only

[**ASGARDEX Desktop**](https://www.asgardex.com/) - Wallet and Exchange Client for THORChain

[**Coinbot**](https://t.me/TeamCoinBot_bot) - Telegram Exchange Bot for THORChain

[**Decentralfi**](https://decentralfi.io/) - Exchange Powered by THORChain

[**DefiSpot**](https://www.defispot.com/trade) - Buy and Earn BTC, ETH, and More Fully Decentralized

[**depouch**](https://depouch.com/) - Premier Cross-Chain DEX

[**EIDEX**](https://eidex.io/screener) - Non-Custodial Route Screener Comparing 33+ Swap Sources

[**FortunaSwap**](https://fortunaswap.finance/) - Cross-Chain DEX

[**Jumper Exchange**](https://jumper.exchange/) - Multi-chain Liquidity Aggregator Powered by Li.Fi

[**Junction Exchange**](https://app.junction.exchange/) - Refer. Trade. Earn Together

[**LeoDex**](https://leodex.io/) - CrossChain DEX Interface

[**Native Swap**](https://nativeswap.io/) - Native Cross-Chain Trading Without Barriers

[**Rango Exchange**](https://rango.exchange/) - First Multi-chain DEX Aggregator

[**RocketX**](https://app.rocketx.exchange/) - Advanced, Hybrid CEX and DEX Aggregator

[**Symbiosis Finance**](https://symbiosis.finance/) - A Multi-chain Liquidity Protocol

[**THORSwap**](https://thorswap.finance/) - World's First Multi-chain Dex Powered by THORChain

[**Unizen**](https://zcx.com/trade) - Omni-chain Enabled Aggregator

### Integrated Wallets and Exchanges

[**Cake Wallet**](https://cakewallet.com/) - Payments Made Easy

[**Edge Wallet**](https://edge.app/) - Cross-platform Mobile Application

[**Gem Wallet**](https://gemwallet.com/) - Open-source Crypto Wallet and Defi Wallet

[**Giddy**](https://giddy.co/) - Your Keys. Your Crypto.

[**Liquality**](https://liquality.io/) - Browser Extension Crypto Wallet with Built-In Swaps

[**ShapeShift**](https://shapeshift.com/) - The Original Multichain Exchange

[**THORWallet Dex**](https://www.thorwallet.org/) - Cross-chain Wallet & Dex, Mobile Wallet

[**Trust Wallet**](https://trustwallet.com/) - Best Crypto Wallet for Web3, NFTs and DeFi

[**Vultisig**](https://vultisig.com/) - A highly secure self-custodial multi-chain crypto vault with in-built two-factor authentication, and no tracking or registration requirements

### (Non-Exchanges) Wallets that Supports RUNE

**Keystore Json/txt File** - Password Encrypted File Supported by Many THORChain Exchanges

[**KeepKey**](https://www.keepkey.com/) - Hardware Wallet Accessed via ShapeShift UI: The Next Frontier of Crypto Security

[**Keplr**](https://www.keplr.app/) - Your Multichain Gateway

[**Ledger**](https://www.ledger.com/) - Hardware Wallet with [RUNE Support](https://support.ledger.com/hc/en-us/articles/4402987997841-THORChain-RUNE-?docs=true): The Smartest Way to Secure your Crypto

[**MetaMask via ShapeShift Snap**](https://shapeshift.com/snap) - Browser Extension Wallet: Multichain Snap for MetaMask

### **Education**

[**GrassRoots Crypto**](https://www.youtube.com/c/GrassRootsCrypto/) - Educational videos

## **Analytics**

[**THORCharts**](https://thorcharts.org/) - Key stats and figures related to core THORChain operations

[**THORChain Dashboard**](https://dashboards.thorchain.org/)

[**THORYield**](https://thoryield.com/) - View your added liquidity on THORChain

[**DecentralFi**](https://decentralfi.io/) - Track positions  - <https://decentralfi.io/liquidity?wallet={thor> address}

[**THORChain Information Bot**](https://t.me/thor_infobot) - Useful commands to fetch network info

[**THORChain THOR InfoBot**](https://twitter.com/THOR_InfoBot) - Monitoring of major events in THORChain

[**THORChain Vision**](https://thorchain.vision/console) - Contains key stats and figures related to core THORChain operations

[**Raynalytics**](https://raynalytics.net/) - Real-time, on-chain analytics and dashboards for THORChain

## **Infrastructure**

[**THORNode Official Docs**](https://docs.thorchain.org/thornodes/overview) **|** [**THORNode Official Announcements**](https://t.me/thornode_ann)

[**THORChain Network Explorer**](https://thorchain.net/) - THORChain Network Explorer

[**Constants**](https://gateway.liquify.com/chain/thorchain_api/thorchain/constants)- Current THORChain Constants

[**Mimir**](https://gateway.liquify.com/chain/thorchain_api/thorchain/mimir) - Overrides for Constants

[**Midgard Docs**](https://gateway.liquify.com/chain/thorchain_midgard/v2/doc) - Documentation for Midgard API to query THORChain.

[**Thornode Docs**](https://gateway.liquify.com/chain/thorchain_api/thorchain/doc/) - Documentation for Thornode API to query Thornode.

[**RuneScan Explorer**](https://runescan.io)- THORChain Block Explorer

## Building on THORChain

For developers looking to integrate THORChain or build new applications:

* Complete integration guides and API documentation
* Transaction memo formats and specifications
* Smart contract deployment (CosmWasm)
* Affiliate fee implementation
* Testing on stagenet

See the [THORChain Developer Documentation](https://dev.thorchain.org/)

## Community Dev Projects

[**XChainJS**](https://xchainjs.org)- A library with a common interface for multiple blockchains, built for simple and fast integration for wallets and more, in JS. [Docs link](http://docs.xchainjs.org/).

[**SwapKit**](https://docs.thorswap.finance/swapkit-docs/) - By THORSwap offers a composable, user-friendly Partner API/SDK on top of THORChain's cross-chain decentralized exchange.

[**Ledger -**](https://www.npmjs.com/package/@thorchain/ledger-thorchain)Client library to communicate with a THORChain App running in a Ledger.

[**xchainpy-lib**](https://github.com/xchainjs/xchainpy-lib) - A library with a common interface for multiple blockchains, built for simple and fast integration for wallets and more, in PY.

[**thorchain-arb**](https://github.com/hoodieonwho/thorchain-arb) - THORChain Arb Bot.

## Community Socials

[**THORChain Community Telegram**](https://t.me/thorchain_org) - Telegram Server

[**THORChain Dev Discord**](https://discord.gg/u6wMSKHpD4) - Discord Server

[**Asgardex**](https://discord.gg/W9hGFBmCGp) - Discord Server

[**ShapeShift**](https://discord.gg/shapeshift) - Discord Server

[**THORSwap**](https://discord.gg/thorswap) - Discord Server

[**THORWallet DEX**](https://discord.gg/gzs8skbaR3) - Discord Server

[**Vultisig**](https://discord.gg/rzKjMMwjwU) - Discord Server

### Regional Socials

Russian: <https://t.me/ThorchainRussian>

Chinese: <https://t.me/thorchain_chinese>

Italian: <https://t.me/THORChain_Italy>

Portuguese: <https://t.me/thorchainportuguese>

French: <https://t.me/THORChainFr>

Spanish: <http://t.me/THORChain_es>

Dutch: <https://t.me/nl_be_thorchain_rune>

German: <https://t.me/ThorChainGermany>

Vietnamese: <https://t.me/Thorchain_Rune_Vietnam>

Indian: <https://t.me/thorchainIndia>


# Technical Deep Dive

Technical deep dive into THORChain's design and core mechanics

This section explains the core technical concepts behind THORChain. It is aimed at readers who want to go beyond the user-facing features and understand how the protocol is designed. Each topic links to a dedicated page with more detail.

## Topics

### [Protocol Innovations](/technical-documentation/technical-deep-dive/protocol-innovations)

The main design choices that make THORChain unique, including validator selection, churning, upgrades, the Bifrost protocol, Incentive Pendulum, liquidity pools, and the swap queue.

### [Economic Model](/technical-documentation/technical-deep-dive/economic-model)

How RUNE supply, the Incentive Pendulum, the emission schedule, and the Reserve work together to align incentives and secure the network.

### [Security](/technical-documentation/technical-deep-dive/security)

THORChain’s multi-layered security approach, including bonded capital, validator rotation, solvency checks, and operational processes.

### [Governance](/technical-documentation/technical-deep-dive/governance)

How THORChain handles minimal governance, including asset and chain listings, protocol upgrades, the Mimir system, and ADRs.

### [Fees](/technical-documentation/technical-deep-dive/fees)

Overview of THORChain’s fee structures: swap fees, outbound fees, and network fees, and how they protect the network while rewarding participants.

### [THORChain Name Service](/technical-documentation/technical-deep-dive/thorchain-name-service)

The system for human-readable cross-chain addresses, simplifying transactions without needing long cryptographic strings.

## Related Sections

* [Technology Overview](/technical-documentation/technology) – high-level explanation of how THORChain works
* [THORNodes](https://github.com/thorchain/docs/tree/master/thornodes/README.md) – running validator nodes and infrastructure details
* [THORChain Finance](/technical-documentation/thorchain-finance) – financial mechanisms and protocol products
* [Understanding THORChain](/technical-documentation/understanding-thorchain) – user-focused introductions


# Protocol Innovations

The core innovations that make THORChain unique in cross-chain DeFi

THORChain was built with the principles of decentralisation, resistance to capture, and sustainability. It introduced several firsts in cross-chain DeFi that allow secure liquidity without wrapped tokens or trusted intermediaries.

## Key Innovations

### Capped Proof of Bond

Validators must bond RUNE to join the network. Bond amounts are capped so no single validator can dominate, keeping the set geographically and operationally distributed. There is no delegation — each validator must run their own node infrastructure.

### Validator Churning

Validators rotate every few days. The oldest or lowest-bonded validators are replaced by new entrants. Each churn proves that funds remain spendable, prevents stagnation, and ensures the network is always refreshed.

### Asynchronous Upgrades

When a new version of the protocol is released, validators upgrade at their own pace. Once a supermajority is running the new version, it becomes the active consensus. This avoids forks, downtime, or the need for coordinated hard-fork events.

### Bifrost Protocol

Bifrost is THORChain’s chain-agnostic client framework. It connects THORChain to different types of blockchains through a common interface:

* **UTXO chains** (Bitcoin, Litecoin, Dogecoin, Bitcoin Cash)
* **EVM chains** (Ethereum, Avalanche, BSC)
* **BFT chains** (Cosmos SDK)\
  This standardisation allows THORChain to add support for very different chains without changing its core logic.

### Incentive Pendulum

Rewards are split between validators and liquidity providers. The Incentive Pendulum automatically adjusts this split to maintain the target **2:1 bond-to-stake ratio**. If liquidity grows faster than security, more rewards flow to validators, and vice versa.

### Continuous Liquidity Pools

Pools never close and allow single-sided deposits. Fees are slip-based: larger trades pay proportionally higher fees. This ensures efficient pricing, keeps pools balanced, and prevents large trades from manipulating prices.

### Swap Queue

Swaps are ordered by price impact in each block. This stops front-running and sandwich attacks (common forms of MEV), ensuring fair execution for all users.

## Network Goals

THORChain contributors continue to work towards three goals:

* **Security**: Functional tools like the Solvency Checker and Node Pause; procedural safeguards such as Stagenet testing and peer reviews; and economic security through bonded RUNE.
* **Liquidity**: Grow liquidity depth so users can swap large amounts across chains with low slippage.
* **Volume**: Increase network usage through wallet integrations, developer tools, and improved swap UX.


# Economic Model

THORChain's economic model including the Incentive Pendulum and emission schedule

THORChain’s economic model is designed to maintain network security, ensure liquidity efficiency, and sustain long-term protocol viability. It does this through a combination of the Incentive Pendulum, an emission schedule from the Reserve, and defined inflows and outflows.

## Incentive Pendulum

The Incentive Pendulum automatically adjusts reward distribution between node operators and liquidity providers to maintain the correct balance between security and liquidity.

The system monitors the ratio of bonded RUNE (from node operators) to pooled assets:

* If there is too much liquidity relative to bonded security, the network is unsafe, so rewards shift toward nodes.
* If there is too much bonded capital relative to liquidity, the network is inefficient, so rewards shift toward liquidity providers.

This creates a self-balancing system that maintains the target **2:1 bond-to-stake ratio**, which is central to THORChain's security model.

<img src="https://3337783180-files.gitbook.io/~/files/v0/b/gitbook-x-prod.appspot.com/o/spaces%2FfvaTNxU33ciP7UstKtwU%2Fuploads%2Fgit-blob-60a7c94c1933dad372eaa94f503bc5da3614b7ff%2Fincentive-pendulum.png?alt=media" alt="Incentive Pendulum diagram showing the balance between bonded RUNE and pooled assets" width="500">

{% hint style="success" %}
Detailed documentation on the Incentive Pendulum can be found in the [developer documentation](https://dev.thorchain.org/concepts/incentive-pendulum.html).
{% endhint %}

## Emission Schedule

### Token Distribution

There are a maximum of **\~360M RUNE** (reduced from 500M per [ADR-023](https://dev.thorchain.org/architecture/adr-023-rune-supply-restructure.html)). Exact max and circulating supply change with burns — use [rune.tools/supply](https://rune.tools/supply) for live figures, or the [Economic Model](https://dev.thorchain.org/concepts/economic-model.html) for protocol detail.

All supply was created at genesis and originally distributed as follows:

* 5% (SEED) and 16% (IDO) sold for capital to start the network and give it value.
* 10% allocated to early developers who worked since 2018.
* 24% given to users who participated in network bootstrapping.
* 44% placed in the Protocol Reserve to pay out to nodes and LPs for the next 10+ years.

{% hint style="success" %}
All vesting has been completed. ADR-023 later burned most of the Reserve and capped max supply near total supply.
{% endhint %}

The [Reserve module](https://runescan.io/address/thor1dheycdevq39qlkxs2a6wuuzyn4aqxhve4qxtxt) and [other modules](https://runescan.io/addresses) can be viewed on RuneScan.

### Block Rewards

Block rewards are calculated as:

$$
blockReward = \frac{ \frac{reserve}{emissionCurve}}{blocksPerYear}
$$

{% hint style="info" %}
The [emission curve](https://dev.thorchain.org/mimir.html#economics) is currently set to 100,000, so block rewards are minimal (on the order of hundreds of RUNE per year). Live values: [Mimir](https://gateway.liquify.com/chain/thorchain_api/thorchain/mimir).
{% endhint %}


# Security

Describes the different security elements within THORChain

THORChain has several layers of security within the code base to ensure solvency of the network, stability of the protocol and minimise the impact of any exploit. These measures are in addition to human security efforts, see more information [here](https://medium.com/thorchain/thorchains-layers-of-security-e308d537acf1).

## Confirmation Counting

To protect against double-spend attacks and re-orgs (non-instant finality chains), THORChain users Confirmation Counting for specific chains when receiving incoming value. [Bifrost](/technical-documentation/technology#the-bifroest-protocol-1-way-state-pegs)informs THORChain when to process the incoming value. How many confirmations are required is dependent on the size of the incoming value.

See more full details [here](https://dev.thorchain.org/bifrost/how-bifrost-works.html#finality--pre-confirmation).

## Outbound Transaction Throttling

To prevent large amounts of funds from leaving the network in an instant, large outbound transactions are throttled from immediately leaving the network. Each block has an outbound value limit (currently 1000 RUNE worth) and each outbound transaction has a maximum time limit that it can be processed. This has three effects:

* Each outbound transaction to compete for the next outbound block, else, it will be processed in the following block, effectively throttling the total outbound capacity of the network. This is independent of [conf-counting](https://docs.thorchain.org/chain-clients/overview#confirmation-counting).
* Large outbounds to spread across multiple blocks, up to 720 blocks (approx one hour).
* Ensures one large outbound request of $1,000,000 is handled the same as one million $1 outbound requests.

This feature is controlled by several [Mimir](https://github.com/thorchain/docs/tree/master/technical-deep-dive/constants-and-mimir.md#outbound-transactions) values that can be changed by Node Operators as required. [Relevant PR](https://gitlab.com/thorchain/thornode/-/merge_requests/1844).

This serves as a defensive layer buying time and allowing a vigilant node operator to pause trading or automatically halt checks to engage before the large malicious outbound transaction is irreversibly executed and funds are lost. While the feature negatively impacts the user experience of THORChain, but it is necessary in ensuring the protection of liquidity provider funds.

The feature is designed to grow as the network grows and is controlled by several Mimir values that can be changed by Node Operators as required. Additionally, the feature is designed to promote bug disclosure instead of directly attacking the network as a bug disclosure is likely more profitable.

The [THORSwap](http://thorswap.finance/) team has created a dashboard to view delayed outbound transfers which is available [here](https://thorchain-scheduled-tx.web.app/).

![THORSwap Transaction Tracker — by THORSwap to track large outbound transactions](https://miro.medium.com/max/1400/0*utXfzXDUatdMtdij)

## Granular Halting Controls via Node Mimir

THORChain has different levels of halt controls within the network which are controlled by Mimir values or by nodes, depending on the type and level.

The halts that can affect an individual chain are:

1. Halt Signing- outbounds que
2. Halt LP - add/remove stopped, swapping allowed.
3. Halt Trading - no trading allows
4. Halt Chain - nodes stop observing that chain

There are also network level halts for trading, synths and lending. To get more information see [here](https://dev.thorchain.org/concepts/network-halts.html).

## Automatic Solvency Checker

The solvency checker of the network’s primary vault was introduced to catch issues early or prevent them before they happened. Detected issues can trigger an automatic trading halt on a specific chain. There are two types of automatic solvency checks:

* **Reactive:** The network continually compares the assets the network believes it has in its primary vault (Asgard Vault) to what assets are actually stored in the network’s chain wallets. For every connected chain, each node compares the stored Asgard vault value to each chain Asgard Wallet amount. If the Asgard Vault value is more than the wallet value by 1%, the node reports insolvency for that chain. [Relevant PR](https://gitlab.com/thorchain/thornode/-/merge_requests/1797).
* **Proactive:** This mode is more powerful and is intended to catch insolvencies even before they appear. When a node attempts to sign a txOut, it will do a calculation to check if by executing the txOut the vault becomes insolvent. If so, then it refuses to sign and reports insolvency. [Relevant PR](https://gitlab.com/thorchain/thornode/-/merge_requests/1831).

### Automatic Trading Halting

If more than 66% of nodes, report an insolvency with a chain (reactive or proactive), trading for all assets on that chain is automatically halted (Halt{Chain}Trading). The halt will also emit a security event to ThorSec.

### Why 1% difference allowance?

THORChain builds an awareness of balances purely by adding the incoming funds, then subtracting the outgoings. Thus the expected balance is the aggregate of the ins and outs. Divergences can occur when actual on-chain balances start to diverge. For gas assets (assets used to pay gas), small divergences can be intermittent, but normally less than +/- 1%.

### Node Operator Triggered Halts

Node Operators have the ability to halt trading within THORChain if they detect malicious activity. This is in addition to automatic chain-specific halting functionality. The ability has been made with the potential for abuse in mind.

A single node can pause trading (HaltTrading) for up to an hour (720 blocks). Any additional node that calls for a halt will add 720 blocks to the halt timer. Any node that calls for the resumption of trading removes 720 blocks from the timer. The halt functions can only be called once by each active node per churn cycle (3 days). This gives the network the ability to respond to a malicious threat without giving any node unilateral control. [Relevant PR](https://gitlab.com/thorchain/thornode/-/merge_requests/1847).

### Unauthorized Transaction Detection

This blanket protection will automatically pause THORChain on a specific chain (Halt{Chain}Trading) if an unauthorised transaction is detected. This will emit a security event and be sent to THORSec. The halt will allow Node Operators, THORSec, and the development team to investigate and react immediately following an unauthorised transaction and issue a fix and restore service as quickly as possible. [Relevant PR](https://gitlab.com/thorchain/thornode/-/merge_requests/2188).

## Automatic Security Flagging

Security events have been added within the code which automatically emits events when certain conditions are met such as node slashing for unauthorized transactions, attempted double-spending, or very large withdraws. Emitted events are sent to a THORSec Discord monitoring channel for immediate review. These emitted on-chain events can also be seen on Midgard. [Relevant PR](https://gitlab.com/thorchain/thornode/-/merge_requests/2198).


# Governance

THORChain's minimal governance system and parameter management through Mimir

THORChain aims to have as little governance baked into the system as possible. This prevents nodes from coordinating or learning who one another are, which improves security by making collusion difficult.

THORChain governance decides:

* which assets are listed or delisted
* which chains are listed or delisted
* when the protocol is upgraded

## Asset Listing

![New Assets](https://3337783180-files.gitbook.io/~/files/v0/b/gitbook-x-prod.appspot.com/o/spaces%2FfvaTNxU33ciP7UstKtwU%2Fuploads%2Fgit-blob-778d5019efbc75ef00acd600c90c19fb8dfb67f3%2FListing%20New%20Assets.jpg?alt=media)

Users signal which assets they want on the network by staking into a new pool. THORChain will recognise it as a new asset and create a pool in *bootstrap mode* (swapping disabled). Every few days the network checks all bootstrap pools and lists the one with the most value.

### Asset Delisting

Assets are delisted automatically when their liquidity falls too low:

1. New bootstrap pools are compared to the smallest active pools.
2. If a bootstrap pool is deeper, the smallest active pool is returned to bootstrap mode and replaced.
3. Assets can later be re-listed if liquidity returns.

## Chain Listing and Delisting

To add a new chain:

1. Community developers write a new Bifröst module and propose it via a [THORChain Improvement Proposal (TIP)](https://dev.thorchain.org/architecture/).
2. The developer community reviews and decides whether to accept it.
3. If accepted, code is tested and added to THORNode.
4. Nodes upgrade as they churn in and out.
5. When 67% of nodes run the new software, the chain connects.

To delist a chain, nodes stop watching it. Once 67% of nodes are no longer watching, the chain is removed and assets are returned to users.

## Mimir

THORChain operates with a set of constants that define fees, limits and security thresholds. These values can be overridden through Mimir.

Live values:

* [Network Constants](https://gateway.liquify.com/chain/thorchain_api/thorchain/constants)
* [Mimir Settings](https://gateway.liquify.com/chain/thorchain_api/thorchain/mimir)

See [Constants and Mimir](https://dev.thorchain.org/mimir.html) within the developer documentation for a description of each one.

## Change Management

Protocol-level changes use **Architecture Decision Records (ADRs)**. An ADR should describe:

* context and goals
* the proposed change
* pros and cons
* references
* changelog

Process and status can be found here:

* [ADR Process](https://dev.thorchain.org/architecture/PROCESS.html)
* [Current ADRs](https://dev.thorchain.org/architecture/index.html)

## Emergency Changes

Nodes cannot directly coordinate, which makes emergency changes difficult. In critical cases the **Ragnarök protocol** is used:

1. Nodes begin to leave the system.
2. When fewer than 4 nodes remain, Ragnarök triggers.
3. All funds are automatically returned to users.
4. The network shuts down safely and can be restarted later.

## Governance Philosophy

THORChain’s governance is minimal by design:

* avoids coordination between nodes
* reduces attack and capture risk
* lets market forces drive asset and chain selection
* reduces human overhead and governance fatigue
* keeps the system self-regulating and secure


# Fees

THORChain uses multiple fee types (Inbound, Liquidity, Affiliate, and Outbound) to ensure fair value exchange and network sustainability.

Fees in THORChain serve three purposes:

* **Value capture:** Liquidity providers are compensated in proportion to the demand placed on pool liquidity. See the [Fees dev docs](https://dev.thorchain.org/concepts/fees.html) for full information.
* **Access control:** Slip-based fees naturally throttle demand for scarce liquidity. In practice, this effect is moderated by:
  * [Streaming Swaps](https://dev.thorchain.org/swap-guide/streaming-swaps.html), which split large swaps into smaller chunks to reduce single-block pressure.
  * [`L1SlipMinBps` (Mimir)](https://dev.thorchain.org/mimir.html#swapping), which enforces a minimum slip (bps) per swap.
* **Resource costs:** Outbound fees cover destination-chain gas and protocol overhead using a dynamic multiplier (OFM).

## Additional benefits

* Spam/dust resistance: minimums and slip floors make abuse economically costly.
* Stable UX expectations: users see predictable fee components rather than raw external gas volatility.
* Long-term sustainability: see [Incentive Pendulum](/technical-documentation/technical-deep-dive/economic-model#incentive-pendulum) for how fees distribution adjust to balance liquidity and security.

## Fee overview

| Fee Type      | What it covers                                                                               | Where it’s paid / taken                                                                   |
| ------------- | -------------------------------------------------------------------------------------------- | ----------------------------------------------------------------------------------------- |
| Inbound Fee   | Source-chain L1 transaction fee for sending funds into THORChain                             | Paid directly by the user to the source chain’s miners/validators (wallet-controlled gas) |
| Liquidity Fee | Slip-based swap fee that compensates LPs, proportional to liquidity demand                   | Deducted by the protocol during the swap (from the output)                                |
| Affiliate Fee | Optional integrator fee (0–10,000 bps) tied to a THORName                                    | Skimmed on swap (see dev docs for ordering with Streaming Swaps)                          |
| Outbound Fee  | Destination-chain gas × dynamic multiplier (OFM \~1–3×), which also covers protocol overhead | Deducted from the swap output; includes the THORChain network component                   |

{% hint style="info" %}
Transactions on the THORChain chain itself (e.g., native RUNE, trade-asset and secured-asset transfers) incur the Native Transaction Fee of 0.02 RUNE. See [Fees dev docs](https://dev.thorchain.org/concepts/fees.html).
{% endhint %}

## Inbound Fee

When you initiate a swap, you broadcast a transaction on the source chain and pay that chain’s normal L1 fee (e.g., sats/byte on Bitcoin, gwei on Ethereum). Using a “fast” gas setting is recommended so the swap isn’t delayed or refunded due to stale pricing. See [Inbound Fee](https://dev.thorchain.org/concepts/fees.html#1-inbound-fee).

## Liquidity Fee

THORChain’s CLP model applies a slip-based fee that scales with the amount of liquidity your swap consumes relative to pool depth—this compensates LPs and naturally throttles demand. In practice, two protocol features shape this effect:

* [Streaming Swaps](https://dev.thorchain.org/swap-guide/streaming-swaps.html): large swaps are split over time to reduce single-block pressure and improve execution for patient swappers.
* [`L1SlipMinBps` (Mimir)](https://dev.thorchain.org/mimir.html#swapping): enforces a minimum fee in basis points per swap, ensuring a floor even when pools are very deep.

For the slip math and derivations, see the [Fees dev docs](https://dev.thorchain.org/concepts/fees.html) and [Continuous Liquidity Pools](/technical-documentation/thorchain-finance/continuous-liquidity-pools).

## Affiliate Fee

Interfaces can include an optional affiliate fee (in basis points) that’s collected via a registered THORName. See the [Affiliate Fee dev docs](https://dev.thorchain.org/concepts/fees.html#3-affiliate-fee) for information, and how to configure preferred payout assets.

## Outbound Fee

To deliver your final asset, THORChain pays gas on the destination chain and charges an Outbound Fee from your swap output. This fee:

* Covers actual L1 gas and protocol overhead.
* Uses a dynamic Outbound Fee Multiplier (OFM) that moves between \~1× and 3× based on network and protocol factors.
* Is published via THORNode endpoints so integrators can budget precisely.

For implementation details, see the [Outbound Fee dev docs](https://dev.thorchain.org/concepts/fees.html#4-outbound-fee).

## Gas observation & process

Mechanics for gas observation, estimation, solvency checks, and per-chain behaviors are handled by [Bifrost](https://dev.thorchain.org/bifrost/how-bifrost-works.html) and its [Chain Clients](https://dev.thorchain.org/chain-clients/index.html). Refer to those pages for internals and per-chain specifics.


# THORChain Name Service

How THORNames (TNS) work

Website: <https://thorname.thorchain.org/>
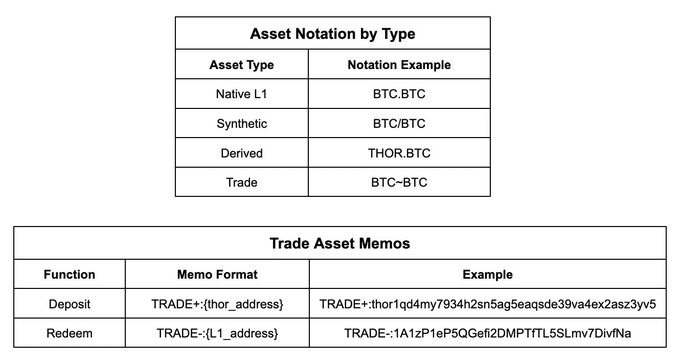
## Overview

THORNames allow anyone to register cross-chain wallet addresses to a 1-30 long string of hexadecimal characters which include special characters `-_+` This makes them compatible to represent emojis ⚡️. THORNames are case insensitive.

Users use a special memo and a THORChain `MsgDeposit` transaction to register their addresses. This then allows the system to lookup the name and retrieve the correct corresponding address for the specified chain.

A THORChain address can be assigned one (1) THORName to manage the other addresses associated. For example: the THORName chris can receive $BTC to the chris.btc address, chris.eth to receive $ETH and so forth. Wallet providers will easily be able to integrate to resolve cross-chain addresses for a user.

Example from <https://gateway.liquify.com/chain/thorchain_midgard/v2/thorname/lookup/td>

```json
{
  "entries": [
    {
      "address": "0xee7ba2d9eca389928a628bf26ea87e65a5c27eca",
      "chain": "AVAX"
    },
    {
      "address": "qznskghhug46gxkx8ykxqxj4kmczge6zjg9trsgf5d",
      "chain": "BCH"
    },
    {
      "address": "0xee7ba2d9eca389928a628bf26ea87e65a5c27eca",
      "chain": "BSC"
    },
    {
      "address": "bc1qqtuq6td6enadcz8v7t2eafph0pq0cfjw2mzug9",
      "chain": "BTC"
    },
    {
      "address": "DBVz9bMNtDYrVLGqwhiFUzpYGcQu1B3PuR",
      "chain": "DOGE"
    },
    {
      "address": "0xe020c8934b23e5bcca1e7eecdb6f39674029fe47",
      "chain": "ETH"
    },
    {
      "address": "cosmos10w52zp06zccjq8zv9sh77p3n2c8sc559q5yl0z",
      "chain": "GAIA"
    },
    {
      "address": "thor1ymkrqd4klk2sjdqk7exufa4rlm89rp0h8n7hr2",
      "chain": "THOR"
    }
  ],
  "expire": "23726750",
  "owner": "thor1ymkrqd4klk2sjdqk7exufa4rlm89rp0h8n7hr2"
}
```

Currently, there are eleven (11) native L1 chains available on THORChain: Bitcoin, Ethereum, Litecoin, Binance Smart Chain, Bitcoin Cash, Doge, Cosmos, Avalanche, Base, TRON and XRP. THORNames are limited to 30 characters, including `^[a-zA-Z0-9+_-]+$`.

### Query a THORName

A THORName can be queried by going to `/thorname/{thorname}`

{% hint style="info" %}
<https://gateway.liquify.com/chain/thorchain_midgard/v2/thorname/lookup/orion>
{% endhint %}

A THORName can be checked using `/thorname/lookup/{thorname}`

{% hint style="info" %}
<https://gateway.liquify.com/chain/thorchain_midgard/v2/thorname/lookup/orion>
{% endhint %}

While there is no reverse on-chain reverse lookup, a reverse lookup is possible within THORChain via using a given THORName `/thorname/lookup/{address}.`

{% hint style="info" %}
Example using a THOR address: <https://gateway.liquify.com/chain/thorchain_midgard/v2/thorname/rlookup/thor15r77zzt7n6kyydw7ajkefdrrv6n0dpplvm83pd>
{% endhint %}

## Fees

There is a one-time registration fee of around 10 RUNE, with a 20 `tor` block fee, which works out to be around 1 RUNE annually. A user who pays 2 RUNE will then keep their name registered for 2 years. Fees are controlled by Constants/Mimir, the current settings are:

* `TNSRegisterFee`: 10 RUNE
* `TNSFeeOnSale`: 1000 Basis Points
* `TNSFeePerBlock`: 20 tor per block (roughly 1 RUNE per year)

Example: a 20 Rune registration registers the THORName for 10 years. (10 RUNE Registration Fee + 1 RUNE every year).

## Creating a THORName

THORNames are created by sending a memo in a MsgDeposit with [memo](https://dev.thorchain.org/affiliate-guide/thorname-guide.html) prefix: `name`, `n` or `~`

Memo template is: `~:name:chain:address:?owner:?preferredAsset:?expiry`

{% hint style="info" %}
Example: `~:ODIN:BTC:bc1Address:thorAddress:BTC.BTC:1231231`
{% endhint %}

Expiry is a block height that can be set in the past to unregister the THORName.

### **Technical Rationale**

Bitcoin has a memo length limitation of 80 bytes and Monero has an address length of 97 bytes. This means swapping from Bitcoin to Monero is not possible using addresses, THORNames solves this issue and can also be used when specifying the affiliate address.

{% hint style="info" %}
Swap example comparison using THORNames.

Without:

`=:BTC.BTC:bc1fx6fsev97atsm5j62kgecpslv6vx2nffv0qq2q:2117277:0500:bc1q6ptu8zayukjz3ag4d4pnjjhtxwd4jckh9gufwu`

`With:`

`=:BTC.BTC:ODIN:2117277:0500:ORION`

107 characters without THORNames, 33 characters with THORNames.
{% endhint %}

Interfaces like [AsgardEx Desktop](https://github.com/asgardex/asgardex-desktop/releases) allow you to create your own memo.

## More Information

THORChain launched THORNames in June 2021, read more here <https://medium.com/thorchain/thorchain-launches-thorname-service-abe42ba11df8>.


# THORChain Finance

THORChain Finance - A comprehensive overview of financial primitives and mechanisms within the THORChain ecosystem

THORChain Finance encompasses the core financial primitives that enable cross-chain liquidity and trading on the THORChain network. These mechanisms provide the foundation for decentralized finance (DeFi) operations while maintaining security and efficiency across multiple blockchain networks.

## Core Financial Primitives

### [Continuous Liquidity Pools](/technical-documentation/thorchain-finance/continuous-liquidity-pools)

The foundation of THORChain's AMM (Automated Market Maker) system, enabling permissionless liquidity provision and efficient asset swapping across chains without wrapped tokens.

### [Trade Assets](/technical-documentation/thorchain-finance/trade-assets)

A capital-efficient alternative to synthetic assets, offering 2x the efficiency for arbitrageurs with 6-second finality and no slippage redemption.

### [Secured Assets](/technical-documentation/thorchain-finance/secured-assets)

THORChain's approach to maintaining asset security through distributed key management and threshold signature schemes (TSS).

### [TOR](/technical-documentation/thorchain-finance/tor)

THORChain's native algorithmic stablecoin, designed to maintain price stability while integrating with the broader THORChain ecosystem.

### [RUNEPool](/technical-documentation/thorchain-finance/runepool)

Pooled liquidity provision mechanism that allows smaller RUNE holders to participate in liquidity provision with lower barriers to entry.

## Economic Model

THORChain's financial architecture is built around the **Incentive Pendulum**, which maintains a 2:1 bond-to-stake ratio ensuring network security. The native RUNE token serves four critical roles:

* **Settlement Asset**: All cross-chain swaps settle in RUNE
* **Security**: Node operators bond RUNE to participate in consensus
* **Liquidity**: Liquidity providers pair RUNE with external assets
* **Governance**: RUNE holders participate in network governance decisions

## Key Features

* **Cross-Chain Native**: Direct swaps between native assets across different blockchains
* **Permissionless**: No centralized authority controls access or operations
* **Capital Efficient**: Advanced mechanisms like Trade Assets maximize capital utilization
* **Secure**: Distributed key management protects user funds across all supported chains
* **Transparent**: All operations are verifiable on-chain

## Getting Started

Choose the primitive that best fits your needs:

* **New to DeFi**: Start with [Continuous Liquidity Pools](/technical-documentation/thorchain-finance/continuous-liquidity-pools)
* **Active Trader**: Explore [Trade Assets](/technical-documentation/thorchain-finance/trade-assets) for efficient arbitrage
* **Stability Seeker**: Learn about [TOR stablecoin](/technical-documentation/thorchain-finance/tor)
* **RUNE Holder**: Consider [RUNEPool](/technical-documentation/thorchain-finance/runepool) for passive liquidity provision


# Continuous Liquidity Pools

How THORChain facilitates continuous, incentivised liquidity.

Instead of limit-order books, THORChain utilises [continuous liquidity pools](#continuous-liquidity-pools) (CLP). The CLP is one of THORChain's most significant features, offering the following benefits:

* Provides “always-on” liquidity to all assets in its system.
* Allows users to trade assets at transparent, fair prices, without relying on centralised third-parties.
* Functions as source of trustless on-chain price feeds for internal and external use.
* Democratises arbitrage opportunities.
* Allows pools prices to converge to true market prices, since the fee asymptotes to zero.
* Collects fee revenue for liquidity providers in a fair way.
* Responds to fluctuating demands of liquidity.

## Benefits of the CLP Model

Assuming a working Swap Queue, the CLP Model has the following benefits:

* The fee paid asymptotes to zero as demand subsides, so price delta between the pool price and reference market price can also go to zero.
* Traders will compete for trade opportunities and pay maximally to liquidity providers.
* The fee paid for any trade is responsive to the demand for liquidity by market-takers.
* Prices inherit an "inertia" since large fast changes cause high fee revenue
* Arbitrage opportunities are democratised as there is a diminishing return to arbitrage as the price approaches parity with reference
* Traders are forced to consider the "time domain" (how impatient they want to be) for each trade.

The salient point is the last one - that a liquidity-sensitive fee penalises traders for being impatient, however traders have a [choice](#streaming-swaps-and-swap-optimisation). This is an important quality in markets, since it allows time for market-changing information to be propagated to all market participants, rather than a narrow few having an edge.

### Slip-based Fee Model (CLP)

The Slip-based Fee Model adds liquidity-sensitive fee compared to the [XYK](#clp-derivation)model. This ensures the fee paid is commensurate to the demand of the pool's liquidity, and is the one THORChain uses. The fee equation is shown below:

$$
fee = \frac{x^2Y}{(x+X)^2}
$$

### Streaming Swaps and Swap Optimisation

THORChain allows users to choose their preferred trade strategy:

1. Time-optimised: Get the trade done quickly, regardless of the cost.
2. Price-optimised: Get the best price possible, even if it takes longer.

The size of the swap and the desired timeframe are related. Impatient swappers who opt for a time-optimised swap will incur higher [slip fees](#benefits-of-the-clp-model). Patient swappers achieve better prices but need to wait.

Previously, swaps were always executed as soon as possible (time-optimised), without user control. Manual optimisation of prices required breaking up swaps into smaller ones, incurring L1 inbound and outbound fees for each swap, reducing cost savings.

Streaming Swaps gives users control over the timeframe, enabling better price optimisation. Large swaps can be divided into smaller ones over specific intervals without additional L1 fees.

Streaming Swaps (Price-Optimised) is similar to a Time Weighted Average Price (TWAP) trade, limited to a 24-hour period.

Two important parts are:

1. The **interval** allows arbitrageurs enough time to rebalance the pool within the swap, ensuring capital requirements are met throughout.
2. The **count** enables the swapper to reduce the size of sub-swaps, minimising slippage for each execution.

A price-optimised swap experiences less slippage compared to a time-optimised swap, without losing capital to on-chain L1 fees.

A fully price-optimised swap can achieve a swap fee as low as 5 basis points (excluding inbound and outbound fees).

Swappers can set a price limit (minimum output). If sub-swaps cannot achieve the specified price during the swap stream, the total or partial inbound amount will be refunded.

{% hint style="info" %}
Streaming Swaps are currently enabled for Swaps. Streaming Swaps were previously available for the deprecated Savers and Lending features.
{% endhint %}

## Continuous Liquidity Pools

### CLP Derivation

| Element | Description   | Element | Description    |
| ------- | ------------- | ------- | -------------- |
| x       | input amount  | X       | Input Balance  |
| y       | output amount | Y       | Output Balance |

Start with the fixed-product formula:

$$
Eqn 1: X\*Y = K
$$

Derive the raw "XYK" output:

$$
Eqn 2: \frac{y}{Y} = \frac{x}{x+X} \rightarrow y= \frac{xY}{x+X}
$$

Establish the basis of Value (the spot purchasing power of `x` in terms of `Y` ) and slip, the difference between the spot and the final realised `y`:

$$
Eqn 3: Value\_y = \frac{xY}{X}
$$

$$
Eqn 4: slip =\frac{Value\_y - y}{Value\_y} =\frac{( \frac{xY}{X})-y}{ \frac{xY}{X}} = \frac{x}{x+X}
$$

Derive the slip-based fee:

$$
Eqn 5: fee = slip \* output = \frac{x}{x+X} \* \frac{xY}{x+X} = \frac{x^2Y}{(x+X)^2}
$$

Deduct it from the output, to give the final CLP algorithm:

$$
Eqn 6: y = \frac{xY}{x+X} - \frac{x^2Y}{(x+X)^2} \rightarrow y= \frac{ xYX} {(x+X)^2 }
$$

Comparing the two equations (Equation 2 & 6), it can be seen that the Base XYK is simply being multiplied by the inverse of Slip (ie, if slip is 1%, then the output is being multiplied by 99%).

## Evolution of the CLP Model

### Pegged Model

The simplest method to exchange assets is the pegged model, (1:1) where one asset is exchanged one for another. If there is a liquidity pool, then it can go insolvent, and there is no ability to dynamically price the assets, and no ability to intrinsically charge fees:

$$
Eqn 8: y = x
$$

### Fixed Price Model

The fixed-sum model allows pricing to be built-in, but the pool can go insolvent (run out of money). The amount of assets exchanged is simply the spot price at any given time:

$$
Eqn 9: y = \frac{xY}{X}
$$

### Fixed Product Model

The fixed-product model (Base XYK above), instead bonds the tokens together which prevents the pool ever going insolvent, as well as allowing dynamic pricing. However, there is no intrinsic fee collection:

$$
Eqn 10: y= \frac{xY}{x+X}
$$

### Fixed-Rate Fee Model

The Fixed-Rate Fee Model adds a 30 Basis Point (0.003) (or less) fee to the model. This allows fee retention, but the fee is not liquidity-sensitive:

$$
Eqn 11: y= 0.997 \* \frac{xY}{x+X}
$$

### Slip-based Fee Model (CLP)

The Slip-based Fee Model adds liquidity-sensitive fee to the model. This ensures the fee paid is commensurate to the demand of the pool's liquidity, and is the one THORChain uses. The fee equation is shown separate (12b), but it is actually embedded in 12a, so is not computed separately.

$$
Eqn 12a: y= \frac{ xYX} {(x+X)^2 }
$$

$$
Eqn 12b: fee = \frac{x^2Y}{(x+X)^2}
$$

{% hint style="warning" %}
The slip-based fee model breaks path-independence and incentivises traders to break up their trade in small amounts.\
For protocols that can't order trades (such as anything built on Ethereum), this causes issues because traders will compete with each other in Ethereum Block Space and pay fees to miners, instead of paying fees to the protocol.\
It is possible to build primitive trade ordering in an Ethereum Smart Contract in order to counter this and make traders compete with each other on trade size again.\
THORChain is able to order trades based on fee & slip size, known as the Swap Queue. This ensures fees collected are maximal and prevents low-value trades.
{% endhint %}

## Calculating Pool Ownership

When a liquidity provider commits capital, the ownership % of the pool is calculated:

$$
units=P\*\frac{rA+Ra+2ra}{rA+Ra+2RA}
$$

* units = newly created pool units for the liquidity provider
* r = rune deposited
* a = asset deposited
* R = total Rune Balance (before deposit)
* A = total Asset Balance (before deposit)
* P = total Pool Units (before deposit)

The liquidity provider is allocated rewards proportional to their ownership of the pool. If they own 2% of the pool, they are allocated 2% of the pool's rewards.

## Virtual Depths

Balances of the pool (X and Y), are used as inputs for the CLP model. An amplification factor can be applied (to both, or either) in order to change the "weights" of the balances:

| Element | Description           |
| ------- | --------------------- |
| a       | Input Balance Weight  |
| b       | Output Balance Weight |

$$
Eqn 7: y= \frac{ xYbXa} {(x+Xa)^2 }
$$

If `a = b = 2` then the pool behaves as if the depth is twice as deep, the slip is thus half as much, and the price the swapper receives is better. This is akin to smoothing the bonding curve, but it does not affect pool solvency in any way. Virtual depths are currently not implemented

If `a = 2, b = 1` then the `Y` asset will behave as though it is twice as deep as the `X` asset, or, that the pool is no longer 1:1 bonded. Instead the pool can be said to have 67:33 balance, where the liquidity providers are twice as exposed to one asset over the other.

{% hint style="info" %}
Virtual Depths were initially applied to Synth Swaps using a multiplier of 2. It was intended that Synth Swaps would create 50% less slip and users pay 50% less fees. However, this was disabled after discovering that this would allow front-running. The multiplier is specified on `/constants` as:

```
"VirtualMultSynths": 2,
```

but currently overridden by a Mimir value of 1.
{% endhint %}

## Impermanent Loss Protection

{% hint style="success" %}
As per [ADR 005](https://dev.thorchain.org/architecture/adr-005-deprecate-ilp.html) Impermanent Loss Protection has been removed for all liquidiy providers.
{% endhint %}

Impermanent Loss Protection ensures LPs always either make a profit, or leave with at break even after a minimum period of time (set at 100 days), and partially covered before that point. This should alleviate most of the concerns regarding become an LP.

THORChain tracks a member's deposit values. When the member goes to redeem, their loss (against their original deposit value) is calculated and is subsidised with RUNE from the reserve.

{% hint style="info" %}
Impermanent Loss Protection is always recorded and calculated symmetrically.
{% endhint %}

There is a 100 day linear increase in the amount of coverage received, such that at 50 days, the member receives 50%, 90 days is 90% etc.

| Element | Description     | Element | Description     |
| ------- | --------------- | ------- | --------------- |
| R0      | RUNE Deposited  | R1      | RUNE to redeem  |
| A0      | Asset Deposited | A1      | Asset to redeem |

$$
\text{P1} = \frac{R1}{A1}
$$

`P1` is the pool ratio at withdrawal.

$$
\text{coverage} = ((A0 \* P1) + R0) - ((A1 \* P1) + R1) => ((A0 \* R1/A1) + R0) - (R1 + R1)
$$

{% hint style="info" %}
Deposit values are *not* the amounts the member deposited. They are the immediate symmetrical value of what the member deposited instead.
{% endhint %}

The coverage is then adjusted for the 100 day rule.

[`blocksForFullProtection`](/technical-documentation/technical-deep-dive/governance#mimir) `= 1440000 // 100 days`

$$
\text{protectionProgress }= (currentHeight - heightLastAdded) / blocksForFullProtection
$$

$$
\text{protection} = (protectionProgress \* coverage)
$$

Then the extra RUNE added into the member's liquidity position to issue them extra liquidity units. The member then redeems all their units, and they will realise extra RUNE and extra ASSET.

{% hint style="info" %}
Since the protection amount is added asymmetrically, the protection will experience a small slip. This helps to prevent attack vectors.
{% endhint %}


# Trade Assets

How THORChain enables Trade Assets as a capital efficient alternative to synthetic assets

A new class of primitives, known as Trade Assets, has been introduced on THORChain. These assets offer twice the capital efficiency of [synthetic assets](/technical-documentation/thorchain-finance/synthetic-asset-model), enhancing the effectiveness of arbitrageurs with the same capital. Trade accounts settle with THORChain's block speed and cost, enabling swaps with 6-second finality without excessive network fees.

Trade Assets can be redeemed for native assets anytime with no slippage, making them ideal for arbitrageurs and high-frequency traders. Trade Assets emulate the experience of trading on a centralized exchange, without compromising on transparency or security. They represent a significant step in making THORChain more user-friendly for high-frequency traders. With twice the capital efficiency of Synthetic Assets, arbitraging pools becomes much more efficient, leading to tighter price spreads across exchanges.

In short, Trade Assets provide active traders with an experience akin to trading on a centralized exchange, but entirely on-chain, without compromising transparency or security.

### What are Trade Assets?

Trade Assets are native assets custodied by THORChain but held outside of liquidity pools. Users receive a credit to their THORChain address, while the assets are held by a protocol-controlled module. Unlike synthetic assets, Trade Assets are not held directly by user wallets. Conceptually, Trade Assets resemble a deposit on a centralized exchange, but with the transparency of being on-chain. Funds are held 1:1 as L1 assets by THORChain until the user withdraws them back to self-custody.

### Advantages of Trade Assets

* Backed 1:1 by native assets secured by THORChain
* Mint or redeem Trade Assets with no slippage (only L1 gas fees)
* 2x capital efficiency of Synthetic Assets
* No outbound fee when swapping to a Trade Asset
* Finality with THORChain block speed (6 seconds)
* Not subject to outbound delays or confirmation counting

### Trade Assets vs Synthetic Assets: Key Differences

Trade Assets allow faster and more capital-efficient arbitrage of the pools compared to [Synthetics](/technical-documentation/thorchain-finance/synthetic-asset-model). Synthetics adjust one side of the pool depth, causing only half the price movement, while Trade Accounts use full capital efficiency for price corrections. For example, a $100 RUNE → BTC swap requires $200 of Synthetic BTC to correct the price, whereas Trade Accounts only need $100 to achieve the same correction. This enables quicker restoration of price deviations with less capital.

<figure><img src="https://3337783180-files.gitbook.io/~/files/v0/b/gitbook-x-prod.appspot.com/o/spaces%2FfvaTNxU33ciP7UstKtwU%2Fuploads%2Fgit-blob-0d919ccfa8a087a992640250483245be642528c1%2FGPur1ZmXAAA1PKA.jpeg?alt=media" alt=""><figcaption></figcaption></figure>

### Why Transition to Trade Assets Now?

With THORChain's growth and increased decentralization, the network is now resilient to attacks that previously limited the feasibility of Trade Assets. The launch of Trade Assets presents new opportunities for arbitrage, order books, high-frequency trading, and P2P lending markets, leveraging the network's robust security and efficiency.

### Dashboards tracking Trade Assets

There are multiple dashboards to track the performance of RUNE added to the RUNEPool:

* <https://thorchain.network/trade>
* <https://thorchain.net/thorfi/trades>
* <https://runescan.io/txs?type=traders>

Dashboards for Trade Assets continuously evolve as THORChain expands, but taking the example of [THORChain.network](https://thorchain.network/trade/) you will find the following in the dashboard:

* Trade Asset: Which asset minted as a Trade Asset
* Price: Current price of 1 unit of the Trade Asset
* Balance: How many units of the Trade Asset has been minted
* Valuation: Price \* Balance
* Pool Ratio: How much the Trade Asset make up entire Trade Asset pool does this account for

### Economic Security

Trade Assets are the first to be held outside liquidity pools on THORChain. This means that not all native assets in TSS Vaults are paired with RUNE. To maintain network economic security, the [Incentive Pendulum](/technical-documentation/technical-deep-dive/economic-model) now considers the value of all assets in the vaults, not just those in pools, when distributing rewards between Nodes and LPs. If the value of vault assets exceeds bonded value, Trade Accounts may face negative interest rates until the value ratio is balanced.

To ensure the security of the network, if the combined pool and trade account value exceeds the total bonded value, trade assets will be liquidated to buy RUNE and deposited into the bond module. This safeguard ensures liquidity redistribution to Active Node Operators and occurs only if the Incentive Pendulum is underbonded.

### Using Trade Accounts

#### How Trade Accounts Work

1. **Deposit L1 assets**: Traders deposit L1 assets into the network, minting a Trade Asset in a 1:1 ratio within a Network Trade module.
2. **Receive accredited shares**: Traders receive accredited shares of this module relative to their deposit.
3. **Swap/Trade assets**: Traders can swap/trade assets with RUNE or other trade assets within the module.
4. **Withdraw balance**: Traders can withdraw from their Trade Account with an outbound delay.

#### How to Mint or Burn Trade Assets

Minting or burning trade assets involves using a specific memo syntax, prefixed with `TRADE+` or `TRADE-`. The asset name is inferred from the received asset, and no slippage fees apply, only L1 gas fees. For example, depositing 1 BTC.BTC will result in the crediting of 1 BTC\~BTC (minus BTC network gas fees), and withdrawing 1 BTC\~BTC will result in the crediting of 1 BTC.BTC (minus network fees).

#### Adding to the Trade Account

To add to the Trade Account, send L1 Asset to the Inbound Address with the memo: `TRADE+:THORADD`. Example:

```makefile
TRADE+:thor1g6pnmnyeg48yc3lg796plt0uw50qpp7humfggz
```

This adds the sent asset and amount to the Trade Account.

#### Swapping Trade Assets

Use the swap memo when swapping to and from trade assets. Example:

```makefile
=:ETH~ETH:thor1g6pnmnyeg48yc3lg796plt0uw50qpp7humfggz
```

Swap (from RUNE) to Ether Trade Asset.

#### Withdrawing from the Trade Account

To withdraw, send a THORChain MsgDeposit with the memo `TRADE-:ADDR`. Example:

```makefile
TRADE-:bc1qp8278yutn09r2wu3jrc8xg2a7hgdgwv2gvsdyw
```

Withdraw 0.1 BTC from the Trade Account and send to the specified address.

#### Verifying Trade Account Balances

Balances can be verified using the Owner's THORChain Address via the `trade/account/` endpoint. Example:

```url
https://gateway.liquify.com/chain/thorchain_api/thorchain/trade/account/thor1g6pnmnyeg48yc3lg796plt0uw50qpp7humfggz
```

### Future Opportunities

* **Arbitrage bots**: Enhance trading efficiency.
* **Order books and high-frequency trading**: Support advanced trading strategies.
* **P2P Lending market**: Enable deposit of one trade asset and withdrawal of another, with dynamic reserve asset interest rates.

### Sources

1. Trade Accounts [Dev Docs](https://dev.thorchain.org/concepts/trade-accounts.html)
2. Relevant PRs: [!3347](https://gitlab.com/thorchain/thornode/-/merge_requests/3347)&[!3451](https://gitlab.com/thorchain/thornode/-/merge_requests/3451)
3. [Twitter Spaces](https://twitter.com/THORChain)— held most weeks,[subscribe on RSS](https://rss.com/podcasts/thorchain/)or wherever you get your podcasts
4. [THORChain University](https://crypto-university.medium.com/)— educational content, monthly posts, &[discord](https://discord.com/invite/c4EhDZdFMA)server
5. [GrassRoots Crypto](https://www.youtube.com/c/grassrootscrypto)— update and explanation videos


# Secured Assets

Asset Type to Integrate into the App Layer

Secure Assets allow L1 tokens to be deposited to THORChain, creating a new native asset, which can be transferred between accounts and integrated with CosmWasm smart contracts using standard Cosmos SDK messages. They also replace [Trade Assets](/technical-documentation/thorchain-finance/trade-assets).

{% hint style="info" %}
See the [Dev Docs ](https://dev.thorchain.org/concepts/secured-assets.html)for a more detailed description.\
Also see [Technology](/technical-documentation/technology) for generic Cosmos information. What notation will they have?
{% endhint %}

### Asset Notation

The [delimiter](/thornodes/frequently-asked-questions/asset-types) for Secured Assets is a dash '-'.\
E.g. `ETH.ETH` is L1. `ETH-ETH` will be a secured asset.

While ETH.tc is pictured, that may change to `ETH-ETH`.

## How will Secured Assets Move Between Base and App Layer?

Secured assets are x/bank tokens on the App Layer (Rujira) representing claim to the native asset on base layer (THORChain).

The native asset is secured to and from the app layer with the following flow:

### Mint and Burn Secured Assets

Example shows the mint and burn process for BTC

<figure><img src="https://3337783180-files.gitbook.io/~/files/v0/b/gitbook-x-prod.appspot.com/o/spaces%2FfvaTNxU33ciP7UstKtwU%2Fuploads%2Fgit-blob-c61e7a7f5e5ab9a9d869e49d7149ef92da0eebf7%2Fimage%20(55).png?alt=media" alt=""><figcaption></figcaption></figure>

### Swapping Secured Assets

Examples below explain how a user:

1. Swap a Secured Asset (SA)—BTC—to another Secured Asset—ETH
2. Swap a Secured Asset—BTC—to a base asset—ETH

<figure><img src="https://3337783180-files.gitbook.io/~/files/v0/b/gitbook-x-prod.appspot.com/o/spaces%2FfvaTNxU33ciP7UstKtwU%2Fuploads%2Fgit-blob-5c6334ace3b68e566a5da0f30b74d6c0fe5ce20c%2Fimage%20(56).png?alt=media" alt=""><figcaption></figcaption></figure>

3. Secured Asset Swapping, swapping the L1 under the hood

<figure><img src="https://3337783180-files.gitbook.io/~/files/v0/b/gitbook-x-prod.appspot.com/o/spaces%2FfvaTNxU33ciP7UstKtwU%2Fuploads%2Fgit-blob-1e356fb715525323e35c8dc6c3e316c305881519%2Fimage%20(59).png?alt=media" alt=""><figcaption></figcaption></figure>

Find more information about [Secured Assets](https://docs.rujira.network/developers/secured-assets) in the Rujira Docs or in the [Dev Docs](https://dev.thorchain.org/concepts/secured-assets.html).


# TOR

How THORChain's USD-pegged stablecoin TOR works.

To understand [Lending (Deprecated)](/thornodes/archived/lending) within THORChain fully, one needs to understand the mechanics of `TOR`.

TOR (`thor.tor`) is a non-transferable unit of account within THORChain designed to match the value of $1 USD and has been in use since [ADR 003](https://dev.thorchain.org/architecture/adr-003-flooredoutboundfee.html). It cannot be exported anywhere and always has a market cap of $0. TOR is valued by taking the median price of the active USD pools.

All collateral, debt and repayments within Lending were converted to and accounted for in TOR.

### TOR Price Stability

TOR is anchored to a basket of USD-pegged stablecoins, such as USDC and USDT. The value of TOR is determined by taking the median price of these active USD pools, ensuring it remains stable and closely pegged to $1 USD. This median approach ensures that TOR is the most stable among the stablecoins in its basket, mitigating the risk of price volatility from any single stablecoin.

### Two-Way Burn Mechanism

There is a RUNE<>TOR mechanism that operates as a two-way burn process. When TOR is minted, an equivalent value of RUNE is burned, and conversely, when TOR is burned, the same value of RUNE is minted. This process ensures that the creation and destruction of TOR directly impact the supply of RUNE, maintaining a balanced and inflation-resistant system.

### TOR Pool Depth and Volatility Sensitivity

The depth of the TOR pool is calculated as the sum of all TOR pools. However, it is sensitive to market volatility. During periods of high volatility, the pool depth contracts to increase slippage for swaps, discouraging users from trading during these times and protecting the system from manipulation. Conversely, during stable periods, the pool depth expands, reducing slippage and encouraging swaps. This dynamic adjustment helps maintain the stability and health of the TOR pool.

### TOR Anchor

You can find the addresses for various stablecoins on specific networks (TORANCHOR) that make up TOR pools on [Mimir](https://gateway.liquify.com/chain/thorchain_api/thorchain/mimir):

```json
"TORANCHOR-AVAX-USDC-0XB97EF9EF8734C71904D8002F8B6BC66DD9C48A6E": 1,
"TORANCHOR-AVAX-USDT-0X9702230A8EA53601F5CD2DC00FDBC13D4DF4A8C7": 1,
"TORANCHOR-BSC-USDC-0X8AC76A51CC950D9822D68B83FE1AD97B32CD580D": 1,
"TORANCHOR-ETH-DAI-0X6B175474E89094C44DA98B954EEDEAC495271D0F": 1,
"TORANCHOR-ETH-USDC-0XA0B86991C6218B36C1D19D4A2E9EB0CE3606EB48": 1,
"TORANCHOR-ETH-USDT-0XDAC17F958D2EE523A2206206994597C13D831EC7": 1
```

### TOR Usage

TOR is used for accounting with THORChain and to price assets, instead of using any specific stablecoin. While TOR is currently non-transferable, greater use of TOR is a possibility.

####


# RUNEPool

How RUNEPool works, its use case, key components and how it enhances liquidity provision for RUNE holders

RUNEPool is a feature of THORChain that allows RUNE holders to join the Protocol Owned Liquidity (POL). By buying into the liquidity pool through RUNEPool, users get a share of the liquidity that THORChain owns across all its pools. This participation helps users earn Annual Percentage Rate (APR) returns and improves the efficiency of the protocol's liquidity, supporting the growth of THORChain's network.

## How does RUNEPool work?

RUNEPool dynamically matches external capital with various pools in the system. Managing 13 different pools, each on its price curve, RUNEPool aggregates and distributes RUNE across these pools. By using the [Incentive Pendulum](/technical-documentation/technical-deep-dive/economic-model), RUNEPool smoothens out price curves, reducing volatility and making THORChain products more attractive to investors.

#### Use Case

RUNEPool offers a single product to gather idle RUNE from centralized exchanges and custodial services, moving them into THORChain's decentralized infrastructure to generate yield. This enhances the productivity of these assets and builds up POL through community participation.

#### Benefits

Adding RUNE to RUNEPool abstracts away user experience complexities, focusing on the Incentive Pendulum and fees generated from the pools. RUNEPool allocates funds based on the yield, simplifying decision-making for users.

#### Key Components

1. **PoL-Enabled Pools**: POL-Enabled pools are defined via the mimir key POL-{Asset}. Currently, all (eight) native assets and five USD stable coins are enabled for POL. The exact list is within the mimir endpoint.
2. **RUNEPool Units (RPU)**: Ownership in RUNEPool is tracked through RUNEPool Units (RPU). These units represent a Pooler’s share in the pool. When a Pooler redeems their units, the total PoL size in RUNE is assessed, and the holder's share is distributed.
3. **Impermanent Loss Management (IL)**: Users experience aggregate IL across PoL-Enabled pools, reducing the risk compared to any single pool.

## How to track RUNEPool performance?

There are multiple dashboards to track the performance of RUNE added to the RUNEPool:

* [thorchain.network/runepool](https://thorchain.network/runepool)
* [thorchain.net/thorfi/runepool](https://thorchain.net/thorfi/runepool)
* [runescan.io/txs?type=runepool](https://runescan.io/txs?type=runepool)

Dashboards continuously evolve as THORChain expands, but taking the example of [THORChain.network](https://thorchain.network/runepool) you will find the following in the dashboard:

* Provider: The wallet that provided the RUNE
* Deposit: How much RUNE was provided by the provider
* Value: How much RUNE is currently possible to withdraw from the RUNEPool by a particular wallet.
* PnL: The difference between the Value and Deposit is the profit that a provider has made by adding RUNE to the RUNEPool
* Latest Deposit: Block # when the last deposit was made by the provider
* Lastet Withdrawal: Block # when the last withdrawal was made by the provider
* Withdrawn: How much RUNE was withdrawn by the provider

<figure><img src="https://3337783180-files.gitbook.io/~/files/v0/b/gitbook-x-prod.appspot.com/o/spaces%2FfvaTNxU33ciP7UstKtwU%2Fuploads%2Fgit-blob-794c4953e18dd1d3edd00dba5270e201896f0cac%2FScreenshot%202024-07-29%20at%2014.09.17.png?alt=media" alt=""><figcaption></figcaption></figure>

## How to use RUNEPool?

This section provides a simple guide on how to use RUNEPool, including adding and withdrawing from the pool, and viewing your position. You can find full technical docs under [dev.thorchain.org](https://dev.thorchain.org/concepts/rune-pool.html)

**Adding to RUNEPool**

1. **Create a Transaction**: Use a `MsgDeposit` transaction with the memo `pool+`.
2. **RUNE Only**: RUNEPool only works with RUNE.
3. **Instructions**: For detailed steps, refer to the "Add to the RUNEPool" section in the documentation.

**Withdrawing from RUNEPool**

1. **Create a Transaction**: Use a `MsgDeposit` transaction with the memo `pool-:<basis-points>:<affiliate>:<affiliate-basis-points>`.
2. **Minimum Term**: You can only withdraw after the minimum term, defined by the `RUNEPoolDepositMaturityBlocks` configuration.
3. **Instructions**: For detailed steps, refer to the "Withdraw from the RUNEPool" section in the documentation.

**Viewing RUNEPool Holders**

1. **All Holders**: Use the `rune_providers` endpoint to see a list of all RUNEPool holders.
2. **Specific Holder**: Use the `rune_providers/{thor owner address}` endpoint to view the position of a specific RUNEPool holder.

### How It Works

**PoL-Enabled Pools**

* **Enabled Assets**: POL is enabled for all eight native assets and five USD stable coins. The exact list can be found in the `mimir` endpoint.

**RUNEPool Units (RPU)**

* **Ownership Tracking**: RUNEPool Units (RPU) represent your share in the pool.
* **Redemption**: When you redeem your units, you receive a share of the total POL size in RUNE.

**Deposit Process**

1. **Deposit**: When you deposit, the balance moves to the `runepool` module.
2. **Pending Units**: Units are added to `PendingPoolUnits`.
3. **Reserve Exit**: The `reserveExitRUNEPool` function moves units from `PendingPoolUnits` to `PoolUnits`, reducing `ReserveUnits`.

**Withdraw Process**

1. **Pending Units Check**: If `PendingPoolUnits` is insufficient, the `reserveEnterRUNEPool` function moves RUNE from the reserve to make up the difference.
2. **Reserve Increase**: `ReserveUnits` are increased, and units move from `PoolUnits` to `PendingPoolUnits`.
3. **Withdraw Limit**: Withdrawals that would exceed `POLMaxNetworkDeposit + RUNEPoolMaxReserveBackstop` are not allowed.

**Impermanent Loss Management**

* **Aggregate IL**: Users experience aggregate impermanent loss across all PoL-enabled pools, reducing individual pool risks.
* **Idle RUNE**: Undeployed RUNE reduces yield but also limits exposure to impermanent loss.

#### Showing Profit and Loss (PnL)

**Global PnL:** The `/thorchain/runepool` endpoint returns the global PnL of RUNEPool, including details for the reserve and independent providers.

```json
jsonCopy code{
  "pol": {
    "rune_deposited": "408589258319",
    "rune_withdrawn": "208496086616",
    "value": "206166561256",
    "pnl": "6073389553",
    "current_deposit": "200093171703"
  },
  "providers": {
    "units": "232440861",
    "pending_units": "0",
    "pending_rune": "0",
    "value": "319161454",
    "pnl": "56394430",
    "current_deposit": "262767024"
  },
  "reserve": {
    "units": "149915806863",
    "value": "205847399802",
    "pnl": "6016995123",
    "current_deposit": "199830404679"
  }
}
```

**Individual Provider PnL:** The `/thorchain/rune_provider/{thor_addr}` endpoint provides position information for a single provider.

```json
jsonCopy code{
  "rune_address": "thor19phfqh3ce3nnjhh0cssn433nydq9shx76s8qgg",
  "units": "232440861",
  "value": "319161517",
  "pnl": "56394493",
  "deposit_amount": "3500000000",
  "withdraw_amount": "3237232976",
  "last_deposit_height": 14357483,
  "last_withdraw_height": 14358846
}
```

This guide should help you understand and utilize RUNEPool effectively. For more detailed instructions, refer to the respective sections in the documentation.

### Sources

* [dev.thorchain.org/concepts/rune-pool.html](https://dev.thorchain.org/concepts/rune-pool.html)
* [RUNEPool Community Call](https://www.youtube.com/watch?v=vq6t9kPEBpw\&t=2s\&themeRefresh=1)
* [Original Issue](https://gitlab.com/thorchain/thornode/-/issues/1841)
* [\[ADD\] RUNEPool MR](https://gitlab.com/thorchain/thornode/-/merge_requests/3612/)
* [RUNEPool Implementation MR](https://gitlab.com/thorchain/thornode/-/merge_requests/3631)


# Synthetics

How THORChain enables synthetic assets with single asset exposure.

{% hint style="warning" %}
Synthetic assets are no longer actively used within THORChain.\
Since 04 Jan 2025, the withdrawal of Synthetics has been disabled. See [this article](https://medium.com/thorchain/thorfi-unwind-96b46dff72c0) for more information.
{% endhint %}

## Synthetic Assets

THORChain synthetics are unique in that they are 100% collateralised when they exist but switch to being 1:1 pegged at the time of redemption. Other synthetic or wrapped asset designs are either over-collateralised or pegged, never both. This means they are either capital-inefficient (requiring over-collateralisation) or capital-sensitive (can depeg if <100% collateralisation). The advantage of THORChain's design is that the collateralisation is managed by the system on a best-effort basis to be aspirationally 100%. However, when the asset is redeemed, it switches to being pegged 1:1, which means they can tolerate going below 100% collateralisation without losing the peg. The deficit is regained by liquidity-sensitive fees on the redemption so that the last holders of the asset can achieve re-collateralisation.

The collateral for synthetic assets is constant-product liquidity, always 50% in the asset, with the other 50% in RUNE. As the price changes, the pool rebalances on the curve, having much stronger inertia than if it were 100% collateralised by the endogenous asset (RUNE). The price-shift is subsidised by the other liquidity in the pool.

{% hint style="info" %}
Synthetic Assets are aspirationally 100% collateralised by pool liquidity when they exist, but redeemed on a 1:1 pegged basis, no matter the health of the collateral.
{% endhint %}

### Minting - 1:1 pegged

Synthetic Assets are created by swapping RUNE (or the Asset), into its synthetic counterpart, using the pool liquidity depth. This process is identical if the asset was swapped into the L1 instead. Thus when minting, the pool treats both the synthetic and its L1 as identical in purchasing power:

$$
\text{synthAmount} = \frac{r \cdot R \cdot A}{(r + R)^2}
$$

* r = rune deposited
* R = Rune Depth (before)
* A = Asset Depth (before)

This is the [identical equation to L1 swaps](/technical-documentation/thorchain-finance/continuous-liquidity-pools#slip-based-fee-model-clp).

The total Synth Supply is then updated:

$$
\text{synthSupply} += \text{synthAmount}
$$

### Synth Units - 100% collateralisation

In the above swap - an asset was added to the pool (the RUNE or ASSET), but none taken out since the swap output is minted from nothing. Thus the pool has extra liquidity that needs to be isolated from other LPs. This is the purpose of Synth Units.

Synth Units represent the liquidity collateral value that is required to "back" the synths 100%, and stops other dual-LPs from claiming ownership of it. They are computationally derived at any point which ensures there is exactly enough at any time to represent the outstanding supply.

The ratio of Synth Units to Liquidity Units should be the same as the ratio of synth supply to the total value of the pool without the synths (since LP units are all pool units without the synth units).

* U = Synth Units (what needs to be isolated to back the synthS)
* L = Liquidity Units (dual-LPs)
* S = Synth Supply (the synths to be backed)
* A = Asset Depth (the assets in the pool)

$$
\frac{U}{L} = \frac{S}{(2A-S)}
$$

$$
U = L \cdot \frac{S}{(2A-S)}
$$

Synth Units are issued to cover the new liquidity minted, but held by the pool (not owned by anyone). Pool Units are therefore the sum of [liquidityUnits](/technical-documentation/thorchain-finance/continuous-liquidity-pools#calculating-pool-ownership)+ synthUnits.

{% hint style="warning" %}
Synth Collateralisation is done aspirationally. If the total value of the liquidity in the pool drops below the total value of the synths, then Synth Units minted will go to infinity, diluting the dual-LPs to 0%.
{% endhint %}

### Redeeming: 1:1 pegged

Synthetic Assets are redeemed by swapping the Synth across the pool. The synth is swapped using the same formula as though it was an L1 asset, thus the synth has the same purchasing power to the L1. It is therefore pegged.

$$
\text{runeAmount} = \frac{s \cdot A \cdot R}{(s + A)^2}
$$

* s = Synths to Redeem
* R = Rune Depth (before)
* A = Asset Depth (before)

The Synth Supply is thus decremented, and this in turn updates the oustanding Synth Units since it is computationally derived.

### Swapping

Synth Swaps can be done as follows:

* Layer 1 to Synth: L1 in, Synth Minted
* Synth to Layer 1: Synth REDEEMED, L1 swapped out
* Synth to Synth: Synth REDEEMED, RUNE moved between pools, synth MINTED

To specify the destination asset is synth, simply provide a THOR address. If it is Layer 1, then provide a layer 1 address, e.g. a BTC address.

## Economics

### Fees

All swaps pay fees, and a synth Mint or Redeem to an L1 is two swaps. Thus 10.0 btc/btc swapped across a pool of 1000 BTC.BTC will receive `10 - ((10/1000)*10)*2 = 9.8` minus any outboundFees. Is the synth pegged 1:0.98? No, because the same holder could swap 10 BTC in 1.0 BTC increments and receive `10*(1 - ((1/1000)*1)*2) = 9.98` minus 10 outboundFees. Both outboundFees and liquidityFees as a function of the swap size can be controlled by the user.

### Effect on Dual-LPs

The dynamic synth unit accounting is to ensure that gain or loss caused by price divergence in the synths is quickly realised to LPs. If Synths as a function of Pool Liquidity goes to 100%, then dual-LPs are diluted to 0%.

### Synth Minting Cap

Due to synths, Liquidity Providers are taking a leveraged position on the RUNE asset today. This can help them earn more rewards if RUNE outperforms the asset, but can also go the other way. The higher the percentage of synths that exist on the network relative to pool depth, the higher the leveraged position Liquidity Providers are taking.

Due to this, the minting of synths is capped to an upper limit of the total pool depth to protect Liquidity Providers and the network. The [Mimir](/technical-documentation/technical-deep-dive/governance#mimir) setting `MaxSynthPerAssetDepth` setting controls the cap which is the asset depth percentage.

### Protocol Owned Liquidity (POL)

With the addition of [yield-bearing synths (Deprecated),](/thornodes/archived/savers) there can be a high demand for minting synths that exceed the cap with normal liquidity. See the original [PR](https://gitlab.com/thorchain/thornode/-/issues/1342). POL has been introduced to deal with a high demand for minting synths while maintaining a safe synth minting limit by using the RUNE within the [Reserve](/technical-documentation/technical-deep-dive/economic-model).

The network can monitor the synth utilisation on a per pool basis, and add liquidity (asymmetrically addition of RUNE) if utilisation is greater than `cap - 5%` (if economic security allows). If synth utilisation is under this figure, then the reserve would remove liquidity (if the PoL has an LP position in this pool).

* cap = e.g. 1500 (in basis points)
* range = 500 (in basis points)
* PA = pool asset depth
* S = synth supply

$$
\text{utilisation} = \frac{S}{PA} \cdot 10000
$$

By having the reserve add rune into the pool, it de-risks LPs from over RUNE leverage, as the reserve takes on some of that risk. The Reserve is long on its own (and only) asset. This, in turn, creates synth space in the pool, more synth minting and more single-sided asset deposits in the form of synths to enter.

### Staged Pools

If an active pool that minted synths becomes staged, then swaps are disabled. However, synth holders can always redeem for RUNE, or the underlying asset, by specifying that on the way out.

### Alternate Synth Derivation

![](https://3337783180-files.gitbook.io/~/files/v0/b/gitbook-x-prod.appspot.com/o/spaces%2FfvaTNxU33ciP7UstKtwU%2Fuploads%2Fgit-blob-4407825a6fb3ca6cc892a57b23bc32b12bd86f62%2Fimage%20\(41\)%20\(3\).png?alt=media)


# Understanding THORChain

Introduction of concepts that help make sense of how THORChain is uniquely able to provide the services it does.

## Automated Market Makers (AMMs) & Liquidity Pools

Automated market makers (AMMs) are decentralised exchanges (DEXs) that rely on users to voluntarily deposit network-supported assets into what are called liquidity pools—this is called *liquidity* *pooling*. Each supported asset has its own dedicated liquidity pool; these algorithmically price its respective asset, also providing the liquidity for the exchange's transactions.

By depositing their capital into the asset-specific pools, these Liquidity Providers (LPs) become owners of a proportional share of that pool for as long as their assets remain deposited. In exchange for contributing liquidity to the network, LPs earn rewards, which are distributed regularly. These rewards come directly from swap fees paid by swappers.

While each AMM carries distinct design mechanics with regard to its liquidity pool functionality, all generally aim to offer their users deep liquidity, low transaction fees, and 100% uptime for as many users as possible. THORChain is no different in this regard.

## THORChain: A Novel AMM Protocol

Unlike other AMMs, THORChain is unique in that it offers swappers the ability to seamlessly swap native assets on their native blockchains. It offers this in perhaps the most decentralized, trustless, permissionless way available. It is precisely for these reasons (and more) that THORChain is the functional backend for many user interfaces.

Key features of THORChain are:

* Native Asset Swaps: Swap Layer 1 assets across multiple chains—e.g., native BTC to ETH swap
* Permissionless: No user registration is required; send a transaction & THORChain will execute it
* Decentralized Pricing: Gives transparent, fair prices without reliance on centralised third-parties
* AMM Design: [Continuous Liquidity Pools](/technical-documentation/thorchain-finance/continuous-liquidity-pools#benefits-of-the-clp-model) maximise network efficiency
* Supports App Layer development via Cosmwasm Smart Contracts

## Using THORChain's Services

THORChain offers two decentralized and permissionless services:

1. [Swaps](https://docs.thorchain.org/understanding-thorchain/roles/swapping): Cross-chain swaps between native assets—e.g., from native BTC (on the Bitcoin blockchain) to native ETH (on the Ethereum blockchain)
2. [Liquidity Pools (LPs)](https://docs.thorchain.org/understanding-thorchain/roles/liquidity-providers): Depositing and withdrawing native assets to provide liquidity

Neither service requires participants to hold the RUNE token. All that is needed to use THORChain is to choose from the several [Exchanges and/or Wallets](https://docs.thorchain.org/ecosystem#exchanges-only) that have integrated with THORChain.

### Interacting with the RUNE token

That said, users may very well wish to interact with the [RUNE](https://docs.thorchain.org/understanding-thorchain/rune) token. Whether a user wants to hold RUNE, deposit into LPs symmetrically, and/or [bond](https://docs.thorchain.org/understanding-thorchain/roles/node-operators) into a THORNode, they will need a wallet that supports RUNE ([List of wallets that support RUNE](https://docs.thorchain.org/ecosystem#integrated-wallets-and-exchanges)). Once the user has successfully obtained a RUNE-supporting wallet, they can acquire RUNE. To do so, users can swap for RUNE from THORChain directly using any of these [Frontend User Interfaces](https://docs.thorchain.org/ecosystem#exchanges-only). They may also choose to acquire RUNE from supported centralized exchanges.

For platform-specific instructions or support with an interface, it is best to get in touch with them via their [support channels](/ecosystem#integrated-wallets-and-exchanges)—this also goes for troubleshooting and user support.

➜ For further reading, see: [An Introduction to THORChain for Bitcoiners](https://erikvoorhees.medium.com/an-introduction-to-thorchain-for-bitcoiners-3f621bf0028e)


# Roles

Roles within THORChain

In the THORChain ecosystem, there are four key roles that network participants may play:

1. **Liquidity providers**: these add liquidity to pools, earning fees for their temporary deposit
2. **Swappers**: those users who use THORChain's liquidity to swap assets ad-hoc, paying fees for the service
3. **Arbitrageurs**: expert traders who continually monitor and rebalance pools; still paying fees but with the intent to earn a profit
4. **Node Operators** who provide a bond and are paid to secure the system.

A single user may take on multiple roles simultaneously.


# Liquidity Providers (LPs)

A deeper dive into the Liquidity Provider  role

Liquidity providers contribute native, network-supported assets to the THORChain liquidity pools. They may deposit any number of assets they choose of any value, doing so for their chosen amount of time; in short, there are no restrictions to LPing other than the need to pay deposit and withdrawal fees. “As stated, these LPs are compensated for their temporary contributions with swap fees, which are dynamically affected by several factors.

{% hint style="warning" %}
Liquidity providers commit capital to pools which have exposure to underlying assets. Liquidity providers THEN gain exposure to the underlying assets in each pool. Since assets can be deposited freely, LPs will experience the volatility of those assets—whether positive or negative.

While LPs are paid liquidity fees, these remain dynamic and may not be enough to cover "Impermanent Losses", which occur when price changes happen. With their deposit, Liquidity providers are voluntarily and knowingly taking on this risk. Therefore, they should not assume they are guaranteed or entitled to receive a specific quantity of their assets back when they deposit; rather, they should expect to receive their fair share of the pool's earnings and final asset balances.
{% endhint %}

## How to LP

### Requirements & Costs

Liquidity providers must have assets to deposit and their assets must be native to a supported chain. There is no minimum amount to deposit in existing pools. However, new assets must win a competition to be listed – larger value deposits will be listed over smaller value deposits.

Liquidity providers must pay for security of their assets since security is not free. This "payment" is the requirement for liquidity providers to hold RUNE, which acts as a redeemable insurance policy whilst they are in the pool. Holding RUNE allows liquidity providers to retain an ability to economically leverage nodes to ensure security of assets. When the liquidity provider withdraws, they can sell their RUNE back to the asset they desire.

The only direct cost to liquidity providers is the network fee, charged for withdrawing assets (pays for the compute resources and gas costs in order to process outbound transactions). An indirect cost to liquidity providers comes in the form of impermanent loss. Impermanent loss is common to Constant Function Market Makers like THORChain. It leads to potential loss of liquidity provider purchasing power as a result of price slippage in pools. However, this is minimised by THORChain's slip-based fee. See [Technical Deep Dive](/technical-documentation/technical-deep-dive) for more details.

Liquidity providers are not subject to any direct penalties for misconduct.

### Process

The process of providing liquidity to THORChain pools is permissionless, non-custodial, and quite simple. First, a user—anyone at all—would deposit their asset(s) to the pool. They would remain in that pool for some amount of time, entirely of their choosing. When they wish to withdraw their pool share, they simply reverse the first step.

Anyone can add liquidity to existing pools; the same goes for proposing new asset pools (this is done simply by depositing it—see [asset listing/delisting](/technical-documentation/technical-deep-dive/governance#asset-listing) for details). Once a new asset pool is listed, anybody can add liquidity to it. It is in this sense that THORChain is permissionless.

Liquidity can be added to existing pools at any time, increasing its depth and attracting swappers with low fees, for the deeper the liquidity, the more affordable the cost of the swap. With that said, deep pools generally have higher swap volume; this in turn generates more fee revenue for LPs.

### **Depositing Assets**

Liquidity providers have two modes by which they can deposit assets: symmetrically or asymmetrically.

{% hint style="info" %}
**Symmetrical vs Asymmetrical Deposits**

**Symmetrical deposits**, the standard approach to providing liquidity, is the method in which the LP deposits an *equal* value of 2 assets to a pool—e.g., user deposits $1000 of BTC + $1000 of RUNE simultaneously to the BTC/RUNE pool.

**Asymmetrical deposits**, in contrast, is the LPing method whereby users deposit *unequal* values of 2 assets to a pool—e.g., a user deposits $2000 of BTC and $0 of RUNE to the BTC/RUNE pool. As this method increases the price slip of the deposit transaction, the LP is (under the hood) given an ownership of the pool accounting for this. The liquidity provider will end up with <$1000 in BTC and <$1000 in RUNE. The deeper the pool, the closer the member will approach owning their pool share equal to their original total of $2000.

*Note: there is no difference between swapping into symmetrical shares, then depositing symmetrically, or depositing asymmetrically and being arbitraged to be symmetrical post-deposit. You will experience the same net slip either way.*
{% endhint %}

Generally, LPs are encouraged to deposit symmetrically. However, if the pool is already imbalanced, they should deposit asymmetrically; this helps the pool return to balance, which in turn improves the network as a whole, as well as making the pool more attractive to swappers.

### Withdrawing Assets

Just as with deposits, the ability to withdraw assets is completely permissionless and non-custodial. Liquidity providers can withdraw their assets at any time. Furthermore, only the original depositor has the ability to execute the withdrawal of their pool share. The network processes their request and the liquidity provider receives their ownership percentage of the pool plus the assets they've earned. A network fee is charged whenever assets are taken out of the network. These fees go into [the network reserve](/technical-documentation/technical-deep-dive/economic-model).

### Security

[Nodes ](/technical-documentation/understanding-thorchain/roles)are economically incentivised to never manipulate user funds (i.e. they would lose more money than they would gain by doing so); they are bound by rules of the network and have less than zero economic incentive to take control of any user-deposited assets.

## Yield

Liquidity providers deposit their assets into liquidity pools and in return earn dynamic yield. Their earnings arrive both in RUNE and the deposited pool's respective asset—e.g., BTC/RUNE LP receives fees in BTC & RUNE.

### Calculation & Distribution

When liquidity providers (LPs) deposit their assets into liquidity pools, they earn rewards over time. These rewards come in two tokens: RUNE and the asset paired in the pool (e.g. BTC in the BTC/RUNE pool).

* Rewards are calculated every block.
* Rewards are paid out when you withdraw your liquidity.

How rewards are calculated depends on whether there are any swaps (trades) in that block.

#### If There Are Swaps in the Block

When a block includes swap transactions, the rewards are based on fees collected from those swaps. Pools that earn more fees get a larger share of the rewards.

Example: 1000 RUNE in rewards split based on swap fees:

|        |                       |          |                     |          |
| ------ | --------------------- | -------- | ------------------- | -------- |
|        | **Pool Depth (RUNE)** | **Fees** | **Share (of Fees)** | Rewards  |
| Pool A | 1,000,000             | 1000     | 33%                 | 333      |
| Pool B | 2,000,000             | 0        | 0%                  | 0        |
| Pool C | 3,000,000             | 2000     | 67%                 | 667      |
| Total  | **6,000,000**         | **3000** | **100%**            | **1000** |

**If There Are No Swaps in the Block**

If a block has no swaps, the rewards are based on the size of the pools. Larger pools receive a bigger portion of the rewards.

Example: 1000 RUNE in rewards split based on pool depth:

<table><thead><tr><th width="128"></th><th></th><th></th><th></th><th></th></tr></thead><tbody><tr><td></td><td><strong>Pool Depth (RUNE)</strong></td><td><strong>Fees</strong></td><td><strong>Share (of Depth)</strong></td><td>Rewards</td></tr><tr><td>Pool A</td><td>1,000,000</td><td>0</td><td>17%</td><td>167</td></tr><tr><td>Pool B</td><td>2,000,000</td><td>0</td><td>33%</td><td>333</td></tr><tr><td>Pool C</td><td>3,000,000</td><td>0</td><td>50%</td><td>500</td></tr><tr><td>Total</td><td><strong>6,000,000</strong></td><td><strong>0</strong></td><td><strong>100%</strong></td><td><strong>1000</strong></td></tr></tbody></table>

This ensures that yield is being sent to where demand is being experienced - with fees being the proxy. Since fees are proportional to slip, it means the increase in rewards ensure that pools experiencing a lot of slip are being incentivised and will attract more liquidity.

### **Yield Comes from Fees & Rewards**

Liquidity providers earn a yield on the assets they deposit. This yield is made up of fees.

**Fees** are paid by swappers and traders. Most swaps cause the ratio of assets in the liquidity pool to diverge from the market rate.

{% hint style="info" %}
The ratio of assets in a liquidity pool is comparable to an exchange rate.
{% endhint %}

This change in the ratio of assets is called a 'slip'. A proportion of each slip is kept in the pool. This is allocated to liquidity providers and forms part of their yield. Learn more about [swapping](/technical-documentation/understanding-thorchain/roles/swapping).

**Rewards** come from THORChain's own [reward emissions](/technical-documentation/technical-deep-dive/economic-model). Reward emissions follow a predetermined schedule of release.

Rewards also come from a token reserve. This token reserve is continuously filled up from network fees. Part of the token reserve is paid out to liquidity providers over the long-term. This provides continuous income even during times of low exchange volume. See [Technical Deep Dive](/technical-documentation/technical-deep-dive) for more details.

{% hint style="info" %}
See here for an [interactive example](https://rebase.foundation/network/thorchain/system-component/providing-liquidity) of the process.
{% endhint %}

### Factors Affecting Yield

**Ownership % of Pool** – Liquidity providers who own more of a pool receive more of that pool's rewards.

**Swap Volume** – Higher swap volumes lead to higher fees. Higher fees lead to higher rewards for liquidity providers.

**Size of Swaps** – Swappers who are in a hurry to exchange assets will tend to make larger swaps. Larger swaps lead to greater price slips and therefore higher fees.

**Incentive Pendulum** – The Incentive Pendulum balances the amount of capital bonded in the network versus pooled. It does this by changing the amount of rewards given to node operators versus liquidity providers. Sometimes rewards will be higher for liquidity providers to encourage them to deposit assets; sometimes the opposite. [Learn more](/technical-documentation/technical-deep-dive/economic-model).

**Change in Asset Prices --** If the price of the assets change, then liquidity providers will receive more of one and less of the other. This may change yield if yield is being priced in a third asset, ie, USD.

### Yield Strategies

**Passive** liquidity providers should seek pools with deep liquidity to minimise risk and maximise returns.

**Active** liquidity providers can maximise returns by seeking out pools with shallow liquidity but high demand. This demand will cause greater slips and higher fees for liquidity providers.

## How it Works

### **Depositing Assets**

Depositing assets on THORChain is permissionless and non-custodial.

Liquidity providers can propose new asset pools or add liquidity to existing pools. Anybody can propose a new asset by depositing it. See [asset listing/delisting](/technical-documentation/technical-deep-dive/governance#asset-listing) for details. Once a new asset pool is listed, anybody can add liquidity to it. In this sense, THORChain is permissionless.

The ability to use and withdraw assets is completely non-custodial. Only the original depositor has the ability to withdraw them. Nodes are bound by rules of the network and cannot take control of user-deposited assets.

#### Process

Liquidity can be added to existing pools to increase depth and attract swappers. The deeper the liquidity, the lower the fee. However, deep pools generally have higher swap volume which generates more fee revenue.

Liquidity providers are incentivised to deposit symmetrically but should deposit asymmetrically if the pool is already imbalanced.‌

{% hint style="info" %}
**Symmetrical vs Asymmetrical Deposits**

**Symmetrical deposits** is where users deposit an *equal* value of 2 assets to a pool. For example, a user deposits $1000 of BTC and $1000 of RUNE to the BTC/RUNE pool.

**Asymmetrical deposits** is where users deposit *unequal* values of 2 assets to a pool. For example, a user deposits $2000 of BTC and $0 of RUNE to the BTC/RUNE pool. Under the hood, the member is given an ownership of the pool that takes into account the slip created in the price. The liquidity provider will end up with <$1000 in BTC and <$1000 in RUNE. The deeper the pool, the closer to a total of $2000 the member will own.

*Note: there is no difference between swapping into symmetrical shares, then depositing that, or depositing asymmetrically and being arbitraged to be symmetrical. You will still experience the same net slip.*
{% endhint %}

### Withdrawing Assets

Liquidity providers can withdraw their assets at any time. The network processes their request and the liquidity provider receives their ownership % of the pool along with the assets they've earned. A network fee is taken whenever assets are taken out of the network. These are added to [the network reserve](/technical-documentation/technical-deep-dive/economic-model#reserve-outflows-and-inflows).

## How Yield is Calculated

The yield of a pool on THORChain is calculated using a metric called **Liquidity Unit Value Index** (LUVI) which can be viewed on [Midgard](https://gateway.liquify.com/chain/thorchain_midgard/v2/pools).

When a user deposits assets into a liquidity pool, they are given ownership of Liquidity Units which represent a percentage of ownership of the pool. LUVI is a measure of the relative value of each liquidity unit and is independent of price.

$$
LUVI =\frac{ \sqrt (Asset \ Depth \* Rune \ Depth)}{Pool \ Units} \ \\
$$

Where:

$$
Pool \ Units = Liquidity \ Units + Synth \ Units
$$

{% hint style="info" %}
Learn more about [Liquidity Units](https://docs.thorchain.org/thorchain-finance/continuous-liquidity-pools#calculating-pool-ownership) and [Synth Units](https://docs.thorchain.org/thorchain-finance/continuous-liquidity-pools#calculating-pool-ownership)
{% endhint %}

The yield of a pool uses LUVI value data from the previous 30 days and extrapolates an APR if that performance is repeated over the course of a year. A `period` parameter may be used to change the number of days of data that are taken into consideration.

{% hint style="info" %}
Example: <https://gateway.liquify.com/chain/thorchain_midgard/v2/pools?period=100d> calculates the APR of a pool with the previous 100 days of data rather than the default of 30 days.
{% endhint %}

Factors that affect LUVI:

* Swap fees, block rewards, and pool donations increase LUVI and are the primary yield sources
* An increase of the synthetic asset liability of a pool decreases LUVI
* An increase in `ASSET Depth` or `RUNE Depth` of a pool increase LUVI
* Changes in the ratio of `ASSET Depth` and `RUNE Depth` in a pool change LUVI
* Changes in `ASSET Price` or `RUNE Price` do not necessarily change LUVI.

For more information, see: [Liquidity Pooling Example High Level](https://www.youtube.com/watch?v=Kzt9SAQRvUQ)

## Risks associated with providing liquidity

Alongside the obvious investment risks of any asset, with liquidity provision, there also comes the risk of impermanent (price-divergent) loss. The bigger the divergence of price between the two assets, the more you are exposed to impermanent loss.

> *When you provide liquidity in a liquidity pool, the two assets are bound together by the system because it will ensure that both sides of the pool have the same value.* *If the price of your deposited assets changes in the wider markets, then swappers will sell one side of the pool for the other. Thus your assets are continuously sold "on the way up" or "on the way down". In fact, your assets are sold at a price that is an average of the starting price and ending price. If you then compare your original deposited assets with what you finally get, you will think you "could have got a better price based on today's value"*

This is called impermanent loss because the losses are only realised when you withdraw from the pool. If the ratio swings to 5x (25.5% IL) but comes back to the same ratio when you entered the pool and withdrew your liquidity at that time, you will not have suffered any impermanent loss. It is similar to traditional finance’s unrealized losses. However, when you withdraw your liquidity from the pool at any other time, the loss becomes real and permanent. The fees you earn are generally able to compensate for those losses, or you may experience no loss at all and withdraw well compensated for your time in the pool.

LPs are encouraged to provide liquidity in pools that they are bullish on, or neutral on (don't care what the final price is). If an LP provides assets in a pool that they become bearish on, then they will be emotionally affected by the price draw-down, and may pull their assets out and realise a permanent loss.


# Swappers

THORChain's value proposition for Swappers.

On THORChain, users can swap their digital assets for other digital assets. The network aims to give users access to:

* A large variety of assets through cross-chain compatibility and simple asset listing
* Superior user experience through open finance protocols and permissionless access
* 1-transaction access to fast chains (Binance Smart Chain), smart chains (Ethereum) and censorship-resistant chains (Bitcoin).

{% hint style="info" %}
See an [overview of Swapping in THORChain](/technical-documentation/understanding-thorchain#how-swapping-works)
{% endhint %}

## How Swaps Work

### Available Assets

Users can swap any assets which are on connected chains and which have been added to the network. Users can swap from any connected asset to any other connected asset. They can also swap from any connected asset to [RUNE](/technical-documentation/understanding-thorchain/rune).

{% hint style="info" %}
Learn more about how chains and assets get added to the network in [the Governance section](/technical-documentation/technical-deep-dive/governance).

To add an asset to THORChain, users simply deposit a new asset to put it in the queue for listing. Swaps can only be made on pools when they have been added to the network and have moved out of the bootstrap phase.
{% endhint %}

### Decentralisation

THORChain manages the swaps in accordance with the rules of the state machine - which is completely autonomous. Every swap that it observes is finalised, ordered and processed. Invalid swaps are refunded, valid swaps ordered in a transparent way that is resistant to front-running. Validators can not influence the order of trades, and are punished if they fail to observe a valid swap.

Swaps are completed as fast as they can be confirmed, which is around 5-10 seconds.

### Continuous Liquidity Pools

Swaps on THORChain are made possible by liquidity pools. These are pools of assets deposited by Liquidity providers, where each pool consists of 1 connected asset, for example Bitcoin, and THORChain's own asset, RUNE. They're called Continuous Liquidity Pools because RUNE, being in each pool, links all pools together in a single, continuous liquidity network.

When a user swaps 2 connected assets on THORChain, they swap between two pools:

1. Swap to RUNE in the first pool,
2. Move that RUNE into the second pool,
3. Swap to the desired asset in the second pool with the RUNE from (2)

The THORChain state machine handles this swap in one go, so the user never handles RUNE.

See [this example](#example) for further detail and the page below for broader detail on Continuous Liquidity Pools.

### **How Swapping Works**

There are two modes possible for THORChain's swap mechanism: A single swap, and a double swap.

**Single Swap**

A single swap occurs when a user swaps some native asset for an equivalent value of RUNE, or vice versa.

Example: RUNE<>BTC swap.

1. User RUNE —> sent into THORChain. Inbound gas paid in RUNE
2. BTC —> sent out from one of THORChain’s vaults to user wallet. Outbound gas is paid in BTC.

**Double Swap**

A double swap occurs when a user swaps some native asset for some other native asset (that is not RUNE). While the user only sees one transaction, there is actually an additional one that occurs internally within THORChain.

Example: BTC<>ETH swap

1. User BTC —>THORChain. Inbound gas paid in BTC
2. Once the BTC is received, RUNE in BTC pool —> sent to ETH Pool
3. ETH —> sent out from one of THORChain’s vaults to user wallet. Outbound Fee is paid in ETH

Step 2 is the internal swap from BTC:RUNE —> RUNE:ETH. See [Swappers](#how-swaps-work) for more information on how swapping works.

{% content-ref url="/pages/V5i5G7Yj3xzJEvTJJjKn" %}
[Continuous Liquidity Pools](/technical-documentation/thorchain-finance/continuous-liquidity-pools)
{% endcontent-ref %}

### Calculating Swap Output

The output of a swap can be worked out using the formula

$$
y = \frac{ xYX} {(x+X)^2 }
$$

where

* x is input asset amount
* X is input asset balance
* y is output asset amount
* Y is output asset balance

#### Example

The BTC.RUNE pool has 100 BTC and 2.5 million RUNE. A user swaps 1 BTC into the pool. Calculate how much RUNE is output:

$$
\frac {1 \* 2500000 \* 100 } {(1 + 100)^2} = 24,507.40
$$

This user swaps 1 BTC for 24,507.40 RUNE.

### Costs

The cost of a swap is made up of two parts:

1. Outbound Fee
2. Price Slippage

All swaps are charged a network fee. The network fee is dynamic – it's calculated by averaging a set of recent gas prices. Learn more about [Network Fees](/technical-documentation/technical-deep-dive).

Note that users who force their swaps through quickly cause large slips and pay larger fees to liquidity providers.

{% hint style="info" %}
For technical details on transaction memo formats, swap parameters, and integration guides, see the [THORChain Developer Documentation](https://dev.thorchain.org/).
{% endhint %}


# Arbitrageurs

Balancing pools to exploit price deltas between markets.

Prices on THORChain are maintained by profit-seeking traders. Traders find assets that are mispriced between markets. They buy assets on markets with low prices and sell them on markets with high prices. This earns them a profit.

Traders compare the exchange rates on THORChain with the rates on external markets. If they find the price is lower on THORChain they can buy there and sell on an external market. If they find the price is lower on external markets they can buy there and sell on THORChain. This process is repeated at high-frequency. Over time, price information propagates and THORChain settles with external markets.

This is how THORChain avoids the need for oracles and how prices are set.

## How it Works

### Process

A swap takes place in the BTC/RUNE pool. This leaves the pool unbalanced. The ratio on THORChain is 20:1 BTC:RUNE, but is 16:1 on external markets. This means that RUNE is undervalued on THORChain.

Traders can now buy cheap RUNE on THORChain and sell it for a profit on external markets. To do so, they swap BTC into the pool and get RUNE out. They sell this RUNE on external markets and make a profit.

The economics of the [swap formula](/technical-documentation/understanding-thorchain/roles/swapping#calculating-swap-output) mean that traders should aim to restore balance to the pool in a single trade. Rebalancing should be done incrementally. If larger rebalancing trades are attempted, arbitrage may not be profitable for traders.

Specifically, each rebalancing trade should be 40–50% the imbalance size. So if the imbalance starts at $100 in value, the first rebalancing trade should be between $40–50. This will leave the imbalance at $50–60. The next rebalance should be $25–30. This process repeats until a satisfactory balance is restored.

{% hint style="info" %}
This hierarchical cascade of rebalancing trades will create arbitrage opportunities for traders big and small.
{% endhint %}

### Impact of Liquidity

Trading profits are impacted by liquidity on THORChain and on external markets. As an example, if the price of the asset in a THORChain pool is $1.20, but the same asset on an external market is $1.00, then someone can buy off that external market and sell into the THORChain pool for profit.

#### Infinitely Deep Liquidity

If both markets are infinitely deep, then the following will occur:

* Buy on External Market for $1.00, no price slip.
* Sell on THORChain for $1.20, no price slip.
* **Total Profit: 20%**

The trader can then continue to arbitrage for a profit of 20% continuously.

#### Finite, but Uneven Liquidity

If both markets have finite liquidity, but one is much deeper than the other, then the one of the markets will slip in price after the trade. However, the trader will experience a price that is roughly the average of the price before and after the trade:

* Buy on External Market for $1.00, no price slip.
* Sell on THORChain for $1.20, realised price of $1.10, price slip to $1.00.
* **Total Profit: 10%**

After the trade, there is no more price differential, but the trader made 10% in profit. The trader has made the pool price equal to the secondary market. They have transferred price information from one market to another.

#### Low Liquidity

If both markets have low liquidity, then the trader is attempting to make trades that slip each market towards each other:

* Buy on External Market for $1.00, realised price of $1.05, price slip to $1.10.
* Sell on THORChain for $1.20, realised price of $1.15, price slip to $1.10.
* **Total Profit: >10%**

The market now has no more price differential. The trader has made each market equal to each other.

## Compensation, Requirements, Costs & Penalties

THORChain does not offer explicit incentives to traders – it does not reward or punish them. Trading profits are determined by the capacity of traders to seek out and capitalise on price differentials between THORChain and external markets.

The majority of arbitrage opportunities will be exercised by software bots. These are under development by 3rd party entities and will be released in due time. They will be open-source and available for anybody to run.


# Node Operators

Node Operators

## THORNodes Overview

THORNodes support the THORChain network. While the initial design target is 100 nodes, the network can scale to over 250+. The design goal of THORChain is such that anyone can join the network with the required funds (permissionless) and be anonymous, yet still be secure. THORChain takes this a step further by having a high churn schedule, kicking out nodes continuously. This high-churn network ensures that it is censorship-resistant, evades capture and resists centralisation.

Each THORNode is comprised of several independent servers in a cluster, which run full-nodes for each connected chain. All THORNodes communicate and operate in cooperation to create a cross-chain swapping network.

{% content-ref url="/pages/dEWfRV1s1uGW4F4cVgvI" %}
[THORNode Overview](/thornodes/overview)
{% endcontent-ref %}

### Rewards

Node Operators earn 67% of the system income when it is stable. You can read more here:

{% content-ref url="/pages/dEWfRV1s1uGW4F4cVgvI" %}
[THORNode Overview](/thornodes/overview)
{% endcontent-ref %}

{% content-ref url="/pages/FikFnYfwSpOPqmdgid4H" %}
[Economic Model](/technical-documentation/technical-deep-dive/economic-model)
{% endcontent-ref %}

### Set up Instructions

Follow these setup up instructions

{% content-ref url="/pages/KOVyvL9C028BNKA5rxlw" %}
[Cluster Launcher](/thornodes/kubernetes)
{% endcontent-ref %}

### Anonymity

Node Operators should stay anonymous and never socially signal that they are running a node.

### Tools

There are a variety of tools available in the ecosystem for Node Operators, such as the Telegram Alerts bot:

{% content-ref url="/pages/wvd06RYPS3FBZgi6b7nY" %}
[Alerting](/thornodes/alerting)
{% endcontent-ref %}

### Security

The most important aspect is that Nodes must pay for their Bond, since this is a core assumption to the security of the network. If a node pays $1m for their bond, then they will never try to steal assets unless if they can access more than $1m of funds. If they can, then they will make a profit.

If delegation was permitted, a Node Operator that paid $100k in RUNE, can possibly receive $900k in delegated funds to qualify and meet the $1m bond requirement. They will now contemplate stealing assets the moment they get access to more than $100k in capital, which is likely.

{% hint style="danger" %}
Nodes must pay for their bond to ensure the economic assumptions of the network are upheld.
{% endhint %}

### Private Delegation

THORChain makes private delegation possible, because it does not erode towards the issues discussed above.

Private Delegation requires Node Operators to know and whitelist in their bonders, and there can only be up to 100 per node. This assumes the bonders are in trust circles with their operators and have their own recourse to ensure operators act in accordance to their obligations. From the point of view of THORChain, a solo node is no different to a delegated node. The network will operate identically.

In addition, there is no discretion as to fee commissions per operator. This means bonders will prioritise on engaging with operators based purely on their trust circles, not fees.


# RUNE

An overview of the asset and its four key roles.

## What is RUNE?

THORChain's native token is called [RUNE](/technical-documentation/understanding-thorchain/rune), and it is carries a fundamental utility within each facet of THORChain's operational infrastructure, as well as the larger ecosystem. Specifically, it fills three key roles:

## Overview

RUNE is the asset which powers the THORChain ecosystem and provides the economic incentives required to secure the network. RUNE has four key roles which are described below.

1. Liquidity (as a settlement asset)
2. Security (as a sybil-resistant mechanism, and a means for driving economic behaviour)
3. Governance (signalling priority on-chain)
4. Incentives (paying out rewards, charging fees, subsidising gas)

### Governance

**RUNE as a Settlement Asset**

RUNE is the settlement asset for all liquidity pools, meaning that when a user pools their liquidity, a 1:1 ratio of RUNE:ASSET is required. This means the value of each native asset pool holds within it an equal value of RUNE. For example, a pool with $100,000 in BTC will necessarily hold $100,000 worth of RUNE.

**RUNE for Network Security**

Node Operators must always have bonded twice as many RUNE as there is RUNE pooled. This ensures the protocol will remain solvent in perpetuity. In bonding this much capital, node operators are economically incentivised to work within the [network’s best interest](/thornodes/overview#risk-of-running-a-node). Thus it through economic security that network security is achieved.

**RUNE for Governance**

By symmetrically adding liquidity to a staged pool, users vote for the pools they want to become active. The deepest pools (i.e. with the most liquidity) become active.

{% hint style="info" %}
An introduction to RUNE and its roles is [here](/technical-documentation/understanding-thorchain#what-is-rune).
{% endhint %}

## 1. Liquidity

### **Transmitting Purchasing Power**

Since RUNE is pooled 50:50 alongside external assets in its pools, when the value of those assets increase/decrease, the RUNE pooled will also increase/decrease by being arbed out or in. The RUNE unit value may not change, but the quantity of RUNE in the pool does. This means the system is always aware of the value of the assets it is trying to secure - it's simply the quantity of RUNE in all its pools.

Once it is aware of the value of the assets it is securing, it can use incentives to ensure security of those assets.

{% hint style="info" %}
*A rule of thumb is for every $1m in multi-chain assets pooled in liquidity pools, $1m of RUNE is required to be pooled along side. Due to a mechanism called the Incentive Pendulum, $2m in RUNE will be driven to be bonded. Thus, $1m in main-chain assets will cause the total value of RUNE to be $3m in an equilibrium. Thus liquidity pools have a positive effect on the monetary base of RUNE.*
{% endhint %}

### **Providing Liquidity Incentives**

Since RUNE is the pooled asset, incentives can be paid directly into each pool. This extra capital is owned by the liquidity providers, and over time, slowly "purchases" the paired asset via arbitrage. Thus RUNE liquidity incentives can drive real yield to LPs.

### **Solving O(n^2) Problem**

Without a native settlement currency, each asset would need to be pooled with every other asset, which would eventually result in hundreds of new pools to be created for just one new asset, diluting liquidity. Having RUNE as the base pair allows any asset to be guaranteed to swap between any other asset.

|                                           |                                             |                                        |
| ----------------------------------------- | ------------------------------------------- | -------------------------------------- |
| <p>No. of Assets</p><p>(eg. BTC, ETH)</p> | <p>No. of Pools</p><p>(Arbitrary Pairs)</p> | <p>No. of Pools</p><p>(RUNE Pairs)</p> |
| *n*                                       | *pools = (n\*(n-1))/2*                      | *pools = n*                            |
| 12                                        | 66                                          | 12                                     |
| 24                                        | 276                                         | 24                                     |
| 100                                       | 4950                                        | 100                                    |

## 2. Security

### **Sybil-resistance**

Sybil-resistance refers to the ability to prevent someone masquerading as many identities in order to overcome a network. Bitcoin uses Proof-of-Work (one-cpu-one-vote) to prevent a network take-over. Ethereum 2.0 will use Proof-of-Stake (32-eth-one-vote) to prevent a network take-over.

THORChain is a **Proof of Bond** network instead. THORNodes commit a bond in order to be churned in. However, this bond isn't just used to identify a node (give them a voting slot), it is used to underwrite the assets in the pools. If the node attempts to steal assets, then their bond is deducted to the amount of the assets they stole (1.5x), and the pools are made whole. Additionally, if nodes misbehave their bond is slashed, ensuring reliable service.

### **Underwriting Assets**

The Incentive Pendulum ensures that Nodes are incentivised to maintain optimal bond levels to secure the network's assets. The bond is extremely liquid since RUNE is the settlement asset in all pools. See the [Economic Model](/technical-documentation/technical-deep-dive/economic-model) for detailed mechanics and calculations.

## 3. Governance

### **LPS: Signalling Priority for Assets**

While THORChain strives to be governance-minimal, there are some parts of the protocol that use committed capital to signal priority. This is the case for the asset listing process, where every few days a new asset can be listed as a pool. In a queue of standby assets, the one with the deepest commitment of RUNE is the one that is listed first.

### **LPs: Signalling Priority for Chains**

Additionally, if a connected chain is no longer economically valuable, then all liquidity providers in that chain can leave. If a pool is empty, it will be delisted, and this will cause the network to immediately sever ties with that chain in a process call a "ragnarok".

### **One-Node-One-Vote**

THORNodes each occupy one of the 120 slots in the system can can vote on changing network parameters using a mechanism called `node-mimir`.

## 4. Incentives

### **Fees**

RUNE is the native currency of THORChain and is consumed as transaction fees on the network. All swaps are charged both a fixed network fee, as well as a dynamic slip-based fee. This prevents various attack paths such as denial-of-service attacks, as well as sandwich attacks on a pool. Learn more about fees here:

{% content-ref url="/pages/K9qI3quGrONhi97sUDWI" %}
[Technical Deep Dive](/technical-documentation/technical-deep-dive)
{% endcontent-ref %}

### **Subsidising Gas**

The network continually consumes gas as it makes outgoing transactions (as well as internal transactions). Gas on networks such as Bitcoin and Ethereum becomes complicated fast, so THORChain doesn't make much of an effort to track every minutia of gas consumed. Instead, nodes are free to use at-will the base assets `BSC.BNB`, `ETH.ETH`, `BTC.BTC`, etc in order to pay for gas. These assets are used directly from the vaults. THORChain then observes outgoing transactions, reports on the gas used, and then pays back the liquidity providers in those pools to the value of twice the amount of gas used (in RUNE).

### **Paying out Emissions**

After fees are charged and gas is subsidised, then THORChain computes the block reward, divides it based on the Incentive Pendulum algorithm, and then pays out to Bonders and Liquidity providers.

This drives Nodes to bond the optimal amount, and pays Liquidity providers for their contribution of liquidity.

Learn about the Incentive Pendulum here:

{% content-ref url="/pages/FikFnYfwSpOPqmdgid4H" %}
[Economic Model](/technical-documentation/technical-deep-dive/economic-model)
{% endcontent-ref %}

## Deterministic Value of RUNE

RUNE's price has two factors: a deterministic value based on the liquidity within the network and a speculative premium. The economic security model creates a minimum value floor for RUNE based on the assets it secures. For detailed calculations and economic mechanics, see the [Economic Model](/technical-documentation/technical-deep-dive/economic-model).

## For more information on RUNE see

* [THORChain Tokenomics Article](https://medium.com/thorchain/thorchain-tokenomics-what-is-rune-52d339633260)
* [Under the Hood: Rune Supply](https://thorchain-community.medium.com/under-the-hood-rune-supply-d30772fdfbaf)
* [Current Supply Data](https://dashboards.thorchain.org/)
* [THORChain Tokenomics Dashboard](https://flipsidecrypto.xyz/BlockTracker/thorchain-tokenomics-g7ZOP_)


# Technology Overview

An overview of the technologies that make up THORChain

There are multiple modules and protocols that makes up THORChain. The tech stack can be broken down in the following key pieces:

* [Bifrost, TSS and Vaults](/technical-documentation/technology/bifrost-tss-and-vaults): THORChain is a leaderless vault manager with several components:
  * 1-Way State Pegs: Syncs state from external chains to THORChain using the Bifröst Protocol.
  * THORChain State Machine (TSS) protocol: Coordinates asset exchange logic, delegates transactions and enables distributed threshold key-signing.
  * Bifröst Chain Client: Processes chain-specific transactions.
* [Midgard](/technical-documentation/technology/midgard): Midgard is a layer 2 REST API that provides front-end consumers with semi real-time rolled up data and analytics of the THORChain network.
* [Cosmos SDK](/technical-documentation/technology/cosmos-sdk): The Cosmos SDK is an open-source toolkit for building multi-asset public Proof-of-Stake (PoS) blockchains. There are multiple benefits from building an application-specific blockchain using the Cosmos SDK: Flexibility, Performance, Security and Sovereignty
* [CosmWasm](/technical-documentation/technology/cosmwasm): CosmWasm is a smart contracting platform built for blockchains that uses the Cosmos SDK, Simply put, it's the Cosmos (Cosm) way of using WebAssembly (Wasm) hence the name. With CosmWasm, teams can deploy smart contracts on THORChain directly

## Developer Resources

For technical implementation details including:

* Transaction memo formats and syntax
* API integration guides (THORNode, Midgard)
* Chain-specific integration requirements
* Smart contract deployment and aggregator contracts
* Affiliate fee implementation
* RPC and WebSocket endpoints
* Testing on stagenet

See the [THORChain Developer Documentation](https://dev.thorchain.org/)


# Bifrost, TSS and Vaults

An overview of THORChain's cross-chain bridge protocol, vault system, and threshold signature scheme.

## Overview

THORChain is a decentralized exchange (DEX) enabling native cross-chain swaps across different blockchains without wrapped assets or bridges. At its core, THORChain operates as a distributed vault manager using three key technologies:

1. **Bifrost Protocol** - Cross-chain bridge for observing and processing external chain transactions
2. **Vault System** - Two-layer architecture for secure asset custody
3. **Threshold Signature Scheme (TSS)** - Distributed key management for vault control

![How THORChain works](https://3337783180-files.gitbook.io/~/files/v0/b/gitbook-x-prod.appspot.com/o/spaces%2FfvaTNxU33ciP7UstKtwU%2Fuploads%2Fgit-blob-12c086da71487cd53c06519d46ecef018d7e1266%2Fimage%20\(3\)%20\(1\).png?alt=media)

## The Bifrost Protocol

Bifrost is THORChain's cross-chain bridge module that enables the protocol to interact with external blockchains. Each THORNode runs a Bifrost service that:

* Observes external blockchain transactions involving THORChain vaults
* Validates transactions through consensus (requires 67% agreement)
* Processes both instant-finality and delayed-finality chains
* Signs outbound transactions using TSS

When nodes observe an inbound transaction, they convert it into a standardized witness transaction format that THORChain can process, regardless of the source chain's architecture.

![Bifrost Protocol Architecture](https://3337783180-files.gitbook.io/~/files/v0/b/gitbook-x-prod.appspot.com/o/spaces%2FfvaTNxU33ciP7UstKtwU%2Fuploads%2Fgit-blob-a68a042b46158086bee30830741768b57e19f458%2Fimage%20\(6\).png?alt=media)

{% hint style="info" %}
For complete technical specifications including transaction structures, chain clients, and integration details, see the [Bifrost Developer Documentation](https://dev.thorchain.org/bifrost/how-bifrost-works.html).
{% endhint %}

## Vault System Architecture

THORChain uses a sophisticated two-layer vault system designed for security and scalability:

### Two-Layer Vault Design

1. Logical Vaults - Represent a bonded set of validator nodes
2. Physical Vaults - Sharded instances of logical vaults for operational efficiency

All vaults use Threshold Signature Scheme (TSS) for distributed control, requiring a supermajority of nodes to sign transactions. This eliminates single points of failure while maintaining operational efficiency.

### Vault Sharding

To support network scaling, THORChain automatically shards vaults based on the `asgardsize` parameter (default: 20 nodes per shard). With 120 active nodes, the system will operate 6 physical vault shards, each controlled by a subset of validators.

### Vault Selection

The protocol dynamically selects which vault receives inbound transactions based on the highest bond-to-asset ratio, ensuring funds are always directed to the most secure vault. This selection rotates automatically as vault compositions change.

![THORChain State Machine](https://3337783180-files.gitbook.io/~/files/v0/b/gitbook-x-prod.appspot.com/o/spaces%2FfvaTNxU33ciP7UstKtwU%2Fuploads%2Fgit-blob-dd5dc4fe320e714dd62852bbdf88b488302298e1%2Fimage%20\(7\).png?alt=media)

{% hint style="info" %}
For detailed vault behaviors, sharding logic, and security mechanisms, see the [Vault Behaviors Documentation](https://dev.thorchain.org/bifrost/vault-behaviors.html).
{% endhint %}

## Vault Lifecycle

Vaults progress through a defined lifecycle:

1. InitVault - Newly created vault, not yet active
2. Active - Processing inbound and outbound transactions
3. Retiring - Migrating funds to new vaults, no new inbound transactions
4. Inactive - Empty vault, eventually pruned from state

## Migration Process

Vault migration ensures continuous operation during validator set changes:

* Occurs automatically during churn cycles when validator sets change
* Prioritizes non-gas assets for migration efficiency
* Executes across multiple rounds to prevent congestion
* Maintains service availability throughout the process

### Security During Migration

When vaults retire, the newest vault immediately becomes active for receiving funds. The retiring vault continues to be monitored until migration completes, after which it becomes inactive.

{% hint style="danger" %}
Never send funds to a retired vault address. Once migration completes and the vault becomes inactive, any funds sent to that address are permanently lost and cannot be recovered.
{% endhint %}

## Threshold Signature Scheme (TSS)

TSS enables distributed control of vault assets without any single party having complete access:

* No Single Point of Failure - No complete private keys exist
* Threshold Security - Requires supermajority participation
* Chain Agnostic - Works across all supported blockchains
* Efficient Operations - Enables fast transaction signing

![TSS Signing Process](https://3337783180-files.gitbook.io/~/files/v0/b/gitbook-x-prod.appspot.com/o/spaces%2FfvaTNxU33ciP7UstKtwU%2Fuploads%2Fgit-blob-81076f1c6554b39afadc865520a95d80739ca669%2Fimage%20\(10\).png?alt=media)


# Midgard

What is Midgard in the THORChain tech stack

Midgard is a layer 2 REST API that provides front-end consumers with semi real-time rolled up data and analytics of the THORChain network. Most requests to the network will come through Midgard. This daemon is here to keep the chain itself from fielding large quantities of requests. You can think of it as a “read-only slave” to the chain. This keeps the resources of the network focused on processing transactions.

Midgard is heavily used in dashboards and transaction scanners like [Thorchain.net](https://thorchain.net/), [Thorchain.network](https://thorchain.network/) and [Runescan.io](https://runescan.io/). You find a full overview of the REST API endpoints on:

* <https://gateway.liquify.com/chain/thorchain_api/thorchain/doc>
* <https://gateway.liquify.com/chain/thorchain_midgard/v2/doc>

For more information see [Gitlab repo](https://gitlab.com/thorchain/midgard).

## Developer Integration

For comprehensive integration guides including:

* Complete REST API documentation
* WebSocket subscription endpoints
* Query optimization strategies
* Rate limiting and best practices
* Running your own Midgard instance

See the [THORChain Developer Documentation](https://dev.thorchain.org/)


# Cosmos SDK

How THORChain has configured the CosmWasm module

The [Cosmos SDK](https://github.com/cosmos/cosmos-sdk) is an open-source toolkit for building multi-asset public Proof-of-Stake (PoS) blockchains, like the Cosmos Hub, as well as permissioned Proof-of-Authority (PoA) blockchains. Blockchains built with the Cosmos SDK are generally referred to as application-specific blockchains, like THORChain. There are multiple benefits from building an application-specific blockchain using the Cosmos SDK:

* Flexibility
* Performance
* Security
* Sovereignty

### Flexibility

THORChain offers developers maximum flexibility:

* Programming Language Choice: Developers can use the programming language they prefer for building the state-machine, thanks to the ABCI (Application Blockchain Interface).
* Framework Selection: Various frameworks are available, such as the Cosmos SDK (in Golang) or Lotion (in JavaScript), allowing developers to choose based on their preferred language.
* Customizable Consensus Engines: Developers can swap or tweak the consensus engine to better suit their needs. Currently, CometBFT is production-ready, but more options will emerge in the future.
* Tradeoff Exploration: Developers can adjust parameters like the number of validators vs. transaction throughput, or choose different storage models like DB or IAVL tree.
* Automated Logic Execution: The Cosmos SDK enables automatic execution of code at the beginning and end of each block, providing further customization.
* Cryptographic Flexibility: Developers are free to choose their cryptographic libraries, avoiding constraints imposed by underlying environments in virtual-machine blockchains.

This flexibility allows developers to create optimized, tailored solutions for THORChain, enhancing overall performance and adaptability.

### Performance

THORChain, being an application-specific blockchain, provides several performance advantages:

* Efficient Consensus: Using a consensus engine like CometBFT BFT offers higher throughput compared to Proof-of-Work blockchains.
* Focused Resources: THORChain operates a single application, eliminating competition for computation and storage resources seen in non-sharded virtual-machine blockchains.
* Reduced Complexity: Avoiding the need for a virtual-machine to interpret transactions significantly lowers computational complexity and boosts performance.

### Security

Application-specific blockchains like THORChain enhance security in several ways:

* Proven Languages: Developers can use established programming languages like Go, which are more mature than many smart contract languages.
* Custom Cryptography: Developers can implement well-audited crypto libraries, rather than relying on the limited functions available in virtual-machines.
* Simplified Security: By eliminating the complexities of a virtual-machine, developers can more easily ensure the security of their application.

### Sovereignty

One of the major benefits of THORChain as an application-specific blockchain is sovereignty:

* Full Control: Stakeholders have complete control over the chain, ensuring that governance and application requirements are aligned.
* Responsive Upgrades: If bugs are found or new features are needed, the community can quickly act without waiting for the broader blockchain’s consensus.
* Community Alignment: The community governing THORChain is directly aligned with the application’s stakeholders, providing a streamlined and responsive governance process.

You can find more information about CosmWasm in their official [docs](https://docs.cosmos.network/).


# CosmWasm

CosmWasm smart contracts on THORChain (App Layer overview)

THORChain now supports **CosmWasm smart contracts** directly on the base chain. This is called the **App Layer** and was introduced with SDK V50 (V3.0). Contracts are written in WebAssembly (Wasm), most commonly using [Rust](https://www.rust-lang.org/).

## How it works

* CosmWasm runs inside THORNode through the `x/wasm` module.
* Contracts are **permissioned**: only approved code and deployers can be whitelisted for mainnet.
* All contracts are tested on **stagenet** before release.
* Nodes can pause contracts or the entire app layer if needed (via Mimir).

## Supported assets

* **Native RUNE and L1 assets** (BTC, ETH, ATOM, etc.) can be used.
* **Secured Assets** (e.g. `btc-btc`) are wrapped forms of L1s managed in THORChain’s state.
* **TokenFactory assets** (“X assets”) can be created by contracts.

> Trade assets (deposit slips) are not supported as contract-moved tokens.

## Security model

The App Layer is **sandboxed** from the base layer:

* Contracts have no special privileges beyond a normal THOR address.
* They can send, swap, or call other contracts, but cannot touch vault logic.
* If an app fails, the base chain remains secure.

## Why it matters

* Developers can build DeFi apps directly on THORChain (orderbooks, perps, stablecoins, lending, etc.).
* Apps can share fees with THORNodes to pay for the security they use.
* Users interact with apps natively from L1 wallets — no wrapping or bridges.

## Learn more

* [THORChain Developer Documentation](https://dev.thorchain.org/)
* [CosmWasm Documentation](https://docs.cosmwasm.com/docs/)
* [ADR-020: App Layer](https://dev.thorchain.org/architecture/adr-020-app-layer.html)


# THORChain & Cosmos

This FAQ clarifies how THORChain has implemented the Cosmos tech stack and solved some of the most common problems faced by developers building on Cosmos chains

## Multiple asset representations

With many Cosmos chains running on various bridged assets, Cosmos teams often end up with multiple representations of the same asset, e.g. Axelar bridged BTC, Nomic bridged BTC, and wBTC bridged from multiple different layer 2s. This splits liquidity and causes significant user confusion.

THORChain will only have one bridged asset for per asset. E.g. `ETH.ETH` on L1 will be represented as a bridged asset with `ETH-ETH`.

## Buggy RPC/gRPC node software

With multiple node providers validating blocks around the world, the risk of node crashes that disrupts work flow, testing and live implementations can happen. Some teams resort to spending significant amount of time adding fairly complex fallback and retry logic in our backend Cosmos library to deal with the situation, but it still occasionally causes alerts to go crazy.

THORChain alleviates this problem by having anonymous nodes that [churn in and out](https://docs.thorchain.org/thornodes/overview/node-operations) validating blocks. The constant churn process keeps node operators on their toes and keeps the network running at optimal levels.

## Derivation path/wallet address incompatibility

Most chains in the Cosmos ecosystem use the same public key hash method and derivation path, making their addresses convertible (works for Osmosis, Neutron, Juno, and Sei v1). Other chains attempt to keep Ethereum compatibility (Injective and Sei v2). The result is that addresses cannot be converted between these chains, which makes things like cross-chain incentivization difficult.

THORChain will have have addresses compatible with at least one other Cosmos chain as the "canonical chain". There is all work being done to try and link different wallet addresses together so that matching accounts can be found across many chains.

## CosmWasm contract size limit

Many CosmWasm contracts quickly move beyond the default 800kb limit for a contract. The CosmWasm team has previously discussed bumping this limit.

THORChain will push on bumping up the contract limit to 1.5mb or more.

## Differing transaction size limits across nodes

Having different settings between nodes for transaction size limits causes P2P sharing of mempool entries to sometimes get stuck. This can cause a node to be “starved” and none of the transactions broadcast to it to be picked up by the network. Levana’s workaround for this is quite involved:

* They run a backend server, the querier, which provides a transaction broadcast endpoint
* Their backend library has added support for an “all nodes broadcast,” where any broadcasts are sent to both the primary node and any fallbacks we’ve configured
* Their frontends do not rely on the standard RPC interface leveraged by cosmjs, but instead have custom code to talk to the querier

THORChain has defined [Node Operations](/technical-documentation/understanding-thorchain/roles/node-operators) that all nodes adhere to, and hence the problem of mempool entries getting stuck is solved.

## Congestion attacks/lack of MEV

Some Cosmos chains have had periods of high traffic, either due to roll-up syncs, large NFT mints, or direct attacks on the chain. Most Cosmos chains have no concept of MEV or fee markets. Osmosis has implemented a basic fee market system, but it was at least initially buggy, and only gate-keeps entrance to the memory pool. It does not prioritize transactions within the pool.

On THORChain, congestion attacks will be less impactful because of the use of chain-native oracles. More on how THORChain addresses MEV in the [FAQ](https://docs.thorchain.org/frequently-asked-questions#how-does-thorchain-prevent-mev).

## Poor wallet compatibility/frontend library support

The Cosmos ecosystem generally uses CosmosKit for wallet integration. It’s a workable library, but has historically suffered from integration bugs, and the documentation has been poor. Furthermore, slight differences in behavior of different wallets has made broad wallet support difficult to achieve.

THORChain is actively working with wallets like XDEFI/Ctrl, Keplr and Leap to alleviate compatibility issues, yet its an iterative process where there will be back and forth.

## Mishandling of multiple gas coins

Many Cosmos chains allow for multiple coins to pay for network/gas fees rather than just one. Having this option is suboptimal. As a recent example from Levana on Osmosis:

* Governance contract lives on Osmosis
* Governance token, LVN, is a native coin on Osmosis, and it can be used for gas fees
* An option in the Levana governance UI allows users to stake the entirety of their LVN holdings
* Keplr has on occasion selected LVN as the gas token to be used in such transactions, even when a user has another gas coin available
* All simulations and checks within the Levana dapp will indicate that this transaction will succeed, since selection of gas coin occurs after our app initiates the signing process
* Keplr provides no useful warning about the fact that more LVN will be used than are available in the wallet

THORChain addresses this by only allowing for [RUNE](/technical-documentation/understanding-thorchain/rune) to be used to pay network/gas fees


# THORNode Overview

Overview of THORNodes

## Overview

THORNodes service the THORChain network. Each THORNode is comprised of several independent servers in a cluster. All THORNodes communicate and operate in cooperation to create a cross-chain swapping network. Running a node is a serious undertaking. While Node Operators are well [compensated](/thornodes/overview/risks-costs-and-rewards#compensation) for running a node, there are also [risks](/thornodes/overview/risks-costs-and-rewards), [skills required](#skillsets) and [costs](/thornodes/overview/risks-costs-and-rewards#costs).

See the [Node Operator 101 Video](https://youtu.be/XXYXNAolPEU) to learn more before running a node.

{% embed url="<https://youtu.be/XXYXNAolPEU>" %}

To understand more about running a THORNode, see the below links:

{% content-ref url="/pages/aU3za5gCtrmKi5YlXZAq" %}
[Risks, Costs and Rewards](/thornodes/overview/risks-costs-and-rewards)
{% endcontent-ref %}

{% content-ref url="/pages/IRWx6jeWmJEDbnFltsuh" %}
[THORNode Stack](/thornodes/overview/thornode-stack)
{% endcontent-ref %}

{% content-ref url="/pages/L4KiOVBHdgKtPMLYDBmk" %}
[Node Operations](/thornodes/overview/node-operations)
{% endcontent-ref %}

## THORNode Dashboards

THORNode information can be viewed at the following dashboards:

1. [thorchain.network](https://thorchain.network/nodes) - Comprehensive THORNode dashboard
2. [thorchain.net](https://thorchain.net/nodes) - THORNode information and network statistics
3. [runescan.io](https://runescan.io/nodes) - THORNode information within the block explorer
4. [thorcharts.org](https://thorcharts.org/thorchain_earnings_distribution) - Earning distribution and other historical data

## Skillsets

Running a THORNode is no simple task. As an operator, you will need to run/maintain multiple linux servers with extremely high uptime. It is encouraged that only professional systems engineers run nodes to maintain the highest quality reliability and security of the network. The simple question to know if you have the skillsets to run a THORNode is:

> *Have you used pagerduty before?*

If the answer is no, it’s probably best that you do not run a node and participate in the network in other ways, such as a [RUNEPool participant](/technical-documentation/thorchain-finance/runepool)or a [bond provider.](/thornodes/pooled-thornodes) The following skill sets are required to be an effective node operator.

* Advanced knowledge of Linux server administration and security
* Advanced knowledge of Kubernetes
* Advanced experience running a host of nodes on a hosted platform such as AWS, Google Cloud, Digital Ocean, etc
* Knowledge of running full nodes for other chains such as Bitcoin and Ethereum.
* Willingness to be “on call” at all times to respond to issues when/if your node becomes unavailable

## Creating a Node

To set up a node, you have two choices:

1. Set up manually (not recommended unless you are an expert)
2. Set up via Kubernetes (recommended)

You can create a bare metal node with your own hardware or use the cluster launcher section for step by step guides using a host provider:

{% embed url="<https://medium.com/@Runetard/bare-metal-node-n00b-guide-a29c5c067b4a>" %}

{% content-ref url="/pages/KOVyvL9C028BNKA5rxlw" %}
[Cluster Launcher](/thornodes/kubernetes)
{% endcontent-ref %}

Once created, follow the [Deploying](/thornodes/deploying), [Joining](/thornodes/joining) and [Managing](/thornodes/managing) pages.

## Node Voting

THORNodes have the ability to vote on [Mimir](https://gateway.liquify.com/chain/thorchain_api/thorchain/mimir) settings. This is important when voting for [ADRs](https://dev.thorchain.org/architecture/index.html) and important network changes.

Mimir settings have specific [abilities](https://gitlab.com/thorchain/thornode/-/blob/develop/docs/mimir.md). The process for voting from a node is:

```cmd
Make mimir
=> Enter THORNode Mimir key: <key>
=> Enter THORNode Mimir value: <value>
```

1. Mimir keys and values are listed in the [Mimir endpoint](https://gateway.liquify.com/chain/thorchain_api/thorchain/mimir).
2. A node can vote at any time on any key value.
3. A node's vote is valid as long as they are active (and removed if they are not).
4. 2/3rds of active nodes need to agree for the change to happen
5. If 2/3rds consensus is not reached, Mimir admin takes priority, or a constant if present.
6. A node can change their vote anytime.
7. A node can delete their vote by using -1 value
8. Voting costs one native transaction fee, which is deducted from their bond.


# Node Operations

Running a THORNode

## Churning

As new nodes join/leave the network, this triggers a “churning event”. Which means the list of validators that can commit blocks to the chain changes, and also creates a new Asgard vault, while retiring an old one. All funds in this retiring vault are moved to the new Asgard vault.

Normally, a churning event happens roughly every 2 1/2 days (43,200 blocks or [`CHURNINTERVAL`](https://gateway.liquify.com/chain/thorchain_api/thorchain/mimir)).

Nodes that targged for the next churn in and out can be seen [here](https://thorchain.network/nodes). The next churn interval can be seen [here](https://thorchain.net/nodes).

### Churning Out

On every churn, the network selects one or more nodes to be churned out of the network (which can be typically churned back in later). In a given churning event, multiple nodes may be selected to be churned out, but never more than 1/3rd of the current validator set. The criterion the network will take into account is the following:

1. Requests to leave the network (self-removal)
2. Banned by other nodes (network-removal)
3. How long an active nodes has been committing blocks (oldest gets removed)
4. Bad behavior (accrued slash points for poor node operation)
5. Nodes that do not meet the minimum version requirement (capped by [`MAXNODETOCHURNOUTFORLOWVERSION`](https://gateway.liquify.com/chain/thorchain_api/thorchain/mimir))

#### Churning In

On every churn, the network may select one or more nodes to be churned into the network but never adds more than one to the total. Which nodes that are selected are purely by validator bond size. Larger bond nodes are selected over lower bond nodes.

## THORNode Details

### **Node Statuses**

Types of node status:

1. **Unknown** - this should never be possible for a valid node account
2. **Whitelisted** - node has been bonded, but hasn’t set their keys yet
3. **Standby** - waiting to have minimum requirements verified to become “ready” status. This check happens on each churn event (3 days on average).
4. **Ready** - node has met minimum requirements to be churned and is ready to do so. Could be selected to churn into the network. Cannot unbond while in this status.
5. **Active** - node is an active participant of the network, by securing funds and committing new blocks to the THORChain blockchain. Cannot unbond while in this status.
6. **Disabled** - node has been disabled by use of LEAVE while in standby, and cannot re-join.

A node can only unbond if they are in the Standby state and not apart of a vault migration during a chrun out. e.g. (their pub key is not a part of a singer membership).

### **Node Accounts**

When you run a THORNode, each THORNode will have its own node account. An example node account looks like this:

```json
{
  "node_address": "thor10rgvc7c44mq5vpcq07dx5fg942eykagm9p6gxh",
  "status": "Active",
  "pub_key_set": {
    "secp256k1": "thorpub1addwnpepq2gmjlu6y0whj8gtfnl3ccta66zx3u5p04wdh834e065x4z6qndzsulj5aa",
    "ed25519": "thorpub1zcjduepqxg5dfc27l3tw2xrxtw63025gaxwup723y0t7p8w2ww37vqgvyw7q348pxp"
  },
  "validator_cons_pub_key": "thorcpub1zcjduepqaxvrp5xjrmg65e3a06sdkr5z7y67xdlzyetlx40p857gxw5g4tqs2xdavr",
  "peer_id": "16Uiu2HAm5EX9mPRpLgWYg7uH7WgSdBGXvfkXNhuAinCKUh1Agnas",
  "active_block_height": 14561460,
  "status_since": 14561460,
  "node_operator_address": "thor10afkwx5heh26fjwum682neq7wkkre5md0wp8vc",
  "total_bond": "96410371093662",
  "bond_providers": {
    "node_operator_fee": "2000",
    "providers": [
      {
        "bond_address": "thor10afkwx5heh26fjwum682neq7wkkre5md0wp8vc",
        "bond": "96410371093662"
      }
    ]
  },
  "signer_membership": [...pub keys of asgard vault memembership],
  "requested_to_leave": false,
  "forced_to_leave": false,
  "leave_height": 0,
  "ip_address": "<redacted>",
  "version": "1.134.0",
  "slash_points": 659,
  "jail": {
    "release_height": 17208649,
    "reason": "failed to perform keysign"
  },
  "current_award": "15968622725",
  "observe_chains": [...block heights of last observed tx on external chains],
  "preflight_status": {
    "status": "Ready",
    "reason": "OK",
    "code": 0
  }
}
```

To get node account information, make an HTTP call to your `thornode` port which will look like the following:

```
http://<host>:1317/thorchain/nodeaccount/<node address>
http://<host>:1317/thorchain/nodeaccounts
```

Or use `https://gateway.liquify.com/chain/thorchain_api/thorchain/node/<node address>.`

Most importantly, this will tell you how many slash points the node account has accrued, their status, and the size of their bond (which is in 1e8 notation, 1 Rune == 100000000).

### Make Relay

Make Relay can be used to send messages into the `#mainnet` channel of the Dev Discord. This allows Node Operators to communicate with Discord members without having post as a Discord user, helping to protect their identiy.

Usage: `make relay "{`*`Message you want to send}`*`"`

<figure><img src="https://3337783180-files.gitbook.io/~/files/v0/b/gitbook-x-prod.appspot.com/o/spaces%2FfvaTNxU33ciP7UstKtwU%2Fuploads%2Fgit-blob-dddc74a879dd8fabff9285c98fc74e5cf1fdac16%2Fimage%20(48).png?alt=media" alt=""><figcaption><p>Example of make relay as seen in Discord</p></figcaption></figure>

### Bond Providers

Bond Providers can contribute to a Node Operator's bond. Node Operators have the option to add and remove bond providers and set a node operator' fee.

See [Bond Providers details](/thornodes/pooled-thornodes)\\


# THORNode Stack

## THORNode Stack

Each THORNode is comprised of 4 major components.

1. **`thornode`** - this is a daemon that runs the THORChain chain itself and a HTTP server, that gives a RESTful API to the chain.
2. **`bifrost`** - this daemon creates connections to remote chains (like Bitcoin, Ethereum, Binance, etc) to both observe activity on those chains (incoming/outgoing transactions), and also sign/broadcast outgoing transactions (moving funds on remote chains).
3. **`gateway`**: THORNode gateway proxy to get a single IP address for multiple deployments.
4. **Full nodes** - for every chain that is supported by the network, each THORNode operator will run their own full node of each chain (Bitcoin, Ethereum, Binance Smart Chain, Avalanche, etc).

THORNode operators may choose to run the following service:

* **`midgard`** - a layer 2 REST API that provides front-end consumers with semi real-time rolled up data and analytics of the THORChain network. Most requests to the network will come through Midgard. The Midgard API keeps the chain itself from fielding large quantities of requests, allowing THORNode to focus on validating and propagating blocks across the network. You can think of it as a “read-only slave” to the chain.

Endpoints can be accessed at [Connecting to THORChain in the developer docs](https://dev.thorchain.org/concepts/connecting-to-thorchain.html).

## THORNode Endpoints

The THORNode daemon contains three endpoints that run on port `1317` or can be access via the public URL <https://gateway.liquify.com/chain/thorchain_api/>.

* **`<tc:1317>/thorchain`**:
  * This endpoint deals specifically with THORChain's native modules and functionality. It provides access to THORChain-specific data such as liquidity pools, nodes, and network configurations. This is where you'll find THORChain-specific operations and data that aren't part of the underlying Cosmos SDK but are unique to THORChain. [`thorchain/doc/`](https://gateway.liquify.com/chain/thorchain_api/thorchain/doc/) contains Swagger documentation for the `thorchain` endpont.
* **`<tc:1317>/cosmos`**:
  * This endpoint interfaces with the [Cosmos SDK](/technical-documentation/technology/cosmos-sdk). It provides access to Cosmos SDK endpoints that THORChain inherits by being built on the Cosmos SDK. The endpoints are version specific and the CosmosSDK version THORChain uses can be found at [here](https://gitlab.com/thorchain/thornode/-/blob/develop/go.mod?ref_type=heads#L17). Tendermint informaiton can also be accessed via `cosmos/base/tendermint` - [`node_info` example](https://gateway.liquify.com/chain/thorchain_api/cosmos/base/tendermint/v1beta1/node_info).
* **`<tc:1317>/bank`**:
  * The `bank` module in Cosmos SDK handles token transfers and balances. The `<tc:1317>/bank` endpoint allows you to interact with accounts, check balances, and transfer assets. See example [here](https://gateway.liquify.com/chain/thorchain_api/bank/balances/thor1dheycdevq39qlkxs2a6wuuzyn4aqxhve4qxtxt).

## THORNode Keys

There are three key-materials on a THORNode.

1. Your operator key, which sends BOND, UNBOND, LEAVE transactions, and you can run this in any THORChain wallet, asgardex, thorswap, vultisig. You can remotely manage your node and this can UNBOND to get funds out if you brick it. If you lose this key you will lose access to your BOND.
2. All key material related to the Cosmos validator, which does not hold funds, and signs off on blocks, as well as posting in messages to the state machine. These messages are gas-free; the state machine actually will give the node address a free gas-unit. If you delete this key you will brick your THORNode, stop sending observations and accrue slashpoints. You will then get churned out 3 days later for bad performance and will probably lose 3 days of rewards. `make relay` also uses it, as it proves it owns the node pubkey when signing.
3. TSS key-material, which does not hold funds, and simply signs TSS. If you delete this key you will accrue [keySignSlashPoints](/thornodes/overview/risks-costs-and-rewards#risk-to-income) and get churned out. This key is encrypted and backed up in the chain itself every 3 days. It is encrypted with point 2, so you should backup point 2. The reason for this is something *really* bad happening on kubernetes that causes TSS key material to be 0'd out globally, which would permanently brick the vaults. this allows the network to reboot by distributing software to THORNode to extract the stored key-material on-chain and decrypt using the mnemonic for each node.

Ensure you back up your node keys so it can be recovered.

* [Backup documentation](/thornodes/managing#backing-up-a-thornode)
* [Node Validator Restore Validator Guide](https://gitlab.com/thorchain/devops/node-launcher/-/blob/master/docs/Restore-Validator-Backup.md)
* [THORNode snapshot Recovery Guide](https://gitlab.com/thorchain/devops/node-launcher/-/blob/master/docs/Thornode-Snapshot-Recovery-and-Storage-Management.md)

See the following references for more information

* [ADR 004: Keyshare Backups](https://gitlab.com/thorchain/thornode/-/blob/develop/docs/architecture/adr-004-keyshare-backups.md)
* [Implementation of Keyshare MR](https://gitlab.com/thorchain/thornode/-/merge_requests/2235/diffs#7944f2a505e9a68da5d0f0ddf05b2b49591bb61b)
* [Implementation of Backup Tools](https://gitlab.com/thorchain/thornode/-/merge_requests/3683/diffs#836efb6e25a091dcb4ff8e1dbb2f0be6a5cbf14c)

It is critical backups are created matinaned, if there are any questions, reach out in the #bare-metal-nodes channel within the Dev Discord.

### Hardforks

Every few years, THORChain conducts a hardfork. During a hardfork, THORChain's data is moved to an archive, and the chain begins running on a new chain ID. This process ensures that the blockchain continues to operate efficiently and scales with the network's growth.

* **Chain ID**: The current `chainid` can be accessed via [`https://gateway.liquify.com/chain/thorchain_rpc/status`](https://gateway.liquify.com/chain/thorchain_rpc/status) or by querying the `<tc:26657>/status` endpoint on a specific node.

**Hardfork History**:

* **ChainId = thorchain**: Blocks 0 - 4,786,559
* **ChainId = thorchain-mainnet-v1**: Blocks 4,786,560 - 17,562,000
* **ChainId = thorchain-1**: Blocks 17,562,001 - Current

To construct the full history of THORChain, data from all three of these chain IDs are required.

#### Full Nodes vs. Archive Nodes:

* **Full Nodes**: Full nodes only store the most recent blocks, including the latest block. They allow participation in the network and provide up-to-date data but do not maintain the complete historical data, this do not chain data form previous chains.
* **Archive Nodes**: Archive nodes store the entire history of the blockchain, including data from all past blocks and hardforks. These nodes are necessary for retrieving historical data and providing a comprehensive view of the blockchain's state over time.

#### Node Requirements:

* **Separate Node for Each Chain ID**: Each Chain ID requires its own node to be run. You cannot run multiple Chain IDs on a single node. To maintain or access the full history of THORChain, separate nodes must be configured for each of the historical chain IDs.

If you require the full archive node dataset, you will need to request it via THORChain's Discord community. Due to bandwidth costs and DDoS concerns, this data cannot be offered publicly.


# Risks, Costs and Rewards

The risks, costs and rewards of running a THORNode

## Risk of Running a Node

Deciding to run a node should be carefully considered and thought through. While the payoffs/rewards can be significant, there can also be an equally significant costs.

### Risks to Bond

To run a node, you must obtain a significant amount of Rune, minimums [apply](#churning-in). This RUNE is sent into the network as “bond” and held as leverage on each node to ensure they behave in the best interest of the network.

Running a malicious node or stealing from the network results in a slashing of this bond. Here are the ways in which a validator’s bond can get slashed.

* **Double Sign** (5% of minimum bond) - if it is observed that a single validator node is committing blocks on multiple chains. To avoid this, never run two nodes with the same node account at the same time.
* **Unauthorised transaction** (1.5x transaction value) - if a node sends funds without authorization, the bond is slashed 1.5x the value of the stolen funds. The slashed bond is dumped into the pool(s) where the funds were stolen and added to the reserve.
* **Loss of Node Operator Key**: The first address to bond to a new node is known as the node operator address. This is the only address that can UNBOND a Node Provider's BOND. If the private key is lost, a Node Operator may lose control of their Node and provided BOND. See [THORNode Keys](/thornodes/overview/thornode-stack#thornode-keys) for more informaiton.

Bond slashing takes directly from the bond and does not affect rewards.

### **Risk to Income**

When a node is active, it earns rewards from the network in RUNE. Sufficient rewards are required to be earned in order for a Validator to be profitable. Running an unreliable node results in rewards being slashed. Here are the ways in which a validator’s rewards can be slashed.

* **Not Observing** (2 slash pts) - if a node does not observe transactions for all chains, while other nodes do, they get slash points added.
* **Not signing a transaction** (600 slash pts) - if a node does not sign an outbound transaction, as requested by the network, they will get slash points added.
* **Fail to keygen** (1 hr of revenue) - When the network attempts to churn, and attempts to create a new Asgard pubkey for the network, and fails to do so due to a specific node(s), they will lose 1 hr of revenue from their bond.

Slash points undo profits made on the network. For every 1 slash point a node receives, they lose 1 block of rewards. Rewards slashing reduces earned rewards and does not affect a validator’s bond.

## Compensation

### Bond Rewards

Node Operators receive rewards if they are bonded and active on the network and are paid out in RUNE. While revenue is generated every block (approximately every 6 seconds) to each operator, those funds are not available immediately. Rewards can be accessed one of two ways:

* Setting a Node Operator fee in basis points, which causes rewards to be paid directly to the Node Operator address after each churn. See [here](/thornodes/joining#node-operator-fee) for details on how to set a Node Operator fee.
* If no Node Operator fee is set, 100% of rewards will be accrued back to the bond after each churn. A Node Operator must then either LEAVE or wait until the node churns out to unbond principal or rewards.

Node Operators earn rewards relative to their bond; the more they bond, the more they earn, up to the effective bond cap (the highest bond of the bottom 2/3rd active nodes). Over time, this incentive increases the median bonded amount, increasing the security of the network and allows the network to grow. [See Keeping Track of Rewards](#keeping-track) below for more details.

Rewards are affected by the [Emission Schedule](/technical-documentation/technical-deep-dive/economic-model) and the [Incentive Pendulum](/technical-documentation/technical-deep-dive/economic-model). Over time, the Emission Schedule decreases the amount of RUNE allocated to nodes. The Incentive Pendulum increases and decreases the amount of RUNE allocated to nodes according to the security and capital efficiency of the network.

#### Keeping Track

When a node joins the network the current block height is recorded. The system creates one block unit for every active node for every active block, and has a running total of the block units created. When a node leaves, it cashes in its block units for a portion of the bond rewards. The spent block units are destroyed.

For example, there are 10,000 RUNE in bond rewards outstanding. Node A has been active for 30 blocks, and has 33 block units, but accrued 3 slash points. There are 1000 block units in total. Node A leaves the network and cashes in its 30 block units (33 - 3). It receives 300 RUNE ((30/1000) \* 10000), leaving 9700 RUNE in node rewards. Its 33 block units are destroyed, leaving 967 block units left.

### Income

Income for one node can be estimated based on a few inputs:

* Number of active nodes
* Reward emission rate
* % of rewards allocated to nodes, set by the Incentive Pendulum
* Price of RUNE\*

These inputs should be plugged into the following formula:

$$
\frac{RewardAllocation \times EmissionRate}{NumberOfNodes}
$$

An example with mainnet day 1 inputs:

* 33 nodes
* 3.06 million RUNE rewards emitted per month
* 67% of rewards allocated to nodes (stable Incentive Pendulum)

$$
\frac{0.67 ∗  3060000}{33} = 62,127
$$

## Costs

Depending on how the node was set up, it will likely cost between $2,000 and $3,500 per month using a hosting provider, potentially more as the blockchain scales and more chain integrations are added.

If using a [bare metal set up](https://medium.com/@Runetard/bare-metal-node-n00b-guide-a29c5c067b4a) there will be an up front hardware cost and then electricity costs on going.

The main driver of costs is resource allocation to hosting the fullnode daemons required for each of THORNode's chain integrations.


# Cluster Launcher

Deploying a THORNode with Kubernetes

## **Deploy a Kubernetes cluster**

In order to deploy all the different services and provide a high availability environment to operate your node, Kubernetes is the preferred scheduling platform. Any production-grade Kubernetes cluster can be used to run and deploy a THORNode. You need your Kubernetes provider to offer external load balancers services type features. Azure, Digital Ocean, GCE, OpenStack are compatible with external load balancers.

{% hint style="info" %}
Terraform is a type of domain-specific language (DSL) used to describe code infrastructure. It is designed to make it easier to create/destroy infrastructure hosted locally or by a provider.
{% endhint %}

This Terraform deployment will deploy a Kubernetes cluster using your VPS provider credentials and EKS service. The cluster will have autoscaling capabilities, which means you don’t have to deal with how many nodes you need to deploy to run your THORNode services.

All the default configurations used in these instructions are for a production environment with enough resources to run your THORNode in good conditions.

{% hint style="warning" %}
**LINUX/MAC is the preferred method of setup.**

Windows should choose either:

1. Deploy a THORNode from a Linux VPS.
2. Use Windows Subsystem for Linux - <https://docs.microsoft.com/en-us/windows/wsl/about>
   {% endhint %}

## Steps

There are three important steps to getting your node set up, deployed and churned in.

1. [Setting up Cluster](/thornodes/kubernetes/setup-aws)
2. [Deploying THORNode Services](/thornodes/deploying)
3. [Joining ("Churning In")](/thornodes/joining)

### Repository Management

Your repository can be organised as follows:

```
./thornode-ops
  |./cluster-launcher
  |./node-launcher
```

All of your set up commands are run in `cluster-launcher` and all of your deploying/joining/managing/leaving commands are run from `node-launcher`

### Running Two or More Nodes

{% hint style="danger" %}
To prevent a catastrophic mistake in handling multiple nodes, set them up on different machines, or use different user profiles on your machine, or in the least, use different repos:
{% endhint %}

```
./thornode-ops
  |./cluster-launcher
  |./node-launcher
./thornode-ops2
  |./cluster-launcher
  |./node-launcher
```

All of your commands can now be run separately. See [Multi Validator Cluster](https://gitlab.com/thorchain/devops/node-launcher/-/blob/master/docs/Multi-Validator-Cluster.md?ref_type=heads) docs for more information.

{% hint style="warning" %}
It is heavily advised to not set up nodes on the same provider. Deploy 1 node on Azure, 1 node on Digital Ocean etc.
{% endhint %}


# Setup - Linode

Setting up a Kubernetes Cluster with Linode (linode)

## Deploy a Kubernetes cluster in Linode using LKE service.

### Requirements

1. a Linode account
2. `linode-cli` and linode credentials configured
3. `kubectl`

{% hint style="warning" %}
**LINUX/MAC is the preferred method of setup.**

**Windows should choose either:**

1. **Deploy a THORNode from a Linux VPS.**
2. **Use Windows Subsystem for Linux -** [**https://docs.microsoft.com/en-us/windows/wsl/about**](https://docs.microsoft.com/en-us/windows/wsl/about)\*\*\*\*
   {% endhint %}

### linode-cli

To install the linode-cli (Linode CLI), follow [these instructions](https://github.com/linode/linode-cli#installation).

You need to have pip (python) on your system.

```bash
pip install linode-cli --upgrade
```

Create a Linode API token for your account with read and write access from your [profile page](https://cloud.linode.com/profile/tokens). The token string is only displayed once, so save it in a safe place.

Use the API token to grant linode-cli access to your Linode account. Pass in the token string when prompted by linode-cli.

```bash
linode-cli
```

### kubectl

To install the kubectl (Kubernetes CLI), follow [these instructions](https://kubernetes.io/docs/tasks/tools/install-kubectl/) or choose a package manager based on your operating system.

MacOS:

Use the package manager [homebrew](https://formulae.brew.sh/) to install kubectl.

```bash
brew install kubernetes-cli
```

Windows:

Use the package manager [Chocolatey](https://chocolatey.org/) to install kubectl.

```bash
choco install kubernetes-cli
```

### wget

To install the wget, follow [these instructions](https://www.gnu.org/software/wget/) or choose a package manager based on your operating system.

MacOS:

Use the package manager [homebrew](https://formulae.brew.sh/) to install wget.

```bash
brew install wget
```

Windows:

Use the package manager [Chocolatey](https://chocolatey.org/) to install wget.

```bash
choco install wget
```

## Deploy Kubernetes Cluster

Use the commands below to deploy a Kubernetes cluster.

You can run the make command that automates those command for you like this:

```bash
make linode
```

Or manually run each commands:

```bash
cd linode/
terraform init
terraform plan # to see the plan
terraform apply
```

## Configure kubectl

Now that you've provisioned your Kubernetes cluster, you need to configure kubectl.

To configure authentication from the command line, use the following command, substituting the ID of your cluster.

```bash
# Store it - method #1
jq -r ".resources[].instances[].attributes.kubeconfig" linode/terraform.tfstate | base64 -D > ~/.kube/config-linode

# Store it - method #2
linode-cli lke kubeconfig-view <use_your_cluster_id> > ~/.kube/config-linode

# Merge it and set current context
KUBECONFIG=~/.kube/config:~/.kube/config-linode kubectl config view --flatten > ~/.kube/tmpcfg && mv -f ~/.kube/tmpcfg ~/.kube/config && kubectl config use-context $(kubectl config current-context --kubeconfig=~/.kube/config-linode)

# Or just view it - method #1
jq -r ".resources[].instances[].attributes.kubeconfig" linode/terraform.tfstate | base64 -D
# Or just view it - method #2
linode-cli lke kubeconfig-view <use_your_cluster_id>
```

> Note: If the above `linode-cli` command is broken you can download the file from the web [dashboar](https://cloud.linode.com/kubernetes/clusters) for the respective cluster.

This replaces the existing configuration at \~/.kube/config.

Once done, you can check your cluster is responding correctly by running the command:

```bash
kubectl version
kubectl get nodes
```

## Clean up your workspace

To destroy and remove previously created resources, you can run the command below.

```bash
make destroy-linode
```

Or run the commands manually:

```bash
cd linode/
terraform destroy
```


# Setup - Azure

Setting up a Kubernetes Cluster with Azure (AKS)

## **Deploy a Kubernetes cluster in Azure using AKS service.**

### **Requirements**

1. Azure account
2. `az` and Azure credentials configured
3. `kubectl`

{% hint style="warning" %}
**LINUX/MAC is the preferred method of setup.**

**Windows should choose either:**

1. **Deploy a THORNode from a Linux VPS.**
2. **Use Windows Subsystem for Linux -** [**https://docs.microsoft.com/en-us/windows/wsl/about**](https://docs.microsoft.com/en-us/windows/wsl/about)\*\*\*\*
   {% endhint %}

## **Steps**

Firstly, clone and enter the [cluster-launcher repository](https://gitlab.com/thorchain/devops/cluster-launcher)**.** All commands in this section are to be run inside this repo.

```
git clone https://gitlab.com/thorchain/devops/cluster-launcher
cd cluster-launcher
```

Then install the [terraform CLI](https://www.terraform.io):

{% tabs %}
{% tab title="LINUX/MAC" %}
Install Terraform:

```bash
brew install terraform
```

{% endtab %}
{% endtabs %}

#### **Azure CLI**

The [Azure CLI](https://docs.microsoft.com/en-us/cli/azure/) allows you to manage your Azure services.

{% tabs %}
{% tab title="LINUX/MAC" %}
Use the package manager [homebrew](https://formulae.brew.sh/) to install the Azure CLI.

```bash
brew install azure-cli
az login
```

{% endtab %}
{% endtabs %}

{% hint style="warning" %}
You will be asked for you Personal Access Token with read/write priveleges (retrieve from API Panel from the Azure web console.)

**API -> Tokens/Keys -> Create Token.**

Make sure you handle your secrets securely!
{% endhint %}

#### Kubernetes Control Tool

You must install and configure the Kubernetes CLI tool (**kubectl**). **\*\*To install** kubectl\*\* , follow [these instructions](https://kubernetes.io/docs/tasks/tools/install-kubectl/), or choose a package manager based on your operating system.

{% tabs %}
{% tab title="LINUX/MAC" %}
Use the package manager [homebrew](https://formulae.brew.sh/) to install **kubectl**.

```bash
brew install kubernetes-cli
```

{% endtab %}
{% endtabs %}

#### **wget && jq**

You also need **wget** and **jq**, follow [these instructions](https://www.gnu.org/software/wget/), or choose a package manager based on your operating system.

{% tabs %}
{% tab title="LINUX/MAC" %}
Use the package manager [homebrew](https://formulae.brew.sh/) to install **wget** and **jq** *Note: You most likely have these installed already.*

```bash
brew install wget
brew install jq
```

{% endtab %}
{% endtabs %}

## **Deploy Kubernetes Cluster**

Use the commands below to deploy an AKS cluster:

```bash
make azure
```

During the deploy, you will be asked to enter information about your cluster:

```bash
var.location
  The location where the Managed Kubernetes Cluster should be created

  Enter a value: eastus2

var.name
  The base name used for all resources

  Enter a value: tc-k8s
```

* Location -- `az account list-locations -o table`
* Name
* Confirm `yes`

{% hint style="info" %}
Deploying a cluster takes \~15 minutes
{% endhint %}

## CONFIGURE

Now that you've provisioned your AKS cluster, you need to configure **kubectl**. Customize the following command with your cluster name and resource group. It will get the access credentials for your cluster and automatically configure kubectl.

```bash
az aks get-credentials -a -g <resource_group> -n <cluster_name>
```

This replaces the existing configuration at \~/.kube/config.

Once done, you can check if your cluster is responding correctly by running the following commands.

```bash
kubectl version
kubectl get nodes
```

You are now ready to deploy a THORNode.


# Setup - Hetzner Bare Metal

Setting up a Kubernetes Cluster with Hetzner Dedicated Servers

{% hint style="danger" %}
This guide for Hetzner Bare Metal is WIP and not currently recommended. Proceed with caution until an update is released and this warning removed.
{% endhint %}

> Checkout the repository [source](https://github.com/delphidigital/bare-metal-cluster-manager) to manage a cluster of dedicated servers on Hetzner.

The scripts in this repository will setup and maintain one or more [kubernetes](https://kubernetes.io) clusters consisting of dedicated [Hetzner](https://www.hetzner.com) servers. Each cluster will also be provisioned to operate as a node in the [THORCHain](https://thorchain.org) network.

Executing the scripts in combination with some manual procedures will get you highly available, secure clusters with the following features on bare metal.

* [Kubespray](https://kubespray.io/) (based)
* Internal NVMe storage ([Ceph](https://ceph.io)/[Rook](https://rook.io))
* Virtual LAN (also over multiple locations) ([Calico](https://www.projectcalico.org))
* Load Balancing ([MetalLB](https://metallb.universe.tf))

## Preparations

### Servers

Acquire a couple of [servers](https://www.hetzner.com/dedicated-rootserver/matrix-ax) as the basis for a cluster (`AX41-NVME`'s are working well for instance). Visit the [admin panel](https://robot.your-server.de/server) and name the servers appropriately.

```
tc-k8s-node1
tc-k8s-node2
tc-k8s-node3
...

tc-k8s-master1
tc-k8s-master2
tc-k8s-worker1
tc-k8s-worker2
tc-k8s-worker3
...
```

Refer to the [reset procedure](#resetting-the-bare-metal-servers) to properly initialize them.

### vSwitch

Create a [vSwitch](https://robot.your-server.de/vswitch/index) and order an appropriate subnet (it may take a while to show up after the order). Give the vSwitch a name (i.e. `tc-k8s-net`) and assign this vSwitch to the servers.

Checkout the [docs](https://docs.hetzner.com/robot/dedicated-server/network/vswitch) for help.

## Usage

Clone this repository, `cd` into it and download kubespray.

```bash
git submodule init && git submodule update
```

Create a Python virtual environment or similar.

```bash
# Optional
virtualenv -p python3 venv
```

Install dependencies required by Python and Ansible Glaxy.

```bash
pip install -r requirements.python.txt
ansible-galaxy install -r requirements.ansible.yml
```

> Note: [Mitogen](https://mitogen.readthedocs.io/en/python3/ansible.html) does not work with ansible collections and the strategy must be changed (i.e. `strategy: linear`).

### Provisioning

Create a deployment environment inventory file for each cluster you want to manage.

```bash
cp hosts.example inventory/production.yml
cp hosts.example inventory/test.yml
cp hosts.example inventory/environment.yml
...

cp hosts.example inventory/production-01.yml
cp hosts.example inventory/production-02.yml
...

cp hosts.example inventory/production-helsinki.yml
cp hosts.example inventory/whatever.yml
```

Edit the inventory file with your server ip's and network information and customize everything to your needs.

```bash
# Manage a cluster
ansible-playbook cluster.init.yml -i inventory/environment.yml
ansible-playbook --become --become-user=root kubespray/cluster.yml -i inventory/environment.yml
ansible-playbook cluster.finish.yml -i inventory/environment.yml

# Run custom playbooks
ansible-playbook private-cluster.yml -i inventory/environment.yml
ansible-playbook private-test-cluster.yml -i inventory/environment.yml
ansible-playbook private-whatever-cluster.yml -i inventory/environment.yml
```

> Check [this](https://kubespray.io/) out for more playbooks on cluster management.

### THORChain

In order for the cluster to operate as a node in the THORCHain network deploy as instructed [here](https://docs.thorchain.org/thornodes/kubernetes/deploying). You can also refer to the [node-launcher repository](https://gitlab.com/thorchain/devops/node-launcher), if necessary, or the THORChain [documentation](https://docs.thorchain.org) as a whole.

## Resetting the bare metal servers

This will install and use Ubuntu 20.04 on only one of the two internal NVMe drives. The unused ones will be used for persistent storage with ceph/rook. You can check the internal drive setup with `lsblk`. Change it accordingly in the command shown above when necessary.

### Manually

Visit the [console](https://robot.your-server.de/server) and put each server of the cluster into rescue mode. Then execute the following script.

```bash
installimage -a -r no -i images/Ubuntu-2004-focal-64-minimal.tar.gz -p /:ext4:all -d nvme0n1 -f yes -t yes -n hostname
```

### Automatically

Create a pristine state by running the playbooks in sequence.

```bash
ansible-playbook server.rescue.yml -i inventory/environment.yml
ansible-playbook server.bootstrap.yml -i inventory/environment.yml
```

### Instantiation

Instantiate the servers.

```bash
ansible-playbook server.instantiate.yml -i inventory/environment.yml
```


# Setup - Google Cloud

Setting up a Kubernetes Cluster with GCP (GKE)

## **Deploy a Kubernetes cluster in GCP using GKE service.**

### **Requirements**

1. GCP account
2. `gcloud` and GCP credentials configured
3. `kubectl`

{% hint style="warning" %}
**LINUX/MAC is the preferred method of setup.**

**Windows should choose either:**

1. **Deploy a THORNode from a Linux VPS.**
2. **Use Windows Subsystem for Linux -** [**https://docs.microsoft.com/en-us/windows/wsl/about**](https://docs.microsoft.com/en-us/windows/wsl/about)\*\*\*\*
   {% endhint %}

## **Steps**

Firstly, clone and enter the [cluster-launcher repository](https://gitlab.com/thorchain/devops/cluster-launcher)**.** All commands in this section are to be run inside this repo.

```
git clone https://gitlab.com/thorchain/devops/cluster-launcher
cd cluster-launcher
```

Then install the [terraform CLI](https://www.terraform.io):

{% tabs %}
{% tab title="LINUX/MAC" %}
Install Terraform:

```bash
brew install terraform
```

{% endtab %}
{% endtabs %}

#### **gcloud CLI**

The [gcloud CLI](https://cloud.google.com/sdk/docs/install) allows you to manage your GCP services.

{% tabs %}
{% tab title="LINUX/MAC" %}
Use the package manager [homebrew](https://formulae.brew.sh/) to install the GCP CLI.

```bash
brew install google-cloud-sdk
```

{% endtab %}
{% endtabs %}

After the installation perform the steps outlined below. This will authorize the SDK to access GCP using your user account credentials and add the SDK to your PATH. It requires you to login and select the project you want to work in. Then add your account to the Application Default Credentials (ADC). This will allow Terraform to access these credentials to provision resources on GCP. Finally, you need to enable the Compute Engine and Kubernetes Engine API services for your GCP project.

```bash
gcloud init
gcloud auth application-default login
gcloud services enable compute.googleapis.com
gcloud services enable container.googleapis.com
```

{% hint style="warning" %}
You will be asked for you Personal Access Token with read/write priveleges (retrieve from API Panel from the GCP web console.)

**API -> Tokens/Keys -> Create Token.**

Make sure you handle your secrets securely!
{% endhint %}

#### Kubernetes Control Tool

You must install and configure the Kubernetes CLI tool (**kubectl**). **\*\*To install** kubectl\*\* , follow [these instructions](https://kubernetes.io/docs/tasks/tools/install-kubectl/), or choose a package manager based on your operating system.

{% tabs %}
{% tab title="LINUX/MAC" %}
Use the package manager [homebrew](https://formulae.brew.sh/) to install **kubectl**.

```bash
brew install kubernetes-cli
```

{% endtab %}
{% endtabs %}

#### **wget && jq**

You also need **wget** and **jq**, follow [these instructions](https://www.gnu.org/software/wget/), or choose a package manager based on your operating system.

{% tabs %}
{% tab title="LINUX/MAC" %}
Use the package manager [homebrew](https://formulae.brew.sh/) to install **wget** and **jq** *Note: You most likely have these installed already.*

```bash
brew install wget
brew install jq
```

{% endtab %}
{% endtabs %}

## **Deploy Kubernetes Cluster**

Use the commands below to deploy an GKE cluster:

```bash
make gcp
```

During the deploy, you will be asked to enter information about your cluster:

```bash
var.project_id
  Project ID

  Enter a value: tc-k8s-123456

var.zone
  GCP zone in region

  Enter a value: us-east1-d
```

* Project ID
* Zone -- `gcloud compute zones list`
* Confirm `yes`

{% hint style="info" %}
Deploying a cluster takes \~15 minutes
{% endhint %}

## CONFIGURE

Now that you've provisioned your GKE cluster, you need to configure **kubectl**. The following command will get the access credentials for your cluster and automatically configure kubectl.

```bash
(cd gcp && gcloud container clusters get-credentials $(terraform output cluster_name) --zone $(terraform output zone))
```

This replaces the existing configuration at \~/.kube/config.

Once done, you can check if your cluster is responding correctly by running the following commands.

```bash
kubectl version
kubectl get nodes
```

You are now ready to deploy a THORNode.


# Setup - HCloud

Setting up a Kubernetes Cluster with Hetzner Cloud (hcloud)

## **Deploy an umnanaged Kubernetes cluster in hcloud**

{% hint style="warning" %}
This approach is only recommended for experienced operators because the kubernetes control plane among other things needs to be managed manually.
{% endhint %}

### **Requirements**

1. hcloud account
2. `hcloud` and hcloud credentials configured
3. `kubectl`
4. `ansible`

{% hint style="warning" %}
**LINUX/MAC is the preferred method of setup.**

**Windows should choose either:**

1. **Deploy a THORNode from a Linux VPS.**
2. **Use Windows Subsystem for Linux -** [**https://docs.microsoft.com/en-us/windows/wsl/about**](https://docs.microsoft.com/en-us/windows/wsl/about)\*\*\*\*
   {% endhint %}

## **Steps**

Firstly, clone and enter the [cluster-launcher repository](https://gitlab.com/thorchain/devops/cluster-launcher)**.** All commands in this section are to be run inside this repo.

```
git clone https://gitlab.com/thorchain/devops/cluster-launcher
cd cluster-launcher
```

Then install the [terraform CLI](https://www.terraform.io):

{% tabs %}
{% tab title="LINUX/MAC" %}
Install Terraform:

```bash
brew install terraform
```

{% endtab %}
{% endtabs %}

#### **hcloud CLI**

The [hcloud CLI](https://github.com/hetznercloud/cli#installation) allows you to manage your hcloud services.

{% tabs %}
{% tab title="LINUX/MAC" %}
Use the package manager [homebrew](https://formulae.brew.sh/) to install the hcloud CLI.

```bash
brew install hcloud
hcloud context create <project_name>
```

{% endtab %}
{% endtabs %}

{% hint style="warning" %}
You will be asked for you Personal Access Token with read/write priveleges (retrieve from API Panel from the hcloud web console.)

**API -> Tokens/Keys -> Create Token.**

Make sure you handle your secrets securely!
{% endhint %}

#### Kubernetes Control Tool

You must install and configure the Kubernetes CLI tool (**kubectl**). **\*\*To install** kubectl\*\* , follow [these instructions](https://kubernetes.io/docs/tasks/tools/install-kubectl/), or choose a package manager based on your operating system.

{% tabs %}
{% tab title="LINUX/MAC" %}
Use the package manager [homebrew](https://formulae.brew.sh/) to install **kubectl**.

```bash
brew install kubernetes-cli
```

{% endtab %}
{% endtabs %}

#### **wget && jq**

You also need **wget** and **jq**, follow [these instructions](https://www.gnu.org/software/wget/), or choose a package manager based on your operating system.

{% tabs %}
{% tab title="LINUX/MAC" %}
Use the package manager [homebrew](https://formulae.brew.sh/) to install **wget** and **jq** *Note: You most likely have these installed already.*

```bash
brew install wget
brew install jq
```

{% endtab %}
{% endtabs %}

## **Environment**

Initialize the git submodule.

```bash
git submodule update --init
```

Use `direnv`, `venv` or whatever you prefer to manage a python environment inside the hcloud folder.

```bash
# Optional
(cd hcloud && direnv allow)

# Optional
(cd hcloud && virtualenv -p python3 venv)
```

Install dependencies required by Python and Ansible Galaxy.

```bash
(cd hcloud && pip install -r ansible/requirements.txt)
(cd hcloud && ansible-galaxy install -r ansible/requirements.yml)
```

## **Deploy Kubernetes Cluster**

Use the commands below to deploy an hcloud cluster:

```bash
make hcloud
```

During the deploy, you will be asked to enter information about your cluster:

```bash
var.name
  The base name used for all resources

  Enter a value: tc-k8s

var.token
  Hetzner Cloud API token

  Enter a value: <secret>

var.user_name
  The admin user name for the nodes

  Enter a value: admin
```

* Name
* Token
* Confirm `yes`

{% hint style="info" %}
Deploying a cluster takes \~15 minutes
{% endhint %}

### Quotas

If necessary, request a quota increase [here](https://console.hetzner.cloud/limits).

## CONFIGURE

Now that you've provisioned your hcloud cluster, you need to configure **kubectl**. Customize the following command with your cluster name and resource group. It will get the access credentials for your cluster and automatically configure kubectl.

```bash
(cd hcloud && scp $(terraform output -raw hcloud_config) ~/.kube/config-hcloud)

# Merge it and set current context
KUBECONFIG=~/.kube/config:~/.kube/config-hcloud kubectl config view --flatten > ~/.kube/tmpcfg && mv -f ~/.kube/tmpcfg ~/.kube/config && kubectl config use-context $(kubectl config current-context --kubeconfig=$HOME/.kube/config-hcloud)

kubectl version
```

You are now ready to deploy a THORNode.


# Setup - Digital Ocean

Setting up a Kubernetes Cluster with Digital Ocean (DO)

## **Deploy a Kubernetes cluster in DO using DOKS service.**

### **Requirements**

1. DO account
2. `doctl` and DO credentials configured
3. `kubectl`
4. `homebrew`

{% hint style="warning" %}
**LINUX/MAC is the preferred method of setup.**

**Windows should choose either:**

1. **Deploy a THORNode from a Linux VPS.**
2. **Use Windows Subsystem for Linux -** [**https://docs.microsoft.com/en-us/windows/wsl/about**](https://docs.microsoft.com/en-us/windows/wsl/about)
   {% endhint %}

## **Steps**

Firstly, clone and enter the [cluster-launcher repository](https://gitlab.com/thorchain/devops/cluster-launcher)**.** All commands in this section are to be run inside this repo.

```
git clone https://gitlab.com/thorchain/devops/cluster-launcher
cd cluster-launcher
```

Then install the [terraform CLI](https://www.terraform.io):

{% tabs %}
{% tab title="LINUX/MAC" %}
Install Terraform:

```
brew install terraform
```

{% endtab %}
{% endtabs %}

#### **DOCTL**

The [Digital Ocean Control tool](https://www.digitalocean.com/docs/apis-clis/doctl/how-to/install/) allows you to manage your DO services.

{% tabs %}
{% tab title="LINUX/MAC" %}
Use the package manager [homebrew](https://formulae.brew.sh/) to install the `doctl`.

```
brew install doctl
doctl auth init --context <NAME>
doctl auth switch --context <NAME>
doctl account get
```

{% endtab %}
{% endtabs %}

{% hint style="warning" %}
You will be asked for a Personal Access Token with read/write priveleges (retrieve from the API Panel in the Digital Ocean web console.)

**API -> Tokens/Keys -> Create Token.**

Make sure you handle your secrets securely! You will need this token twice more for setup and if you navigate away from the API web console it will not be displayed again.
{% endhint %}

#### Kubernetes Control Tool

You must install and configure the Kubernetes CLI tool (`kubectl`). **To install kubectl** , follow [these instructions](https://kubernetes.io/docs/tasks/tools/install-kubectl/), or choose a package manager based on your operating system.

{% tabs %}
{% tab title="LINUX/MAC" %}
Use the package manager [homebrew](https://formulae.brew.sh/) to install **kubectl**.

```
brew install kubernetes-cli
```

{% endtab %}
{% endtabs %}

{% hint style="warning" %}
**DO Droplet Limit**

You will need to increase your Droplet Limit if you get an error like this:

```
Error: Error creating Kubernetes cluster: POST https://api.digitalocean.com/v2/kubernetes/clusters: 422 (request "8b639077-b8d3-4913-b3ec-8e70283dea49") validation error: worker_node_pool_specs[0].invalid droplet size
```

On the Digital Ocean web console (Settings > Team > Droplet Limit) you will be able to request the `Droplet Limit` be increased. 10 Droplets is the default limit, request 25 to begin with.
{% endhint %}

{% hint style="info" %}
**Check the versions of `kubectl` that are supported by DO**

```
doctl kubernetes options versions
```

Make sure that you have installed a version of `kubectl` that is supported by DO.
{% endhint %}

#### **wget && jq**

You also need **wget** and **jq**, follow [these instructions](https://www.gnu.org/software/wget/), or choose a package manager based on your operating system.

{% tabs %}
{% tab title="LINUX/MAC" %}
Use the package manager [homebrew](https://formulae.brew.sh/) to install **wget** and **jq** *Note: You most likely have these installed already.*

```
brew install wget
brew install jq
```

{% endtab %}
{% endtabs %}

## **Deploy Kubernetes Cluster**

Use the commands below to deploy a DOKS cluster:

```
make do
```

During the deploy, you will be asked to enter information about your cluster:

![](https://3337783180-files.gitbook.io/~/files/v0/b/gitbook-x-prod.appspot.com/o/spaces%2FfvaTNxU33ciP7UstKtwU%2Fuploads%2Fgit-blob-60c8851fb327b6f2f773abae0f6c81fa7964f368%2Fimage%20\(20\)%20\(1\).png?alt=media)

* Name
* DO Region -- see valid [List of Regions](https://www.digitalocean.com/docs/platform/availability-matrix/#other-product-availability) (**use lower-case**)
* Confirm `yes`

![Kubernetes Availability (note, use lower-case in the terminal)](https://3337783180-files.gitbook.io/~/files/v0/b/gitbook-x-prod.appspot.com/o/spaces%2FfvaTNxU33ciP7UstKtwU%2Fuploads%2Fgit-blob-0b9ac8cad4af0d56c43244abe9228cd79ff62030%2Fimage%20\(26\).png?alt=media)

Final success message: `Apply complete! Resources: 2 added, 0 changed, 0 destroyed.`

{% hint style="info" %}
Deploying a cluster takes \~10 minutes
{% endhint %}

## CONFIGURE

Now that you've provisioned your DOKS cluster, you need to configure **kubectl**. Customize the following command with your cluster name and region.

```
doctl kubernetes cluster kubeconfig save <use_your_cluster_name>
kubectl version
```

If successful, you will see:

```
Notice: Adding cluster credentials to kubeconfig file found in "/home/user/.kube/config"
Notice: Setting current-context to do-<region_name>-<cluster_name>
```

Test this configuration,

```
$ kubectl version
Client Version: version.Info{Major:"1", Minor:"18", GitVersion:"v1.18.6", GitCommit:"dff82dc0de47299ab66c83c626e08b245ab19037", GitTreeState:"clean", BuildDate:"2020-07-16T06:30:04Z", GoVersion:"go1.14.5", Compiler:"gc", Platform:"linux/amd64"}
Server Version: version.Info{Major:"1", Minor:"18", GitVersion:"v1.18.6", GitCommit:"dff82dc0de47299ab66c83c626e08b245ab19037", GitTreeState:"clean", BuildDate:"2020-07-15T16:51:04Z", GoVersion:"go1.13.9", Compiler:"gc", Platform:"linux/amd64"}
```

To verify, run this, and check the status is "Ready":

```
kubectl get nodes

NAME                          STATUS   ROLES    AGE     VERSION
<cluster_name>-pool-5xhc1     READY    <none>   6m      v1.18.6
```

You are now ready to deploy a THORNode.


# Setup - AWS

Setting up a Kubernetes Cluster with AWS

## **Deploy a Kubernetes cluster in AWS using EKS service.**

### **Requirements**

1. AWS account
2. CLI and AWS credentials configured
3. AWS IAM Authenticator
4. `kubectl`
5. `wget` (required for EKS module)

{% hint style="warning" %}
**LINUX/MAC is the preferred method of setup.**

**Windows should choose either:**

1. **Deploy a THORNode from a Linux VPS.**
2. **Use Windows Subsystem for Linux -** [**https://docs.microsoft.com/en-us/windows/wsl/about**](https://docs.microsoft.com/en-us/windows/wsl/about)\*\*\*\*
   {% endhint %}

## **Steps**

Firstly, clone and enter the [cluster-launcher repository](https://gitlab.com/thorchain/devops/cluster-launcher)**.** All commands in this section are to be run inside this repo.

```
git clone https://gitlab.com/thorchain/devops/cluster-launcher
cd cluster-launcher
```

Then install the [terraform CLI](https://www.terraform.io):

{% tabs %}
{% tab title="LINUX/MAC" %}
Install Terraform:

```
brew install terraform
```

{% endtab %}
{% endtabs %}

#### **AWS CLI**

In order for Terraform to run operations on your behalf, you must install and configure the AWS CLI tool. \*\*\*\*To install the AWS CLI, follow [these instructions](https://docs.aws.amazon.com/cli/latest/userguide/install-cliv2-mac.html), or choose a package manager based on your operating system.

{% tabs %}
{% tab title="LINUX/MAC" %}
Use the package manager [homebrew](https://formulae.brew.sh/) to install the AWS CLI.

```
brew install awscli
aws configure
```

{% endtab %}
{% endtabs %}

{% hint style="warning" %}
You will be asked for you AWS access credentials (retrieve from AWS IAM from the AWS web console.)

**IAM -> User -> Security Credentials -> Create Access Key.**

Make sure you handle your secrets securely!
{% endhint %}

#### **AWS IAM Authenticator**

You also must install and configure the **AWS IAM Authenticator** tool. \*\*\*\*To install, follow [these instructions](https://docs.aws.amazon.com/eks/latest/userguide/install-aws-iam-authenticator.html), or choose a package manager based on your operating system.

{% tabs %}
{% tab title="LINUX/MAC" %}
Use the package manager [homebrew](https://formulae.brew.sh/) to install the **AWS IAM Authenticator**.

```bash
brew install aws-iam-authenticator
```

{% endtab %}
{% endtabs %}

#### Kubernetes Control Tool

You must install and configure the Kubernetes CLI tool (**kubectl**). \*\*\*\*To install **kubectl** , follow [these instructions](https://kubernetes.io/docs/tasks/tools/install-kubectl/), or choose a package manager based on your operating system.

{% tabs %}
{% tab title="LINUX/MAC" %}
Use the package manager [homebrew](https://formulae.brew.sh/) to install **kubectl**.

```
brew install kubernetes-cli
```

{% endtab %}
{% endtabs %}

#### **wget && jq**

You also need **wget** and **jq**, follow [these instructions](https://www.gnu.org/software/wget/), or choose a package manager based on your operating system.

{% tabs %}
{% tab title="LINUX/MAC" %}
Use the package manager [homebrew](https://formulae.brew.sh/) to install **wget** and **jq**\
\&#xNAN;*Note: You most likely have these installed already.*

```
brew install wget 
brew install jq
```

{% endtab %}
{% endtabs %}

## **Deploy Kubernetes Cluster**

Use the commands below to deploy an AWS EKS cluster. You can run the make command that automates those command for you like this:

```
make aws
```

During the deploy, you will be asked to enter information about your cluster:

![](https://3337783180-files.gitbook.io/~/files/v0/b/gitbook-x-prod.appspot.com/o/spaces%2FfvaTNxU33ciP7UstKtwU%2Fuploads%2Fgit-blob-60c8851fb327b6f2f773abae0f6c81fa7964f368%2Fimage%20\(20\)%20\(1\).png?alt=media)

* Name
* AWS Region -- see valid [List of Regions](https://docs.aws.amazon.com/general/latest/gr/rande.html#regional-endpoints)
* Confirm `yes`

![Regions](https://3337783180-files.gitbook.io/~/files/v0/b/gitbook-x-prod.appspot.com/o/spaces%2FfvaTNxU33ciP7UstKtwU%2Fuploads%2Fgit-blob-52ead67f0a5e7b4cea0f321dd3fe0f06ef9c3d91%2Fimage%20\(25\).png?alt=media)

![Note: AWS EKS is not available in some regions](https://3337783180-files.gitbook.io/~/files/v0/b/gitbook-x-prod.appspot.com/o/spaces%2FfvaTNxU33ciP7UstKtwU%2Fuploads%2Fgit-blob-b1c1413147a5e9b714a6269c7ab8bd898ea442f7%2Fimage%20\(21\).png?alt=media)

Or manually:

```
cd aws/
terraform init
terraform plan # to see the plan
terraform apply
```

Final success message: `Apply complete! Resources: 30 added, 0 changed, 0 destroyed.`

{% hint style="info" %}
If you are a **returning** node operator and you wish to use the same node name, the Cloudwatch log files from your previous session will block this step. You need to manually delete the logs from your console:

**Cloudwatch / Cloudwatch Logs / Log Groups -> "delete"**
{% endhint %}

{% hint style="info" %}
Deploying a cluster takes \~10 minutes
{% endhint %}

## CONFIGURE kubectl

This is done automatically during provisioning. To configure authentication from the command line, use the following command. It will get the access credentials for your cluster and automatically configure kubectl in case you need to manually reconfigure kubectl.

```
make kubeconfig-aws
```

Or get your kubeconfig file manually:

```
(cd aws && aws eks --region $(terraform output -raw region) update-kubeconfig --name $(terraform output -raw cluster_name))
```

To verify, run this, and check the status is "Ready":

```
kubectl version
kubectl cluster-info
kubectl get nodes
```

You are now ready to deploy a THORNode.

### BACKUPS (OPTIONAL)

Once your node is running, use the following command to automatically backup the Persistent Volumes for your Kubernetes cluster. This may help in recovering your node in the event of a disaster.

Enable backups:

```
make aws-backups
```

Disable backups:

```
make aws-destroy-backups
```


# Deploying

Deploying a THORNode and its associated services.

## **Deploy THORNode services**

Now you have a Kubernetes cluster ready to use, you can install the THORNode services.

{% hint style="info" %}
Helm charts are the defacto and currently easiest and simple way to package and deploy Kubernetes application. The team created different Helm charts to help to deploy all the necessary services. Please retrieve the source files from the Git repository here to follow the instructions below:

[**https://gitlab.com/thorchain/devops/node-launcher**](https://gitlab.com/thorchain/devops/node-launcher)
{% endhint %}

### Requirements

* Running Kubernetes cluster
* Kubectl configured, ready and connected to running cluster

{% hint style="info" %}
If you came here from the Setup page, you are already good to go.
{% endhint %}

## Steps

Clone the `node-launcher` repo. All commands in this section are to be run inside of this repo.

```bash
git clone https://gitlab.com/thorchain/devops/node-launcher
cd node-launcher
git checkout master
```

### Install Helm 3

Install Helm 3 if not already available on your current machine:

```bash
make helm
make helm-plugins
```

### Tools

{% tabs %}
{% tab title="Deploy" %}
To deploy all tools, metrics, logs management, Kubernetes Dashboard, run the command below.

```bash
make tools
```

{% endtab %}

{% tab title="Destroy" %}
To destroy all those resources run the command below.

```bash
make destroy-tools
```

{% endtab %}
{% endtabs %}

You need to give the deployment a namespace name, `thorchain` is used in the example below.

If you are successful, you will see the following message:

![](https://3337783180-files.gitbook.io/~/files/v0/b/gitbook-x-prod.appspot.com/o/spaces%2FfvaTNxU33ciP7UstKtwU%2Fuploads%2Fgit-blob-9aa73b99c5e22b401e43dec7120b368f4eff2d05%2Fimage%20\(14\).png?alt=media)

If there are any errors, they are typically fixed by running the command again.

{% hint style="success" %}
`make help` will list all commands available. See [here](https://gitlab.com/thorchain/devops/node-launcher/-/blob/master/README.md) for more information.
{% endhint %}

## Deploy THORNode

It is important to deploy the tools first before deploying the THORNode services as some services will have metrics configuration that would fail and stop the THORNode deployment.

{% hint style="info" %}
Testnet no longer exists, only mainnet THORNodes can be created.
{% endhint %}

You have multiple commands available to deploy different configurations of THORNode. The commands deploy the umbrella chart `thornode-stack` in the background in the Kubernetes namespace `thornode` by default.

```bash
NET=mainnet TYPE=<type> NAME=<namepsace name> make install e.g.
NET=mainnet TYPE=validator NAME=thornode make install
```

{% hint style="info" %}
If you are intending to run all chain clients, bond in & earn rewards, you want to choose "Validator". Select FullNode if you only want to run THORNode and Midgard.
{% endhint %}

{% hint style="info" %}
Deploying a THORNode will take 1 day for every 3 months of ledger history, since it will validate every block. THORNodes are "full nodes", not light clients.
{% endhint %}

If successful, you will see the following:

![](https://3337783180-files.gitbook.io/~/files/v0/b/gitbook-x-prod.appspot.com/o/spaces%2FfvaTNxU33ciP7UstKtwU%2Fuploads%2Fgit-blob-9479f675e0ca32bcb4c0cbe6a89bcd3f68c46db2%2Fimage%20\(15\).png?alt=media)

You are now ready to join the network:

{% content-ref url="/pages/cPfGgXpXBkXVvwyZMbhT" %}
[Joining](/thornodes/joining)
{% endcontent-ref %}

### Debugging

{% hint style="info" %}
Set `thornode` to be your default namespace so you don't need to type `-n thornode` each time:

`kubectl config set-context --current --namespace=thornode`
{% endhint %}

Use the following useful commands to view and debug accordingly. You should see everything running and active. Logs can be retrieved to find errors:

```bash
kubectl get pods -n thornode
kubectl get pods --all-namespaces
kubectl logs -f <pod> -n thornode
```

Kubernetes should automatically restart any service, but you can force a restart by running:

```bash
kubectl delete pod <pod> -n thornode
```

{% hint style="warning" %}
Note, to expedite syncing external chains, it is feasible to continually delete the pod that has the slow-syncing chain daemon (eg, binance-daemon-xxx).

Killing it will automatically restart it with free resources and syncing is notably faster. You can check sync status by viewing logs for the client to find the synced chain tip and comparing it with the real-world blockheight, ("xxx" is your unique ID):

```bash
kubectl logs -f deploy/binance-daemon -n thornode
```

{% endhint %}

{% hint style="info" %}
Get real-world blockheights of external blockchain at <https://gateway.liquify.com/chain/thorchain_api/thorchain/lastblock> or a block explorer like mempool.space.
{% endhint %}

## CHART SUMMARY

### THORNode full stack / chart

* **thornode**: Umbrella chart packaging all services needed to run a fullnode or validator THORNode.

This should be the only chart used to run [THORNode stack ](/thornodes/overview#thornode-stack)unless you know what you are doing and want to run each chart separately (not recommended).

#### THORNode services:

* **thornode**: THORNode daemon
* **gateway**: THORNode gateway proxy to get a single IP address for multiple deployments
* **bifrost**: Bifrost service
* **midgard**: Midgard API service

### Tools

* **prometheus**: Prometheus stack for metrics
* **loki**: Loki stack for logs
* **kubernetes-dashboard**: Kubernetes dashboard


# Joining

How to join THORChain as an Node.

## **Joining THORChain**

Now that you have a THORNode deployed in your Kubernetes cluster, you need to start operating your node to join the network.

{% hint style="danger" %}
Do not import your node menonic in a wallet. Nodes will have their own address.
{% endhint %}

There are a couple of steps to follow.

### 1. Check your current node status

The first step would be to make sure your deployment was successful and your node is running correctly. \_\*\*\_To check the current status of your node, you can run the command status from the `node-launcher`repository on your terminal:

```bash
make status
```

You will get an output along those lines, the example below is for a mainnet node:

```bash
 ________ ______  ___  _  __        __
/_  __/ // / __ \/ _ \/ |/ /__  ___/ /__
 / / / _  / /_/ / , _/    / _ \/ _  / -_)
/_/ /_//_/\____/_/|_/_/|_/\___/\_,_/\__/
ADDRESS     thor13hh6qyj0xgw0gv7qpay8thfucxw8hqkved9vr2
IP
VERSION     0.0.0
STATUS      Unknown
BOND        0.00
REWARDS     0.00
SLASH       0
PREFLIGHT   { "status": "Standby", "reason": "node account has invalid registered IP address", "code": 1 }
API         http://:1317/thorchain/doc/
RPC         http://:26657
MIDGARD     http://:8080/v2/doc
CHAIN       SYNC       BLOCKS
THOR        55.250%    37,097/67,144
BTC         2.399%     227,986/678,340
ETH         7.764%     947,182/12,199,994
LTC         0.012%     6,526/1,818,000
BCH         2.293%     197,340/682,404
```

Your node is running but as you can see in the \`Preflight\` section, your node is not yet ready to be churned in and currently is in standby [status](/thornodes/overview/node-operations#node-statuses), since your node has no IP address setup yet.

Do not proceed until your node is fully synced across all chains. You can see the required external chain heights [here](https://gateway.liquify.com/chain/thorchain_api/thorchain/lastblock) and the THORChain chain height [here](https://gateway.liquify.com/chain/thorchain_api/thorchain/block). Continue to run `make status` until all chains are synced.

{% hint style="danger" %}
Before sending the BOND, verify that your THORNode is **fully synced** with connected chains. Connected chains such as Ethereum & Bitcoin may take a day to sync. If your node is fully bonded and is selected to churn in to THORChain as ACTIVE without fully syncing all connected chains, you will immediately get slashed for missing observations, and lose money. It is normal to see Ethereum sit on 99.999% for many hours - be patient.
{% endhint %}

{% hint style="danger" %}
Only the original wallet that did the first BOND will be able to LEAVE/UNBOND. You can top up BOND using a different wallet but make sure you keep the private key to the original BOND wallet secure and accessible.
{% endhint %}

### 2 - Send a small BOND (recommend 100-1000)

To be able to set up the node IP address, you first need to get it whitelisted in the chain by sending your BOND.

1. You will do a "Deposit" transaction using RUNE. This is an internal MsgDeposit transaction (different from a MsgSend to another wallet). There is no destination address -- use an appropriate wallet such as [ASGARDEX](https://github.com/asgardex/asgardex-desktop/releases). The Bond is locked in a module controlled by the state machine.
2. Deposit your [BOND](https://dev.thorchain.org/concepts/memos.html#bond-unbond-and-leave) using the memo `BOND:<thornode-address>` (or use an appropriate GUI that does this memo for you). Send a small amount of RUNE to whitelist the node, the bond will be picked up.

{% hint style="info" %}
Some `make` commands during setup require RUNE (0.02 to 1.0) to execute into the state machine to prevent DDoS. If your bond is too small (e.g. 1 RUNE) you may run out and not be able to complete the setup until adding more.
{% endhint %}

Give the network 3-5 seconds to pick up your bond. To verify it has received your bond, run the following:

```bash
curl https://gateway.liquify.com/chain/thorchain_api/thorchain/node/<node-address>
```

If you run `make status` again, you should see this:

```bash
 ________ ______  ___  _  __        __
/_  __/ // / __ \/ _ \/ |/ /__  ___/ /__
 / / / _  / /_/ / , _/    / _ \/ _  / -_)
/_/ /_//_/\____/_/|_/_/|_/\___/\_,_/\__/
ADDRESS     thor13hh6qyj0xgw0gv7qpay8thfucxw8hqkved9vr2
IP
VERSION     0.0.0
STATUS      Whitelisted
BOND        1000.00
REWARDS     0.00
SLASH       0
PREFLIGHT   { "status": "Standby", "reason": "node account has invalid registered IP address", "code": 1 }
API         http://:1317/thorchain/doc/
RPC         http://:26657
MIDGARD     http://:8080/v2/doc
CHAIN       SYNC       BLOCKS
THOR        55.250%    37,097/67,144
BTC         2.399%     227,986/678,340
ETH         7.764%     947,182/12,199,994
LTC         0.012%     6,526/1,818,000
BCH         2.293%     197,340/682,404
```

As you can see, it is in standby but does not have an IP registered yet. This is needed for peer discovery.

### 3 - Setup Node IP Address

You must tell THORChain your IP-Address for its address book and seed-service to run properly:

```bash
make set-ip-address
```

If you run the status command again, you should now see a different message for the Preflight section saying you need to set your node keys.

{% hint style="info" %}
Once your IP address has been registered for discovery, you can use your own host for queries.
{% endhint %}

{% hint style="danger" %}
Do not import your node menonic in a wallet. Nodes will have their own address.
{% endhint %}

### 4 - Setup Node keys

Tell THORChain about your public keys for signing sessions:

```bash
make set-node-keys
```

If you run the `make status` command again, you should now see that your node is in status “ready” and is now ready to be churned in the next rotation.

### 5 - Set Version

Make sure your node broadcasts its latest version, else you won't churn in since THORChain enforces a version requirement. This version will appear in your `make status`. If you are on `0.0.0` then you haven't set your version:

```bash
make set-version
```

### 6 - Send Final Bond

If you followed steps 1-5 above, your preflight will be saying:

```bash
PREFLIGHT   { "status": "Standby", "reason": "node account does not have minimum bond requirement: 100000000000/30000000000000, "code": 1 }
```

To address this, send the remaining bond, that is higher than the minimum bond, currently 300K RUNE set by a network [Mimir ](https://gateway.liquify.com/chain/thorchain_api/thorchain/mimir)setting, look for `MinimumBondInRune`. See [#bonding-the-right-amount](#bonding-the-right-amount "mention")for how much bond to send.

If you finally run `make status` you should see this, with keyword **"Ready":**

```bash
 ________ ______  ___  _  __        __
/_  __/ // / __ \/ _ \/ |/ /__  ___/ /__
 / / / _  / /_/ / , _/    / _ \/ _  / -_)
/_/ /_//_/\____/_/|_/_/|_/\___/\_,_/\__/
ADDRESS     thor13hh6qyj0xgw0gv7qpay8thfucxw8hqkved9vr2
IP          1.2.3.4
VERSION     0.54.0
STATUS      Standby
BOND        300,099.96
REWARDS     0.00
SLASH       0
PREFLIGHT   { "status": "Ready", "reason": "OK", "code": 0 }
API         http://1.2.3.4:1317/thorchain/doc/
RPC         http://1.2.3.4:26657
MIDGARD     http://1.2.3.4:8080/v2/doc
CHAIN       SYNC       BLOCKS
THOR        100.000%   67,144/67,144
BTC         100.000%   678,340/678,340
ETH         100.000%   12,199,994/12,199,994
LTC         100.000%   1,818,000/1,818,000
BCH         100.000%   682,404/682,404
```

## Bonding The Right Amount

Although your node is ready to be churned in, it doesn’t mean it will be the next one to be selected since someone else could have posted a higher bond than you. To maximise chances of a quick entry, monitor Midgard to see what everyone else is bonding and try to outbid them.

This endpoint will show data on average, median, total, minimum and maximum bond amounts. For fastest entry, bond higher than the current active median.

```json
curl -s https://gateway.liquify.com/chain/thorchain_midgard/v2/network | jq '.bondMetrics'

resp:
 "bondMetrics" : {
    "averageActiveBond": "97664560467471",
    "averageStandbyBond": "9815575442995",
    "bondHardCap": "102284516414049",
    "maximumActiveBond": "111919846678019",
    "maximumStandbyBond": "104416033169205",
    "medianActiveBond": "99028435881350",
    "medianStandbyBond": "318000000",
    "minimumActiveBond": "53582883425758",
    "minimumStandbyBond": "52363105276428",
    "totalActiveBond": "9766456046747104",
    "totalStandbyBond": "353360715947839"
   }
```

{% hint style="info" %}
RUNE is always displayed in 1e8 format, 100000000 = 1 RUNE
{% endhint %}

You will need to be greater than the `minimumActiveBond.`Bonding more than `bondHardCap` will not result in more [rewards](/thornodes/overview/risks-costs-and-rewards#compensation). `medianActiveBond` is a good target to get and stay active.

{% hint style="info" %}
Some useful community sites to assist monitoring your node are <https://thorchain.network>, [https://thorchain.net](https://thorchain.net/#/nodes).
{% endhint %}

### Bonding More

At any time during standby, you can bond more by making an additional BOND transaction with memo:

`BOND:<thornode-address>`

{% hint style="info" %}
Only the original wallet that did the first BOND will be able to LEAVE/UNBOND. You can top up BOND using a different wallet but make sure you keep the private key to the original BOND wallet secure and accessible.
{% endhint %}

You can also [remove some of your bond](https://docs.thorchain.org/thornodes/leaving) whilst you are on [standby](/thornodes/overview/node-operations#node-statuses), using the UNBOND memo.

### Node Operator Fee

* Setting the Node Operator fee `10000` causes all rewards to be paid back each churn.
* Setting the Node Operator fee to `5000` causes 50% of rewards to be paid back to the Node Operator address and 50% to be accrued back to the bond.

To set a Node Operator fee, send a deposit transaction with the following [memo](/thornodes/pooled-thornodes#node-operator):

`BOND:<node address>:<bond wallet address>:<operator fee in basis pts>`

See [Pooled THORNodes](/thornodes/pooled-thornodes)for full information.


# Managing

Accessing Logs, Metrics and more

## THORNode commands

The Makefile provide different commands to help you operate your THORNode.

There are two types of make commands, READ and WRITE.

{% hint style="info" %}
Run `make help` at any stage to get an exhaustive list of help options and how to interact with the system. See [here](https://gitlab.com/thorchain/devops/node-launcher/-/blob/master/README.md?ref_type=heads) for an overview of each command.
{% endhint %}

#### READ COMMANDS

Read commands simply read your node state and doesn't commit any transactions.

{% tabs %}
{% tab title="STATUS" %}
To get information about your node on how to connect to services or its IP, run the command below. You will also get your node address and the vault address where you will need to send your bond.

```bash
make status
```

{% endtab %}

{% tab title="SHELL" %}
Opens a shell into your `thor-daemon` deployment: From within that shell you have access to the `thorcli` command.

```bash
make shell
```

{% endtab %}

{% tab title="LOGS" %}
Display stream of logs of THORNode deployment:

```bash
make logs
```

{% endtab %}

{% tab title="MNEMONIC" %}
This will print your node mnemonic (phrase). Use this to ever rescue your node funds if something goes wrong.

*Note: Your bond is held at ransom in order to prevent you from stealing funds from this vault. Your bond will always be more valuable than funds on this vault, so you have no economic reason to touch these funds.*

```bash
make mnemonic
```

{% endtab %}

{% tab title="PASSWORD" %}
A keystore file that secures your private keys is also stored on the THORNode. The password that is used to decrypt it can be printed by the following command

```bash
make password
```

{% endtab %}

{% tab title="RESTART" %}
Restart a THORNode deployment service selected:

```bash
make restart
```

{% endtab %}

{% tab title="RESET" %}
Reset a THORNode deployment service selected, including deleting the persistent volume. This command is **destructive** and will reset the chain back to 0%. You would use this for unrecoverable issues that `make restart` did not solve.

```bash
make reset
```

{% endtab %}
{% endtabs %}

#### WRITE COMMANDS

Write commands actually build and write transactions into the underlying statechain. They cost RUNE from your bond, currently 0.02, but you can check this on the `/constants` endpoint "CLICOSTINRUNE". This will post state in the chain which will be now updated globally. The RUNE fee is to prevent DDoS attacks.

{% tabs %}
{% tab title="NODE-KEYS" %}
Send a `set-node-keys` to your node, which will set your node keys automatically for you by retrieving them directly from the `thor-daemon` deployment.

```bash
make set-node-keys
```

{% endtab %}

{% tab title="IP ADDDRESS" %}
Send a `set-ip-address` to your node, which will set your node ip address automatically for you by retrieving the load balancer deployed directly.

```bash
make set-ip-address
```

{% endtab %}

{% tab title="VERSION" %}
In order to update your THORNode to a new version, you will need to update the docker tag image used in your deployments. Depending on your choice of deployment this can be done differently.

For Kubernetes deployments, you can edit the deployments of the different services you want to update using the commands below.

To update your `thor-daemon`, `thor-api` and `bifrost` deployment images to version 0.2.0:

```bash
kubectl set image deployment/thor-daemon thor-daemon=registry.gitlab.com/thorchain/thornode:mainnet-0.2.0
kubectl set image deployment/thor-api thor-api=registry.gitlab.com/thorchain/thornode:mainnet-0.2.0
kubectl set image deployment/bifrost bifrost=registry.gitlab.com/thorchain/thornode:mainnet-0.2.0
```

To update your \`midgard\` deployment image to version 0.2.0

```bash
kubectl set image deployment/midgard midgard=registry.gitlab.com/thorchain/midgard:mainnet-0.2.0
```

You can then follow the deployments restarting status either by checking your Kubernetes dashboard or using the CLI command below:

```bash
kubectl get deployment/thor-daemon
```

Once the deployments are all in the ready state again, you need to broadcast to the network that you are running a new version using the command below:

```bash
make set-version
```

{% endtab %}
{% endtabs %}

## Tools

Note, all of these should already be installed from `make tools`. However you can install them separately useing the DEPLOY tabs below.

To access the tools, navigate to the ACCESS tabs below.

All of these commands are to be run from `node-launcher`

### LOGS MANAGEMENT (LOKI)

It is recommended to deploy a logs management ingestor stack within Kubernetes to redirect all logs within a database to keep history over time as Kubernetes automatically rotates logs after a while to avoid filling the disks. The default stack used within this repository is Loki, created by Grafana and open source. To access the logs you can then use the Grafana admin interface that was deployed through the Prometheus command.

{% tabs %}
{% tab title="DEPLOY" %}
You can deploy the log management automatically using the command below:

```bash
make install-loki
```

This command will deploy the Loki chart. It can take a while to deploy all the services, usually up to 5 minutes depending on resources running your kubernetes cluster.

You can check the services being deployed in your kubernetes namespace `loki-system`.
{% endtab %}

{% tab title="ACCESS" %}
**Access Grafana**

See previous section to access the Grafana admin interface through the command `make grafana`.

**Browse Logs**

Within the Grafana admin interface, to access the logs, find the `Explore` view from the left menu sidebar. Once in the `Explore` view, select Loki as the source, then select the service you want to show the logs by creating a query. The easiest way is to open the "Log browser" menu, then select the "job" label and then as value, select the service you want. For example you can select `thornode/bifrost` to show the logs of the Bifrost service within the default `thornode` namespace when deploying a mainnet validator THORNode.

![](https://3337783180-files.gitbook.io/~/files/v0/b/gitbook-x-prod.appspot.com/o/spaces%2FfvaTNxU33ciP7UstKtwU%2Fuploads%2Fgit-blob-84fbebfb183dd99daed2c0183769dedfeaec975e%2Fimage%20\(30\).png?alt=media)

![](https://3337783180-files.gitbook.io/~/files/v0/b/gitbook-x-prod.appspot.com/o/spaces%2FfvaTNxU33ciP7UstKtwU%2Fuploads%2Fgit-blob-c5b381b2b20aa6a55deb4620a8b107f607ca11cb%2Fimage%20\(37\)%20\(1\).png?alt=media)

![](https://3337783180-files.gitbook.io/~/files/v0/b/gitbook-x-prod.appspot.com/o/spaces%2FfvaTNxU33ciP7UstKtwU%2Fuploads%2Fgit-blob-b98569b47a0de10d2bbdf3010fa27c57e6b7317f%2Fimage%20\(36\)%20\(1\).png?alt=media)

![](https://3337783180-files.gitbook.io/~/files/v0/b/gitbook-x-prod.appspot.com/o/spaces%2FfvaTNxU33ciP7UstKtwU%2Fuploads%2Fgit-blob-da4198784ad176ab34f9bb81a78b45a22e7852a6%2Fimage%20\(33\)%20\(1\).png?alt=media)
{% endtab %}

{% tab title="DESTROY" %}
Destroy Loki logs management stack

```bash
make destroy-loki
```

{% endtab %}
{% endtabs %}

### METRICS MANAGEMENT (Prometheus)

It is also recommended to deploy a Prometheus stack to monitor your cluster and your running services.

{% tabs %}
{% tab title="DEPLOY" %}
You can deploy the metrics management automatically using the command below:

```bash
make install-metrics
```

This command will deploy the prometheus chart. It can take a while to deploy all the services, usually up to 5 minutes depending on resources running your kubernetes cluster.

You can check the services being deployed in your kubernetes namespace `prometheus-system`.
{% endtab %}

{% tab title="ACCESS" %}
We have created a make command to automate this task to access Grafana from your local workstation:

```bash
make grafana
```

Open [http://localhost:3000](http://localhost:3000/) in your browser.

Login as the `admin` user. The default password should have been displayed in the previous command (`make grafana`).

![](https://3337783180-files.gitbook.io/~/files/v0/b/gitbook-x-prod.appspot.com/o/spaces%2FfvaTNxU33ciP7UstKtwU%2Fuploads%2Fgit-blob-6c848f812316a5ee636c7608265e3db5478edbc2%2Fimage%20\(16\).png?alt=media)

**Access Prometheus admin UI**

We have created a make command to automate this task to access Prometheus from your local workstation:

```bash
make prometheus
```

Open [http://localhost:9090](http://localhost:9090/) in your browser.
{% endtab %}
{% endtabs %}

As part of the tools command deployment, you also have deployed a Prometheus stack in addition to the Elasticsearch in your Kubernetes cluster. All CPU, memory, disk space, and THORNode / THORChain custom metrics are automatically being sent to the Prometheus database backend deployed in your cluster.

You should have available different dashboards to see the metrics across your cluster by nodes, deployments, etc, and also a specific **`THORNode / THORChain`** dashboard to see the THORChain status, with current block height, how many validators are currently active and other chain related information.

{% hint style="info" %}
Click the 🔍 SEARCH ICON to find the list of dashboards
{% endhint %}

![Example of Grafana Dashboard](https://3337783180-files.gitbook.io/~/files/v0/b/gitbook-x-prod.appspot.com/o/spaces%2FfvaTNxU33ciP7UstKtwU%2Fuploads%2Fgit-blob-0dc1caf02fc73ff875ed7cc8e76d6ae65225cf90%2Fimage%20\(9\)%20\(1\).png?alt=media)

For a more in-depth introduction of Grafana, please[ follow the documentation here](https://grafana.com/docs/grafana/latest/getting-started/what-is-grafana/)**.**

## Kubernetes Dashboard

You can also deploy the Kubernetes dashboard to monitor your cluster resources.

{% tabs %}
{% tab title="DEPLOY" %}

```bash
make install-dashboard
```

This command will deploy the Kubernetes dashboard chart. It can take a while to deploy all the services, usually up to 5 minutes depending on resources running your kubernetes cluster.
{% endtab %}

{% tab title="ACCESS" %}
We have created a make command to automate this task to access the Dashboard from your local workstation:

```bash
make dashboard
```

Open [http://localhost:8000](http://localhost:8000/) in your browser.
{% endtab %}
{% endtabs %}

View your kubernetes dashboard by running the following:

```bash
make dashboard
```

![Kubernetes Dashboard](https://3337783180-files.gitbook.io/~/files/v0/b/gitbook-x-prod.appspot.com/o/spaces%2FfvaTNxU33ciP7UstKtwU%2Fuploads%2Fgit-blob-11140e084fb5abc37ade7c3b99e67850c372723b%2Fimage%20\(14\)%20\(1\).png?alt=media)

## Backing up a THORNode

You should backup your THORNode in case of failures. By default, if you are using the Kubernetes deployments solution, all the deployments are automatically backed up by persistent volume disks.\
Depending on your provider, the volumes are usually available in the provider administration UI, for example in AWS, you can find those volumes in your regular console, in the region you chose to deploy your Kubernetes cluster.

Again by default, with Kubernetes, by using persistent volumes used in the default configuration, you are already protected again restart failures at container level, or node failures. As long as you don’t specifically use the destroy commands from the Makefile or manually delete your Kubernetes deployments, your volumes will NOT be deleted at any time.

It is still recommended, as any project, to have different backups on top of those volumes to make sure you can recover in admin error deleting those volumes or other Kubernetes resources that would imply deleting those volumes.

Also see the Create and Validator Backup guide.

{% embed url="<https://gitlab.com/thorchain/devops/node-launcher/-/blob/master/docs/Restore-Validator-Backup.md>" %}

For AWS, you can easily setup in your console to have snapshots of your cluster volumes be taken every day. For other provider there can be different ways to achieve this as well either manually or automatically.

It is up to the node operator to setup those extra backups of the core volumes to be able to recover in any kind of failures or human errors.

Some volumes would be more critical than others, for example Midgard deployment are also by default backed up by persistent volumes, so it can recover in case of container restarts, failures or node failures and the deployment being automatically scheduled to a different node, but if you were to delete the Midgard volume, it would reconstruct its data from your THORNode API and events from scratch. For that specific service having extra backups might not be critical, at the time of the writing of that document, Midgard implementation might change in the future.

At minimum you should also securely backup your node keys: `node_key.json` and `priv_validator_key.json`. Do this as follows:

```bash
kubectl get pods -n thornode
```

Copy the thornode pod name, e.g. `thornode-abcdefg-hijkl` and replace with `{thornode pod name}` below:

```bash
kubectl cp thornode/{thornode pod name}:root/.thornode/config/node_key.json node_key.json

kubectl cp thornode/{thornode pod name}:root/.thornode/config/priv_validator_key.json priv_validator_key.json
```

For full disaster recovery (complete loss of cluster), it is possible to issue LEAVE command from the original BOND wallet. See [Leaving](https://docs.thorchain.org/thornodes/leaving) for detailed procedures.

## Node Security

The following are attack vectors:

1. If anyone accesses your cloud credentials, they can log in and steal your funds
2. If anyone accesses the device you used to log into kubernetes, they can log in and steal your funds
3. If anyone accesses your hardware device used to bond, they can sign a LEAVE transaction and steal your bond once it is returned
4. If anyone has access to your node's private keys through logs or configuration files, they can steal your funds
5. If any GitLab repo is compromised and you `git pull` any nefarius code into your node and run `make <any command>`, you can lose all your funds.

#### Checking diffs

Prior to `git pull` or `make pull` updates, review node-launcher repo diffs:

```bash
git fetch
git diff master..origin/master
```

Regularly review patches in GitLab: <https://gitlab.com/thorchain/devops/node-launcher/-/commits/multichain>

When chain clients have updated tags (version number or sha256), inspect the GitLab diffs for the relevant image in <https://gitlab.com/thorchain/devops> and ensure the CI build checksum matches the expected. This ensures you are executing code on your node that you are satisfied is free from exploits. Some images such as Ethereum use the 'official' docker image, e.g. <https://hub.docker.com/r/ethereum/client-go/tags>.

{% hint style="danger" %}
**RUNNING A NODE IS SERIOUS BUSINESS**

DO SO AT YOUR OWN RISK, YOU CAN LOSE A SIGNIFICANT QUANTITY OF FUNDS IF AN ERROR IS MADE

THORNODE SOFTWARE IS PROVIDED AS IS - YOU ARE SOLELY RESPONSIBLE FOR USING IT

YOU ARE RESPONSIBLE FOR THE CODE RUNNING ON YOUR NODE. **YOU ARE** THE NETWORK. INSPECT ALL CODE YOU EXECUTE.
{% endhint %}

When running a node, it is quite common to get slashed. The network relies on slash points to rate node quality. When your node is slashed, the first thing you need to do is run `make status`, and make sure all your chains are 100% in sync. If any of the external chains are not 100% in sync, then it will cause node to be slashed due to missing observations.

The best prevention is to have a cluster with lots of fast resources (cpu, memory, IO, network) and good backups/redundancy to prevent downtime.

Unfortunately even when your node is fully in-sync, it is still possible to be slashed due to external chain events.

#### Constantly accumulating slash points

**Problem:** Sometimes bifrost fails to forward observations to thornode, due to an account number / sequence number mismatch. Here is what you need to check:

1. run `make logs` , and choose `bifrost`
2. Search your bifrost logs for `{"level":"error","service":"bifrost","module":"observer","error":"fail to send the tx to thorchain: fail to broadcast to THORChain,code:32, log:account sequence mismatch, expected 26806, got 26807: incorrect account sequence","time":"2021-05-30T07:28:18Z","message":"fail to send to THORChain"}` 3. **Solution:** `make restart` and choose `bifrost`


# Pooled THORNodes

How to manage a pooled THORNode with separate Operator and Providers.

## Summary

Skilled Node Operators who don't individually have enough $RUNE to run a node themselves can use the Bond Provider feature to collect bond from other $RUNE holders.

Node Operators can define up to **100 THOR addresses** as Bond Providers. These addresses will be able to bond and unbond to the node, earning rewards proportional to the amount of bond they contribute. Node Operators define an operator fee in basis points, which defaults to zero and must be set explicitly when bond providers are added. The Node Operator fee is taken from rewards and paid directly to the Node Operator address after each churn.

### Rationale

The minimum $RUNE needed to churn in as a THORNode is currently set at 300K - but with bond competition, this number could be much higher.

Not many people in the world have both the technical skills to run a validator AND at least 300K $RUNE, which limits the supply of Node Operators who secure THORChain.

Pooled THORNodes provide a way for a skilled Operator to enter a trusted agreement with known Bond Providers to bootstrap enough capital for running a THORNode. The Network's security increases, and more RUNE holders have access to yield-bearing bond-space.

### Economic Security

At first glance it might seem Pooled Validators contradict the economic security model of THORChain (i.e. that Node Operators put up twice the value in slash-able bond as the assets they secure). With Pooled Validators it is possible for the Node Operator to individually put up less bond than the value of the assets that the node secures. However this nuance only exists within the relationship between the Node Operator and the Bond Providers. The Network only considers the THORNode as single entity thus the economic model is intact.

{% hint style="warning" %}
It would be disastrous to THORChain if operators could collect unlimited bond quantities from anon/retail providers. Malicious Operators could start marketing campaigns collecting RUNE and then rug-pull their users, or worse, access economies of scale and take over the network. This is why Pooled THORNodes are invite-only and limited to 100 per node to moderate this.
{% endhint %}

## Managing a Pooled THORNode

{% hint style="info" %}
All RUNE `Amount` values are in 1e8 decimals, e.g. 1 RUNE = 100000000.
{% endhint %}

### Node Operator

#### Adding a Bond Provider

Add a bond provider using a BOND transaction with a modified memo from a wallet you control (ledger, desktop, thorcli):

`BOND:<NodeAddress>:<BondProviderAddress>:<NodeOperatorFee>`

**Example:** `BOND:thor1agftrgu74z84hef6dt6ykhe7cmjf3f8dcpkfun:thor1tfm4q8u57qzsznpvh02s8j483aga63cl02k6jt:2000`

* NodeAddress - THORNode address (prefixed by `thor`)
* BondProviderAddress - Bond Provider address to whitelist (prefixed by `thor`)
* NodeOperatorFee - fee in basis points to be taken from rewards and paid directly to Node Operator's address after each churn.
* RUNE TX Value - 1.02 minimum (anything over 1.02 is added to the Operator's Bond).

*A Node Operator is the first on-chain bonding transaction to a new node. You cannot change the operator address after the fact.*

*The Operator is also added as a Bond Provider.*

#### **Removing a Bond Provider**

While the node is churned out and the vault has successfully migrated, a Node Operator can remove a Bond Provider using an UNBOND transaction with a modified memo:

`UNBOND:<NodeAddress>:<AmountToUnbond>:<BondProviderAddress>`

* NodeAddress - THORNode address (prefixed by `thor`)
* AmountToUnbond - Amount of Bond Provider's bond to refund
* BondProviderAddress - Bond Provider address to refund/remove (prefixed by `thor`)
* Amount - Most UIs will require an 'amount' for the transaction, this must be 0 (A gas fee of 0.02 RUNE will still need to be paid for the transaction but the UI will handle this)

*This command will refund the Bond Provider their bond and remove them from the Bond Provider list only if `Amount` constitutes all of the bond the Bond Provider is owed. 0 (ZERO) will work to remove the BP from the Whitelist Addresseses if they have already unbonded all their bond.*

#### Node Operator Fee

Node operators can set a fee that is paid to them from the earnings each churn.

To set a Node Operator fee, send a deposit transaction with the following memo:

`BOND:<node address>:<bond wallet address>:<operator fee in basis pts>`

Example: `BOND:thor1agftrgu74z84hef6dt6ykhe7cmjf3f8dcpkfun:thor1tfm4q8u57qzsznpvh02s8j483aga63cl02k6jt:2000`

To adjust the fee, the no operators can send:\
`BOND:<NodeAddress>::<OperatorFeeInBasisPts>`

**Example**: `BOND:thor1agftrgu74z84hef6dt6ykhe7cmjf3f8dcpkfun::4000` to see the fee to 40%.

Fees can range from 0 to 10000 basis pts. Setting 10000 causes all rewards to be to the node operator each churn. Setting it to 0 causes rewards to accrue to the bond.

See [here](/thornodes/joining#node-operator-fee) for more details.

### Bond Provider

#### Adding/Removing Bond

Once whitelisted, a Bond Provider can Bond and Unbond from the node as normal.

**Adding Bond:**

`BOND:<NodeAddress>`

* NodeAddress - THORNode address (prefixed by `thor`)
* RUNE Tx Value - Amount of RUNE to bond

**Removing Bond:**

`UNBOND:<NodeAddress>:<AmountToUnbond>`

* NodeAddress - THORNode address (prefixed by `thor`)
* AmountToUnbond - Amount of Bond Provider's bond to refund
* Amount - Most UIs will require an 'amount' for the transaction, this must be 0 (A gas fee of 0.02 RUNE will still need to be paid for the transaction but the UI will handle this)

{% hint style="info" %}
**When you can add Bond**

When the node is standby, active or not churning, bond amounts can be increased/decreased.\
Bond can always be increased (whether Active or on Standby). You can tell the network is migrating if there are `retiring` Asgard Vaults.\
<https://runescan.io/vaults>
{% endhint %}

### Reward Shares

Operators and Providers all have a bond amount registered to the node. Operators can start at 0.00 bonded. This on-chain bond amount is summed to the total bond, and thus everyone has a fair share in the THORNode's principle + rewards.

The Operator Fee is distributed to the Node Operator address from all RUNE rewards earned by a node after each churn. Bond Provider rewards are added to their Bond and auto-compounded.

If an Operator LEAVES, all the bond is fairly distributed.


# Fullnode

Setting up a THORNode & Midgard

The term fullnode describes a basic setup of a synced THORNode daemon and optionally Midgard and is meant to provide API endpoints for private or public use. Because the THORNode doesn't take part in the chains consensus other chain clients aren't needed.

See [Overview](/thornodes/overview) for more information about the different node types.

{% hint style="info" %}
The installation guides for running a fullnode via Docker or directly on Linux are not officially supported by the development team. The preferred and supported way is by using [Kubernetes](/thornodes/fullnode/thornode-kubernetes).
{% endhint %}


# Thornode - Kubernetes

Setting up a fullnode on Kubernetes

For deploying Thornode and Midgard on Kubernetes, follow the instructions for [Cluster Launcher](/thornodes/kubernetes) and [Deployment](/thornodes/deploying).

Instead of `TYPE=validator`, use `TYPE=fullnode` at the [Thornode deployment](/thornodes/deploying#deploy-thornode) step.

```sh
NET=mainnet TYPE=fullnode NAME=thornode make install
```


# Thornode - Linux

Setting up a fullnode on Linux

{% hint style="info" %}
The steps shown here are tested on `Ubuntu 24.04`, different distributions may need adjustments to the commands.

All commands are meant to be run as root user, if not specified otherwise. Depending on the server installation, they may need to be run from a different user via `sudo`.
{% endhint %}

## Prerequisites

Install all needed packages for building and configuring the THORNode daemon

```sh
apt install -y --no-install-recommends aria2 ca-certificates curl git golang jq make pv
```

## Application user

Add the application user that is used to run the THORNode application

```sh
useradd -m thornode -s /bin/bash
```

## Build

Checkout the latest code and build the binary

As `thornode` user run:

```sh
git clone --branch v2.135.1 https://gitlab.com/thorchain/thornode $HOME/build

cd $HOME/build

ln -fs /usr/bin/true docker; export PATH=$(pwd):$PATH; TAG=mainnet make install

# remove bifrost binary and build directory
rm $HOME/go/bin/bifrost
rm -rf $HOME/build
```

Note: The build process currently expects to have a docker binary available, which isn't needed for building the `thornode` binary, so providing it a fake docker command via symlink is just a hack around that limitation.

## Prepare environment

### Config

Before running the fullndode the first time, the configuration files and directory layout need to be created.

As `thornode` user run:

```sh
$HOME/go/bin/thornode init thornode --overwrite --chain-id thorchain-1
```

### Seed nodes

Seeds provide a list of active thorchain nodes, which are needed to join the network.

{% hint style="warning" %}
Nine Realms infrastructure has been decommissioned. Refer to the upstream [node-launcher documentation](https://gitlab.com/thorchain/devops/node-launcher/-/tree/master/docs) for the current seed list.
{% endhint %}

### Ports

THORChain doesn't use the cosmos-sdk default ports. Technically this step isn't needed, but it is meant to stay in line with all other THORNode deployments.

As `thornode` user run:

```sh
sed -ri 's/:2665([0-9])/:2714\1/g' $HOME/.thornode/config/config.toml
```

### Genesis

For joining the network, the correct genesis file is required.

{% hint style="warning" %}
Nine Realms infrastructure has been decommissioned. Refer to the upstream [node-launcher documentation](https://gitlab.com/thorchain/devops/node-launcher/-/tree/master/docs) for the current genesis file source.
{% endhint %}

### Sync

The fastest way to join the network is by downloading a current snapshot and syncing from it.

{% hint style="warning" %}
Nine Realms infrastructure has been decommissioned. Refer to the upstream [Thornode Snapshot Recovery and Storage Management](https://gitlab.com/thorchain/devops/node-launcher/-/blob/master/docs/Thornode-Snapshot-Recovery-and-Storage-Management.md) doc for the current snapshot source and recovery procedure.
{% endhint %}

## Systemd

Create a service file to be able to manage the thornode process via systemd

{% code title="/etc/systemd/system/thornode.service" overflow="wrap" %}

```toml
[Unit]
Description=Thornode Daemon
After=network-online.target

[Service]
User=thornode
ExecStart=/home/thornode/go/bin/thornode start
Restart=on-abort
RestartSec=3
LimitNOFILE=65535

[Install]
WantedBy=multi-user.target
```

{% endcode %}

Reload systemd config

```sh
systemctl daemon-reload
```

## Start

Start the daemon

```sh
systemctl start thornode.service
```


# Thornode - Docker

Setting up a fullnode with Docker

{% hint style="info" %}
The steps shown here are tested on `Ubuntu 24.04`, different distributions may need adjustments to the commands.

All commands are meant to be run as root user, if not specified otherwise. Depending on the server installation, they may need to be run from a different user via `sudo`.
{% endhint %}

## Prerequisites

Install all packages needed for running and configuring the THORNode container

```sh
apt install -y --no-install-recommends aria2 curl docker.io jq pv
```

{% hint style="info" %}
The published image is built for `linux/amd64`. On an `arm64` host (e.g. Apple Silicon) add `--platform linux/amd64` to the `docker run` command to run it under emulation.
{% endhint %}

## Configuration

### Work directory

Prepare work directory

```sh
mkdir -p /opt/thornode/.thornode/config
```

### Genesis

No manual step is required. On first start the container fetches the genesis file automatically from the network's seed nodes (discovered via the configured seed-nodes endpoint, then pulled from a peer's RPC). A successful genesis fetch is **not** by itself enough to join the network — you must also choose a sync method below, otherwise the node will attempt to initialize from the fetched genesis and fail.

### Sync

A fullnode cannot replay the chain from genesis with a current binary; you must bootstrap from a recent state. Choose one of the following.

#### Option A — Automatic StateSync (self-contained)

Set `THOR_AUTO_STATE_SYNC_ENABLED=true` (included in the `docker run` below). The node determines a trust height from the default trusted RPC servers and restores recent state over P2P from StateSync peers.

{% hint style="warning" %}
Network StateSync is memory intensive — at the time of writing it requires roughly `80 GB` of RAM. Ensure your server is sized accordingly.
{% endhint %}

#### Option B — Snapshot restore

Download a current snapshot and extract it into `/opt/thornode/.thornode/data` before starting the container (leave `THOR_AUTO_STATE_SYNC_ENABLED` unset in this case). For snapshot sources and the recovery procedure, see the upstream [Thornode Snapshot Recovery and Storage Management](https://gitlab.com/thorchain/devops/node-launcher/-/blob/master/docs/Thornode-Snapshot-Recovery-and-Storage-Management.md) doc.

{% hint style="info" %}
That document is written for the Kubernetes/Helm `node-launcher` deployment (it uses `make` targets); for a standalone Docker node use it only as the source of the snapshot location and storage guidance, and place the extracted data under the mounted `.thornode/data` directory.
{% endhint %}

## Start

Use the image tag that matches the current network version (check `/thorchain/version` on a public node). At the time of writing this is `mainnet-3.18.1`.

Start the thornode container

```sh
docker run -d --restart=on-failure \
  -v /opt/thornode/.thornode:/root/.thornode \
  -e CHAIN_ID=thorchain-1 \
  -e THOR_AUTO_STATE_SYNC_ENABLED=true \
  -p 127.0.0.1:1317:1317 \
  -p 127.0.0.1:27147:27147 \
  -p 27146:27146 \
  --name thornode \
  registry.gitlab.com/thorchain/thornode:mainnet-3.18.1
```

{% hint style="info" %}
On `arm64` hosts add `--platform linux/amd64`. If you bootstrapped via a snapshot (Option B) instead of StateSync, remove the `-e THOR_AUTO_STATE_SYNC_ENABLED=true` line.
{% endhint %}


# Midgard - Linux

Setting up Midgard on Linux

{% hint style="info" %}
The steps shown here are tested on `Ubuntu 24.04`, different distributions may need adjustments to the commands.

All commands are meant to be run as root user, if not specified otherwise. Depending on the server installation, they may need to be run from a different user via `sudo`.
{% endhint %}

## Prerequisites

Install all needed packages for building and running midgard

```sh
apt install -y --no-install-recommends apt-transport-https gcc gnupg lsb-release postgresql postgresql-common wget
```

## Application user

Add the application user that is used to run the thornode daemon

```sh
useradd -m midgard -s /bin/bash
```

## Database

### Install TimescaleDB

Run the PostgreSQL package setup script

```sh
/usr/share/postgresql-common/pgdg/apt.postgresql.org.sh
```

Add the TimescaleDB package

```sh
echo "deb https://packagecloud.io/timescale/timescaledb/ubuntu/ $(lsb_release -c -s) main" | sudo tee /etc/apt/sources.list.d/timescaledb.list
```

Install the TimescaleDB GPG key

```sh
wget --quiet -O - https://packagecloud.io/timescale/timescaledb/gpgkey | sudo gpg --dearmor -o /etc/apt/trusted.gpg.d/timescaledb.gpg
```

Update your local repository list and install TimescaleDB

```sh
apt update
sudo apt install timescaledb-2-postgresql-16 postgresql-client-16
```

Tune your PostgreSQL instance for TimescaleDB

```sh
timescaledb-tune
```

Restart PostgreSQL

```sh
systemctl restart postgresql
```

### Create midgard database

```sh
su - postgres

psql

CREATE USER midgard WITH ENCRYPTED PASSWORD 'password';
CREATE DATABASE midgard OWNER midgard;

exit
```

### Install TimescaleDB extension

Connect to the database

```sh
psql -d "postgres://midgard:password@localhost:5432/midgard"
```

Add TimescaleDB to the database

```sql
CREATE EXTENSION IF NOT EXISTS timescaledb;
```

Check that TimescaleDB is installed

```sql
\dx
```

```plaintext
                                                List of installed extensions
    Name     | Version |   Schema   |                                      Description                                      
-------------+---------+------------+---------------------------------------------------------------------------------------
 plpgsql     | 1.0     | pg_catalog | PL/pgSQL procedural language
 timescaledb | 2.16.1  | public     | Enables scalable inserts and complex queries for time-series data (Community Edition)
(2 rows)
```

## Install

As `midgard` user run:

```sh
git clone --branch 2.24.4 https://gitlab.com/thorchain/midgard.git $HOME/build

cd $HOME/build

export ENV CGO_ENABLED=1

go install -v -installsuffix cgo ./cmd/blockstore/dump
go install -v -installsuffix cgo ./cmd/midgard
go install -v -installsuffix cgo ./cmd/trimdb
go install -v -installsuffix cgo ./cmd/statechecks

mkdir -p $HOME/{config,openapi/generated}
cp openapi/generated/doc.html $HOME/openapi/generated/
```

## Configuration

As `midgard` user run:

```sh
mkdir $HOME/config
```

{% hint style="warning" %}
Nine Realms infrastructure has been decommissioned. Refer to the upstream [node-launcher documentation](https://gitlab.com/thorchain/devops/node-launcher/-/tree/master/docs) for the current genesis file source, then place it at `$HOME/config/genesis.json`.
{% endhint %}

Add midgard config.

{% hint style="warning" %}
Nine Realms infrastructure has been decommissioned. The `blockstore.remote` field below is left empty — refer to the upstream [Thornode Snapshot Recovery and Storage Management](https://gitlab.com/thorchain/devops/node-launcher/-/blob/master/docs/Thornode-Snapshot-Recovery-and-Storage-Management.md) doc for the current value.
{% endhint %}

{% code title="/home/midgard/config/midgard.json" overflow="wrap" %}

```json
{
  "listen_port": 8080,
  "max_block_age": "60s",
  "shutdown_timeout": "5s",
  "thorchain": {
    "last_chain_backoff": "7s",
    "fetch_batch_size": 100,
    "parallelism": 4,
    "read_timeout": "60s",
    "tendermint_url": "https://gateway.liquify.com/chain/thorchain_rpc/websocket",
    "thornode_url": "https://gateway.liquify.com/chain/thorchain_api/thorchain",
    "fork_infos": [
      {
        "chain_id": "thorchain-1",
        "earliest_block_hash": "0B3C8F9E3EA7E9B1C10CAC5217ED771E0540671EFB9C5315BF01167266BCBEDF",
        "earliest_block_height": 17562001
      }
    ]
  },
  "timescale": {
    "user_name": "midgard",
    "password": "password",
    "database": "midgard",
    "sslmode": "disable",
    "commit_batch_size": 100,
    "max_open_conns": 100,
    "no_auto_update_ddl": true,
    "host": "localhost",
    "port": 5432
  },
  "websockets": {
    "enable": false,
    "connection_limit": 100
  },
  "usdpools": [
    "BNB.BUSD-BD1",
    "BNB.BUSD-BAF",
    "BNB.USDT-DC8",
    "ETH.USDT-0X62E273709DA575835C7F6AEF4A31140CA5B1D190",
    "ETH.USDT-0XDAC17F958D2EE523A2206206994597C13D831EC7",
    "AVAX.USDC-0XB97EF9EF8734C71904D8002F8B6BC66DD9C48A6E",
    "ETH.USDC-0XA0B86991C6218B36C1D19D4A2E9EB0CE3606EB48"
  ],
  "genesis": {
    "local": "/home/midgard/config/genesis.json",
    "initial_block_height": 17562001,
    "initial_block_hash": "0B3C8F9E3EA7E9B1C10CAC5217ED771E0540671EFB9C5315BF01167266BCBEDF"
  },
  "blockstore": {
    "local": "./tmp/blockstore",
    "remote": ""
  }
}
```

{% endcode %}

## Systemd

Create a service file to be able to manage the Midgard process via systemd

{% code title="/etc/systemd/system/midgard.service" overflow="wrap" %}

```toml
[Unit]
Description=Midgard Daemon
After=network-online.target

[Service]
User=midgard
WorkingDirectory=/home/midgard
ExecStart=/home/midgard/go/bin/midgard /home/midgard/config/midgard.json
Restart=on-abort
RestartSec=3
LimitNOFILE=65535

[Install]
WantedBy=multi-user.target
```

{% endcode %}

Reload systemd config

```sh
systemctl daemon-reload
```

## Start

Start the daemon

```sh
systemctl start midgard.service
```


# Midgard - Docker

Setting up Midgard with Docker

{% hint style="info" %}
The steps shown here are tested on `Ubuntu 24.04`, different distributions may need adjustments to the commands.

All commands are meant to be run as root user, if not specified otherwise. Depending on the server installation, they may need to be run from a different user via `sudo`.
{% endhint %}

## Prerequisites

Install all packages needed for running and configuring the Midgard container

```sh
apt install -y --no-install-recommends docker.io
```

## Configuration

### Work directories

Prepare work directories

```sh
mkdir -p /opt/timescale
mkdir -p /opt/midgard/{config,blockstore}
```

### Genesis

Download the genesis file.

{% hint style="warning" %}
Nine Realms infrastructure has been decommissioned. Refer to the upstream [node-launcher documentation](https://gitlab.com/thorchain/devops/node-launcher/-/tree/master/docs) for the current genesis file source.
{% endhint %}

Add midgard config.

{% hint style="warning" %}
Nine Realms infrastructure has been decommissioned. The `blockstore.remote` field below is left empty — refer to the upstream [Thornode Snapshot Recovery and Storage Management](https://gitlab.com/thorchain/devops/node-launcher/-/blob/master/docs/Thornode-Snapshot-Recovery-and-Storage-Management.md) doc for the current value.
{% endhint %}

{% code title="/opt/midgard/config/config.json" overflow="wrap" %}

```json
{
  "listen_port": 8080,
  "max_block_age": "60s",
  "shutdown_timeout": "5s",
  "thorchain": {
    "last_chain_backoff": "7s",
    "fetch_batch_size": 100,
    "parallelism": 4,
    "read_timeout": "60s",
    "tendermint_url": "https://gateway.liquify.com/chain/thorchain_rpc/websocket",
    "thornode_url": "https://gateway.liquify.com/chain/thorchain_api/thorchain",
    "fork_infos": [
      {
        "chain_id": "thorchain-1",
        "earliest_block_hash": "0B3C8F9E3EA7E9B1C10CAC5217ED771E0540671EFB9C5315BF01167266BCBEDF",
        "earliest_block_height": 17562001
      }
    ]
  },
  "timescale": {
    "user_name": "midgard",
    "password": "password",
    "database": "midgard",
    "sslmode": "disable",
    "commit_batch_size": 100,
    "max_open_conns": 100,
    "no_auto_update_ddl": true,
    "host": "localhost",
    "port": 5432
  },
  "websockets": {
    "enable": false,
    "connection_limit": 100
  },
  "usdpools": [
    "BNB.BUSD-BD1",
    "BNB.BUSD-BAF",
    "BNB.USDT-DC8",
    "ETH.USDT-0X62E273709DA575835C7F6AEF4A31140CA5B1D190",
    "ETH.USDT-0XDAC17F958D2EE523A2206206994597C13D831EC7",
    "AVAX.USDC-0XB97EF9EF8734C71904D8002F8B6BC66DD9C48A6E",
    "ETH.USDC-0XA0B86991C6218B36C1D19D4A2E9EB0CE3606EB48"
  ],
  "genesis": {
    "local": "genesis.json",
    "initial_block_height": 17562001,
    "initial_block_hash": "0B3C8F9E3EA7E9B1C10CAC5217ED771E0540671EFB9C5315BF01167266BCBEDF"
  },
  "blockstore": {
    "local": "/blockstore",
    "remote": ""
  }
}
```

{% endcode %}

## Start

Start the TimescaleDB database

```sh
docker run -d --restart=on-failure \
  -v /opt/timescale:/var/lib/postgresql/data \
  -e POSTGRES_DB=midgard \
  -e POSTGRES_USER=midgard \
  -e POSTGRES_PASSWORD=password \
  -p 127.0.0.1:5432:5432 \
  --name timescale \
  timescale/timescaledb:2.13.0-pg15 \
  postgres -c plan_cache_mode=force_custom_plan
```

Start Midgard

```sh
docker run -d --restart=on-failure \
  -v /opt/midgard/config:/config \
  -v /opt/midgard/blockstore:/blockstore \
  -p 127.0.0.1:8080:8080 \
  --name midgard --net host \
  registry.gitlab.com/thorchain/midgard:2.24.4
```


# Proxy Setup

Make API/RPC available externally

One easy way to make thornodes and midgards API or RPC endpoints available ecternally is by using a reverse proxy, a webserver that accepts all HTTP(S) requests and forwards them to the specific application.

{% hint style="info" %}
The steps shown here are tested on `Ubuntu 24.04`, different distributions may need adjustments to the commands.

All commands are meant to be run as root user, if not specified otherwise. Depending on the server installation, they may need to be run from a different user via `sudo`.
{% endhint %}

## DNS records

The reverse proxy needs a way to distinguish between the endpoints that it needs to address. One way to do this is by using different DNS records for each service, for example: `api.yourdomain.com`, `rpc.yourdomain.com`, `midgard.yourdomain.com`

## Install prerequisites

```sh
apt install -y --no-install-recommends nginx
```

## Configuration

### Remove default page

The default page is not needed and can be removed:

```sh
rm -f /etc/nginx/sites-enabled/default
```

### Enable THORNode API endpoint

When using a self built version of THORNode, the API endpoint is disabled by default and needs to be enabled in the thornode app config.

{% code title="/home/thornode/.thornode/config/app.toml" overflow="wrap" %}

```toml
[api]

# Enable defines if the API server should be enabled.
enable = true

# Swagger defines if swagger documentation should automatically be registered.
swagger = false

# Address defines the API server to listen on.
address = "tcp://127.0.0.1:1317"
```

{% endcode %}

Thornode needs to be restarted, for the changes to take effect.

```sh
systemctl restart thornode.service
```

### Proxy configuration

Create the required proxy configurations

{% tabs %}
{% tab title="API" %}
{% code title="/etc/nginx/sites-enabled/thornode-api" overflow="wrap" %}

```nginx
server {
  listen      80;
  server_name api.yourdomain.com;
  
  access_log  /var/log/nginx/thornode-api_access.log;
  error_log   /var/log/nginx/thornode-api_error.log;

  location / {
    proxy_pass                           http://localhost:1317/;
    proxy_set_header  Host               $http_host;
    proxy_set_header  X-Real-IP          $remote_addr;
    proxy_set_header  X-Forwarded-For    $proxy_add_x_forwarded_for;
    proxy_set_header  X-Forwarded-Proto  $scheme;
  }
}
```

{% endcode %}
{% endtab %}

{% tab title="RPC" %}
{% code title="/etc/nginx/sites-enabled/thornode-rpc" overflow="wrap" %}

```nginx
server {
  listen      80;
  server_name rpc.yourdomain.com;
  
  access_log  /var/log/nginx/thornode-rpc_access.log;
  error_log   /var/log/nginx/thornode-rpc_error.log;

  location / {
    proxy_pass                           http://localhost:27147/;
    proxy_set_header  Host               $http_host;
    proxy_set_header  X-Real-IP          $remote_addr;
    proxy_set_header  X-Forwarded-For    $proxy_add_x_forwarded_for;
    proxy_set_header  X-Forwarded-Proto  $scheme;
  }
}
```

{% endcode %}
{% endtab %}

{% tab title="MIDGARD" %}
{% code title="/etc/nginx/sites-enabled/midgard" overflow="wrap" %}

```nginx
server {
  listen      80;
  server_name midgard.yourdomain.com;
  
  access_log  /var/log/nginx/midgard_access.log;
  error_log   /var/log/nginx/midgard_error.log;

  location / {
    proxy_pass                           http://localhost:8080/;
    proxy_set_header  Host               $http_host;
    proxy_set_header  X-Real-IP          $remote_addr;
    proxy_set_header  X-Forwarded-For    $proxy_add_x_forwarded_for;
    proxy_set_header  X-Forwarded-Proto  $scheme;
  }
}
```

{% endcode %}
{% endtab %}
{% endtabs %}

## Restart proxy service

```sh
systemctl restart nginx.service
```


# Alerting

Alert Channels & Monitoring Software

## Community Alert Channels

To listen for update announcements, join the following channels:

* **THORNode Announcements (Telegram)**: <https://t.me/thornode_ann>
* **THORChain Community Devs (Discord)**: <https://discord.gg/g6Z2whSvGF>

{% hint style="info" %}
Be sure to use a pseudonym in order to prevent doxxing yourself. Node operators should remain anonymous for the health of the network and your personal/node security.
{% endhint %}

[Also see the Prometheus Alerts guide.](https://gitlab.com/thorchain/devops/node-launcher/-/blob/master/docs/Alerting.md)

## Vǫrðr 👻

A monitoring application for THORNodes.

> A Vǫrðr or warden is a guardian spirit who will follow the soul of a living person from birth until death.

{% hint style="info" %}
Vǫrðr is a community developed monitoring app for THORNodes. It's fully open-source at <https://github.com/sourcapital/vordr>. This is 3rd party software outside of the scope of THORSec.
{% endhint %}

## Features

* All chains are monitored for `Health` and `Sync Status` every minute
* THORChain version is monitored every minute
* Kubernetes pod restarts are monitored every 5 minutes
* Kubernetes pod logs of all chains are aggregated
* Slash points are monitored every minute
* Jailing is monitored every minute
* Chain observations are monitored every minute

## Supported Chains

| Client   | Chain                                                              |
| -------- | ------------------------------------------------------------------ |
| Bitcoin  | Bitcoin (BTC), Litecoin (LTC), Bitcoin Cash (BCH), Dogecoin (DOGE) |
| Ethereum | Ethereum (ETH), Avalanche (AVAX)                                   |
| Cosmos   | Cosmos (ATOM), Binance (BSC), THORChain (RUNE)                     |

{% hint style="info" %}
See <https://github.com/sourcapital/vordr#kubernetes> on how to run Vǫrðr in the Kubernetes cluster.
{% endhint %}


# Leaving

How to leave THORChain

## Overview

Approximately every 2 1/2 days (43,200 blocks or [`CHURNINTERVAL`](https://gateway.liquify.com/chain/thorchain_api/thorchain/mimir)) the system will churn its vaults and nodes.

Outgoing nodes consist of:

1. Nodes wishing to leave, and/or
2. The most unreliable node(s), and/or
3. The oldest node

Note: Just less than 1/3 of the active network can be churned out in a single churn event. The network will always maintain supermajority plus one node for Byzantine Fault Tolerance (BFT) security.

Incoming:

1. The node(s) with the highest bond ([`NUMBEROFNEWNODESPERCHURN`](https://thornode.ninerealms.com/thorchain/mimir) nodes).

Churned out nodes will be put in standby, but their bond will not automatically be returned. They will be credited any earned rewards in their last session. If they do nothing, but keep their cluster online and up-to-date with the latest THORNode version, they will be eventually churn back in.

Alternatively, an "Active" node can leave the system voluntarily, in which case they are marked to churn out first.

{% hint style="warning" %}
It is assumed nodes that wish to LEAVE while on Standby will be away for a significant period of time, so by permanently jailing their address, it forces them to completely destroy and re-build before re-entering. This also ensures they are running the latest software.
{% endhint %}

## Unbonding

{% hint style="info" %}
You cannot unbond if you are "Ready" or "Active".
{% endhint %}

If a Node Operator wants to retrieve part of their bond & rewards (such as deciding to take profits), they can simply Unbond. This keeps their Node on standby, ready to be churned back in.

To unbond from the system, simply send an **UNBOND** transaction.

Example, this will draw out 10k in RUNE from the bond, as long as the remaining amount is higher than the minimum bond.

`UNBOND:<node address>:1000000000000`

{% hint style="info" %}
THORChain always treats assets in 1e8 'base format' ie, 1.0 RUNE = 100,000,000 units (tor). To get from one to the other, simply multiply by 100m.
{% endhint %}

{% hint style="info" %}
If using ASGARDEX to **BOND** or **UNBOND**, simply put the RUNE amount, e.g. "100" for 100 RUNE. It does the memo in 1e8 for you.
{% endhint %}

{% hint style="info" %}
You can get your node address by running `make status`
{% endhint %}

{% hint style="warning" %}
Only the address that originally bonded the funds can **UNBOND** or **LEAVE**.\
This ensures you can safely leave this system if you no longer have access to your node (but it is still running).
{% endhint %}

## Issues with Unbonding/Leaving

If you cannot unbond, check your node's status and ensure you are in Standby mode. Only nodes in Standby mode can unbond or leave.

## Leaving

1. If a node issues a LEAVE while Active, they are eligible to churn back in on the next churn
2. If a node issues a LEAVE while on Standby, the node is considered Disabled and will never churn back in.

To leave the system, send the following transaction from your original bond address to the Vault Address: `LEAVE:<ADDRESS>` with at least 1 RUNE.

**Example**:

`LEAVE:<node address>`

⏱ *Wait a few hours, verify on the /nodes endpoint that you are now `Disabled`* 👀 Then send another LEAVE:

`LEAVE:<node address>`

⏱ *Wait a few minutes, verify you have received your bond back* 👀 - `make status` should show `BOND 0.00` and your wallet should get the full Bond back.

{% hint style="info" %}
View your node's status on [Runescan](https://runescan.io) or the [THORNode API](https://gateway.liquify.com/chain/thorchain_api/thorchain/nodes).
{% endhint %}

*🔥 Commence destroying your node 🔥*

## Destroying

### Confirming you have left

You should complete this checklist before you do the next step:

1. Have you sent a final **LEAVE** transaction and have you received your BOND back - ie 1,000,000 RUNE, and can you account for any slash points or rewards?

If yes, then proceed:

### DESTROY

To destroy and remove previously created resources, you can run the command below.

{% hint style="danger" %}
Destroying your cluster will completely destroy your node, including purging all keys on it.

**DO NOT DO THIS UNTIL YOUR NODE HAS CHURNED OUT AND YOU HAVE VERIFIED YOUR BOND IS COMPLETELY RETURNED**

IF YOU DESTROY A NODE PREMATURELY, YOU MAY LOSE A SIGNIFICANT AMOUNT OF FUNDS
{% endhint %}

### 1) Destroying the Node and Tools

First, destroy the node and tools, this will delete your node then your tooling 1-by-1. Do this from the `node-launcher` repo:

```bash
make destroy-tools
```

![Destroying the Tooling](https://3337783180-files.gitbook.io/~/files/v0/b/gitbook-x-prod.appspot.com/o/spaces%2FfvaTNxU33ciP7UstKtwU%2Fuploads%2Fgit-blob-e845c1aa1ebaced8e9b69c6196eb8f9c7caadc60%2Fimage%20\(22\).png?alt=media)

### 2) Destroy the cluster

Then destroy the cluster from the `cluster-launcher` repo:

{% tabs %}
{% tab title="AWS" %}
You will be asked to enter your cluster name and region (the same as what you [put in when you first deployed](https://docs.thorchain.org/thornodes/kubernetes/setup#deploy-kubernetes-cluster)).

```bash
make destroy-aws
```

{% endtab %}

{% tab title="DO" %}
You will be asked to enter your cluster name and region, as well as your Personal Token (the same as what you [put in when you first deployed](https://docs.thorchain.org/thornodes/kubernetes/setup#deploy-kubernetes-cluster)).

```bash
make destroy-do
```

{% endtab %}
{% endtabs %}

You will be asked to confirm:

![](https://3337783180-files.gitbook.io/~/files/v0/b/gitbook-x-prod.appspot.com/o/spaces%2FfvaTNxU33ciP7UstKtwU%2Fuploads%2Fgit-blob-5ee39ac49e2829df3a4eb6d36a075086a904d9e5%2Fimage%20\(23\).png?alt=media)

{% hint style="danger" %}
**DO NOT DESTROY YOUR NODE UNTIL YOU HAVE CHURNED OUT AND HAVE RECEIVED YOUR FULL BOND BACK IN YOUR CUSTODY**

**IF YOU DESTROY YOUR NODE WITH FUNDS LOCKED UP - YOU WILL LOSE A SIGNIFICANT QUANTITY OF FUNDS**
{% endhint %}

![Final destroy complete](https://3337783180-files.gitbook.io/~/files/v0/b/gitbook-x-prod.appspot.com/o/spaces%2FfvaTNxU33ciP7UstKtwU%2Fuploads%2Fgit-blob-5642d8d439b61d0dec60d0ebff703c36c9a4ad65%2Fimage%20\(24\).png?alt=media)


# Emergency Procedures

This page describes how to react in a network-wide emergency (funds-at-risk).

This document outlines the procedures for Node Operators to respond to network-wide emergencies, such as funds-at-risk scenarios or critical network attacks, on THORChain’s Mainnet. THORChain is a decentralized, permissionless cross-chain liquidity protocol, and Node Operators play a critical role in maintaining network security and integrity. These procedures ensure rapid, coordinated, and secure responses while preserving the network’s impartiality and resistance to capture.

The overarching ethos for THORChain's security posture is "an abundance of caution". **Halt Earn, Halt Often!**

`make pause` is the big red button that stops everything. Node Operators are supported by the community, developers and all stakeholders to `make pause` if there is any doubt. It is easily undone if incorrectly used (Eg: `make resume`)

See the Additional Resources for more in-depth information and guides.

### Key Principles

* **Rapid Response**: Node Operators must act swiftly to secure the network when a funds-at-risk bug or attack is detected.
* **Pseudo-Anonymity**: Operators should avoid revealing personal information, even during emergencies, to maintain network neutrality and security. Use tools like make relay to communicate anonymously via the THORChain Dev Discord. Alternatively, create a burner email and Discord account.
* **Decentralized Governance**: The removal of admin mimir means network decisions, such as halts or parameter changes, are now managed through [node voting](/thornodes/overview#node-voting) or Mimir overrides initiated by nodes.
* **Mainnet Context**: THORChain operates on Mainnet, with robust mechanisms like node churn, Threshold Signature Scheme (TSS), and Bifrost for cross-chain security.

## Reporting a Bug

If you discover a bug that poses a risk to funds or network stability, follow these steps:

1. **Immediate Notification**: Directly message the THORChain team or admins via the Dev Discord (tag @thorsec if needed) or other secure channels. Alternatively, submit the bug through the formal [Bounty Program](https://gitlab.com/thorchain/thornode/-/blob/develop/bugbounty.md) for evaluation.
2. **Bug Report Details**: Include the following in your report:
   * A clear description of the bug or vulnerability.
   * Steps to reproduce the issue, if applicable.
   * Potential impact (e.g., funds at risk, network disruption).
   * Any relevant logs or evidence from your THORNode.
3. **Bounty Program**: If the bug is verified as critical, you may be eligible for a bounty proportional to its severity. Do not disclose the bug publicly until it is resolved to prevent exploitation.

## Emergency Classifications and Responses

Emergencies are classified based on severity, with corresponding actions for Node Operators:

#### Critical - Funds At Risk

* **Description**: A vulnerability or attack threatens the security of funds in liquidity pools/vaults or anything that poses an existential risk to the protocol.
* **Actions**:
  1. **Initiate Network Halt**: If a critical threat is confirmed, a Node Operator must issue the `make pause` command to halt the entire network. This pauses the entire network for 720 blocks (\~1hr) to allow time for investigation and corrective actions such as voting to pause specific chain operations (e.g., [halting signing](https://dev.thorchain.org/concepts/network-halts.html)). `make resume` will reduce the pause period by 720 blocks & another `make pause` will increase the pause by another 720 blocks. Once the first `make pause` is dispatched, the issue is not time critical as the entire network is paused and this paus period can and should be increased as appropriate.
  2. **Node Voting**: Propose and vote on emergency actions, such as Mimir overrides, to adjust network parameters. This will be discussed in the Dev Discord `#mainnet channel` channel. Voting requires consensus among active nodes.
     * Use `thornode tx thorchain mimir <key> <value> --from <node-address>` to submit Mimir changes.
  3. **Monitor and Communicate**: Use monitoring tools like [Vǫrðr](https://github.com/sourcapital/vordr) to check chain health and sync status. Relay critical updates anonymously via `make relay` to the Dev Discord `#mainnet channel`.
  4. **Coordinate with Team**: Work with the core team and other operators to verify the threat and deploy patches. Avoid premature public disclosure to prevent panic or exploitation.

#### Major - Network Disruption (Funds Not At Risk)

* **Description**: A bug or attack disrupts network operations (e.g., chain sync issues, high slash points) but does not directly threaten funds.
* **Actions**:
  1. **Assess Node Status**: Check your node’s health using make status to ensure it is synced and operational. Review slash points and chain sync status via Grafana or Prometheus dashboards.
  2. **Vote on Parameters**: If required, Propose Mimir changes to adjust network parameters (e.g., reduce `ChurnInterval` to stabilize the network).
  3. **Restart Services**: If your node is affected, restart services using `make restart` or reset the node with make reset for unrecoverable issues (note: this is destructive and resets chain data).
  4. **Monitor Logs**: Access logs via Grafana’s Loki interface to diagnose issues. Select the relevant service (e.g., thornode/bifrost) in the Log browser.

#### Minor - No Funds or Network At Risk

* **Description**: Non-critical issues, such as minor performance degradation or isolated node failures.
* **Actions**:
  1. **Diagnose Locally**: Check your node’s metrics (CPU, memory, disk) using Prometheus or Kubernetes dashboards.
  2. **Apply Updates**: Deploy patches or updates to your THORNode services using Helm charts from the node-launcher repository.
  3. **Report**: Inform the team via Discord or the Bounty Program for tracking and future improvements. Alternatively, raise an issue within the THORChain [Thornode ](https://gitlab.com/thorchain/thornode)or [NodeLauncher ](https://gitlab.com/thorchain/devops/node-launcher)repositories.

## Network Halts

In addition to the network wide pausing via the `make pause` command, THORChain supports blockchain specitic halts to pause operations during critical emergencies:

* **Initiating a Halt**: [Node voting](/thornodes/overview#node-voting) to pause signing for a specific chain (e.g., BTC, ETH). This prevents outbound transactions until the issue is resolved. All Halt controls are [listed here](https://dev.thorchain.org/concepts/network-halts.html).
* **Voting on Halts**: Nodes can vote to approve or extend halts via the node voting mechanism. A supermajority is required for consensus.
* **Resuming Operations**: Once the threat is mitigated, nodes vote to lift the halt using Mimir overrides or resume normal operations.

## Monitoring and Recovery

* **Monitoring Tools**: Use [Vǫrðr](https://github.com/sourcapital/vordr) for real-time chain health and sync status monitoring. Deploy Prometheus and Grafana for detailed metrics on node performance and network status.
* **Backups**: Ensure your THORNode’s persistent volumes are backed up via your Kubernetes provider (e.g., AWS, Google Cloud or bare-metal). Regularly verify backups to protect against data loss.
* **Recovery**: In case of node failure, restore from backups or resync your node. Avoid using `make reset or hard-reset-thornodes` unless absolutely necessary, as it deletes chain data.

## Network Upgrades

Network upgrades are critical for patching vulnerabilities, addition capabilities or improving protocol performance during emergencies. All active nodes must run the updated version for the network to proceed with an upgrade. The process can be managed in three ways:

* **Natural Upgrade**: Versions are proposed in the Dev Discord for a certain block height, nodes follow instructions to signal support, at the block height the network stops for nodes to update their software, and the network naturally resumes when >2/3 of nodes adopt the newest version. Node with older versions are churned out via the regular churn process.
* **Assertive Upgrade**: Once a supermajority of nodes has upgraded, demonstrating acceptance, operators can vote to ban nodes running outdated versions. Banned nodes are churned out, removed from the Threshold Signature Scheme (TSS), and ejected from the consensus set. These nodes must fully leave, destroy their setup, and redeploy a new node to rejoin.
  * Use node voting (Node Voting) to propose and approve banning outdated nodes.
* **Forced Upgrade (Hard Fork)**: In time-critical scenarios, a hard fork may be initiated to exclude old nodes. This carries significant risks, such as consensus failures or network instability, and should be a last resort.
  * Coordinate via the Dev Discord and use Alerting for THORNodes to monitor fork outcomes.
* **Best Practices for Upgrades**:
  * Deploy updates using Helm charts from the Node Launcher Repository.
  * Ensure backups are current before upgrading, as described in Restore Validator Backup and THORNode Snapshot Recovery and Storage Management.
  * Monitor node sync and health post-upgrade using Vǫrðr Monitoring and Prometheus dashboards.
  * Verify multi-validator cluster stability if applicable, as outlined in Multi-Validator Cluster Setup.

## Best Practices

* **Stay Synced**: Ensure your node is fully synced with all connected chains (e.g., Bitcoin, Ethereum) before taking action. Unsynchronized nodes may accrue slash points.
* **Secure Keys**: Protect your operator key and node mnemonic. Loss of the operator key results in loss of bond access, and loss of the validator key may brick your node.
* **Regular Updates**: Keep your THORNode software and Helm charts up to date using the node-launcher repository.
* **Community Coordination**: Engage with other operators and the core team via the Dev Discord or Community Telegram for real-time collaboration.

## Additional Resources

* [Network Halts](https://dev.thorchain.org/concepts/network-halts.html)
* [Alerting for THORNodes](https://gitlab.com/thorchain/devops/node-launcher/-/blob/master/docs/Alerting.md?ref_type=heads)
* [Multi-Validator Cluster Setup](https://gitlab.com/thorchain/devops/node-launcher/-/blob/master/docs/Multi-Validator-Cluster.md?ref_type=heads)
* [Restore Validator Backup](https://gitlab.com/thorchain/devops/node-launcher/-/blob/master/docs/Restore-Validator-Backup.md?ref_type=heads)
* [THORNode Snapshot Recovery and Storage Management](https://gitlab.com/thorchain/devops/node-launcher/-/blob/master/docs/Thornode-Snapshot-Recovery-and-Storage-Management.md?ref_type=heads)
* [Node Voting](/thornodes/overview#node-voting)
* [THORNode Stack](/thornodes/overview/thornode-stack)
* [Vǫrðr Monitoring](https://github.com/sourcapital/vordr)
* [Node Launcher Repository](https://gitlab.com/thorchain/devops/node-launcher) (For THORNode deployment)
* [THORNode Repository](https://gitlab.com/thorchain/thornode) (For THORNode Sofware)


# CHECKLIST

Checklist of items for Node Operators

## Deploying

* [ ] I have set up a local `thornode` repository with a `cluster-launcher` and `node-launcher` git cloned into the right sub-folders
* [ ] I have installed all the pre-requisites
* [ ] I have a AWS/DO account ready with credentials if using a service provider
* [ ] I have deployed a cluster and saved my node details (name of node, region)
* [ ] I have installed tools via `make tools`
* [ ] I have deployed a node by running `make mainnet-validator`
* [ ] I have securely saved my THORNode Password and THORNode Mnemonic

{% content-ref url="/pages/KOVyvL9C028BNKA5rxlw" %}
[Cluster Launcher](/thornodes/kubernetes)
{% endcontent-ref %}

{% content-ref url="/pages/FDqh84xQVZS59Rrcmrof" %}
[Deploying](/thornodes/deploying)
{% endcontent-ref %}

## Joining

* [ ] I have retrieved the latest VAULT address and sent a small test bond
* [ ] I have confirmed my node has been credited the small bond
* [ ] (Optional) I have confirmed I can unbond a small amount
* [ ] I have sent the final bond, higher than the MinimumBond
* [ ] I have run `make set-ip-address` to set my Node's IP address
* [ ] I have run `make set-node-keys` to set my Node's public keys
* [ ] I have run `make set-version` to set my Node's version
* [ ] I have verfied in `make status` that my node is ready to churn in
* [ ] (Optional) I have added my node key to the Telegram Bot for notifications

{% content-ref url="/pages/cPfGgXpXBkXVvwyZMbhT" %}
[Joining](/thornodes/joining)
{% endcontent-ref %}

{% hint style="info" %}
The BOND memo is `BOND:<node-address>`
{% endhint %}

## Upgrading

* [ ] I have run `make status` to verify the current state of my node
* [ ] I have run `kubectl get pods -n thornode` to verify all my node's services are running properly, resetting any that are faulty
* [ ] I have run the upgrade command
* [ ] I have run `make set-version` to set my new Node version
* [ ] I have run `make status` to verify the final state of my node

## Unbonding

* [ ] I have waited until my node is churned out and is in `standby`
* [ ] I have sent an UNBOND transaction from the same wallet registered to my node
* [ ] I have verified that I have received my BOND back

{% content-ref url="/pages/lT1adLDxEt4QovlTHz9z" %}
[Leaving](/thornodes/leaving)
{% endcontent-ref %}

{% hint style="info" %}
The UNBOND memo is `UNBOND:<node-address>:<amount>`
{% endhint %}

## Leaving Whilst Active

* [ ] I have confirmed my node is active and I wish to leave before waiting to churn naturally
* [ ] I have sent the first LEAVE transaction and verified my node has "requested to leave".
* [ ] I have verified that a churn has taken place and my node is in STANDBY
* [ ] I have verified that my node has returned hot funds
* [ ] I have sent the final LEAVE transaction and received my bond back

{% content-ref url="/pages/lT1adLDxEt4QovlTHz9z" %}
[Leaving](/thornodes/leaving)
{% endcontent-ref %}

{% hint style="info" %}
The LEAVE memo is `LEAVE:<node-address>`
{% endhint %}

## Leaving Whilst Standby

* [ ] I have verified that a churn has taken place and my node is in STANDBY
* [ ] I have verified that my node has returned all funds
* [ ] I have sent the final LEAVE transaction and received my bond back

{% content-ref url="/pages/lT1adLDxEt4QovlTHz9z" %}
[Leaving](/thornodes/leaving)
{% endcontent-ref %}

## Destroying a Node

* [ ] I have verified that I have either UNBONDED my entire BOND or LEFT and received my BOND back.
* [ ] I have run `make destroy destroy-tools` to destroy my node from `node-launcher`
* [ ] I have run `make destroy-aws` to destroy my cluster from `cluster-launcher`

{% content-ref url="/pages/lT1adLDxEt4QovlTHz9z" %}
[Leaving](/thornodes/leaving)
{% endcontent-ref %}


# Multi-node Deployment

Some node operators may desire to run multiple validators within the same cluster, while sharing a single set of daemons among them to save resource cost. This can be performed via the following method. These instructions are relevant for mainnet at the time of writing, but please ensure that correct network and current set of daemons are used.

{% embed url="<https://gitlab.com/thorchain/devops/node-launcher/-/blob/master/docs/Multi-Validator-Cluster.md>" %}


# Developing

Deploying a custom stagenet to have a developer-controlled environment

THORChain uses multiple network environments to move from an idea to mainnet deployment, each with a specific role:

* **Mainnet**: The live production network where real assets are transacted. Security and reliability are ensured through validator consensus, with only well-tested changes deployed to minimize risks.
* **Stagenet**: A pre-production network mirroring mainnet, used to test new features and chain integrations with real assets and participants. Changes require consensus, providing real-world validation but slower testing.
* **Devnet / Mocknet**: A developer-managed environment for rapid testing and iteration. Validators and participants are fully controlled, making it ideal for testing new chains like TON, TRON, Optimism, or Arbitrum before advancing to the official stagenet or mainnet.

A devnet offers developers full control over the THORChain environment to test without impacting live networks. Key benefits include:

* Autonomy: Configure without consensus delays.
* Rapid Iteration: Test and refine quickly.
* Risk Mitigation: Isolate changes to ensure live network stability.

#### gRPC Support

THORChain supports gRPC for enhanced communication between clients and servers. This feature is available in the Stagenet environment for testing and development purposes.

* Enabled gRPC Endpoint: A gRPC endpoint has been deployed and can be accessed at `thornode-grpc.defiantlabs.net:443`.
* New Feature Development: The addition of gRPC support is being tracked in [Merge Request #1232](https://gitlab.com/thorchain/devops/node-launcher/-/merge_requests/1232), which adds the required functionality to the node-launcher repository.

### Prerequisites to Setup a Devnet

#### Hardware Requirements

* CPU: 8 cores
* Memory: 32 GiB
* Storage: 256 GiB

#### Software Requirements

* kubectl: Kubernetes CLI \[v1.31.1 or later]
* Helm: Manage Kubernetes deployments with Helm charts.
* Minikube: Local Kubernetes cluster for testing.
* THORNode Binary: Core THORChain binary for managing nodes.

## 1. Installation

1. Install kubectl

```
sudo apt update
sudo apt install -y apt-transport-https ca-certificates curl
sudo curl -fsSLo /usr/share/keyrings/kubernetes-archive-keyring.gpg https://packages.cloud.google.com/apt/doc/apt-key.gpg
echo "deb [signed-by=/usr/share/keyrings/kubernetes-archive-keyring.gpg] https://apt.kubernetes.io/ kubernetes-xenial main" | sudo tee /etc/apt/sources.list.d/kubernetes.list
sudo apt update
sudo apt install -y kubectl// Some code
```

2. Install Helm

```bash
curl https://raw.githubusercontent.com/helm/helm/main/scripts/get-helm-3 | bash
```

3. Install Minikube

```bash
curl -LO https://storage.googleapis.com/minikube/releases/latest/minikube-linux-amd64
sudo install minikube-linux-amd64 /usr/local/bin/minikube
```

4. Install THORNode Binary

```bash
git clone git@gitlab.com:thorchain/thornode.git
cd thornode
git checkout develop
TAG=stagenet make install
```

## 2. Configuration

### Configure Minikube

Minikube simulates a [Kubernetes](https://docs.thorchain.org/thornodes/kubernetes) environment locally.

#### Start Minikube

```bash
minikube start --cpus 8 --memory 32768 \
  --kubernetes-version=v1.31.1 \
  --network-plugin=cni --cni=cilium \
  -p custom-stagenet \
  --addons default-storageclass storage-provisioner volumesnapshots csi-hostpath-driver \
  --extra-config=kubelet.cgroup-driver=systemd \
  --extra-config=kubelet.max-pods=50 \
  --disk-size=256gb \
  --extra-config=kubeadm.pod-network-cidr=10.244.0.0/16
minikube profile custom-stagenet
```

#### Enable MetalLB for Load Balancing

```bash
minikube addons enable metallb
kubectl apply -f - <<EOF
apiVersion: v1
kind: ConfigMap
metadata:
  namespace: metallb-system
  name: config
data:
  config: |
    address-pools:
    - name: default
      protocol: layer2
      addresses:
      - 192.168.252.0/22
EOF
```

### Configure THORNode Binary

#### Initialize Configuration

```bash
thornode init custom --home ~/.thornode
```

#### Generate Faucet Keys

```bash
thornode keys add faucet
```

Save the faucet address for funding RUNE transactions in the stagenet.

## 3. Deploy the Devnet

Modify Deployment Configurations

1. Clone the **node-launcher** repository:

```bash
git clone https://gitlab.com/thorchain/devops/node-launcher.git
cd node-launcher
make tools
```

2. Edit thornode-stack/stagenet.yaml:

* Enable **Gaia Daemon** only for testing:

```yaml
gaia-daemon:
  enabled: true
  resources:
    requests:
      cpu: 500m
      memory: 512Mi
    limits:
      cpu: 500m
      memory: 512Mi
```

* Adjust resource allocations (CPU/memory) and persistence sizes.
* Add environment variables for the faucet and chain configuration:

```yaml
thornode:
  env:
    FAUCET: "<your-faucet-address>"
```

3. Deploy with Minikube:

```bash
kubectl apply -f thornode-stack/stagenet.yaml
```

## 4. Add a Validator Node

1. Start the genesis validator:

```bash
docker compose --profile genesis up
```

2. Start additional validators:

```bash
docker compose --profile validator-1 up
thornode tx thorchain deposit 30000000000000 rune "BOND:<validator-address>" --from faucet --chain-id thorchain --node http://localhost:27147
```

3. Trigger network churn:

```bash
thornode tx thorchain mimir ChurnMigrateRounds --from faucet --chain-id thorchain --node http://localhost:27147 -- 2
thornode tx thorchain mimir ChurnInterval --from faucet --chain-id thorchain --node http://localhost:27147 -- 100
```

## 5. Test Your Environment

* Verify connectivity:

```bash
export KUBECONFIG=~/.kube/config
kubectl get nodes
```

* Access API:

```bash
API: http://localhost:1317
RPC: http://localhost:27147
```

## Advanced Options

* Custom Configurations: Use custom seed phrases or faucet wallets.
* Enable Chains: Modify the docker-compose.yml or stagenet.yaml file to include more chains.
* Deploy Custom Contracts: Override environment variables to test unique configurations.

## References

For more details or if you encounter any errors in above steps, check out the docs in Gitlab directly:

{% embed url="<https://gitlab.com/thorchain/devops/node-launcher/-/blob/6e05a0292d0ea4cafd4b48f053ca93423c3ae912/docs/Custom-Stagenet.md>" %}

{% embed url="<https://gitlab.com/thorchain/thornode/-/blob/ursa/custom-stagenet/tools/stagenet/README.md?ref_type=heads>" %}


# Frequently Asked Questions

THORChain Frequently Asked Questions and Issues

## **General FAQs**

**Who founded THORChain?**

It was founded in 2018 by a pseudo-anonymous core team of contributors, of which Chad Barraford is a member. Today Nine Realms has publicly taken over THORChain operations which is led by Gavin McDermott.

**How many developers are there?**

There are approx 8 core devs and 9 devs from Nine Realms working on the protocol. There are approx 40 devs + community members working within the ecosystem.

**What are the Vesting and Allocation Details?**

All tokens have fully vested since August 2023.

### **What is the Roadmap?**

The roadmap is detailed in the [THORChain Q2 2024 Ecosystem Report](https://medium.com/thorchain/thorchain-q2-2024-ecosystem-report-13911bd5c7a5) article.

### **Where can I buy Rune?**

Directly on THORChain by swapping any supported asset for RUNE or exchanges like Binance list RUNE. Only RUNE is supported on THORChain.

### **What is the circulating supply of RUNE?**

Approx. 360M. See [https://runescan.io/addresses](https://runescan.io/addresses/) for a breakdown of the RUNE supply.

### **What is the inflation rate of RUNE?**

Currently a nominal \~2 RUNE per day or about 720 RUNE per year. The protocol inflation is predominantly determined by the size of the reserve. The formula is: `Reserve/EmissionCurve/BlocksPerYear/`, thus gradually decreases every block. See the [Economic Model](/technical-documentation/technical-deep-dive/economic-model) for detailed information on emission schedule and reserves.

### **How are swap fees calculated?**

Swap fees are dependent on the depth of liquidity pools, the deeper the pools (aka the more liquidity) the less the fee is. Swap fee also depends on the size of the deposit. Bigger deposits incur more swap fees. See [Technical Deep Dive](/technical-documentation/technical-deep-dive).

### **What Interfaces / Exchanges are there? How to access THORChain?**

You can many interfaces to interact with THORChain. See [Exchanges](/ecosystem#exchanges).

#### **What is Outbound Throttling?**

* See [Outbound Transaction Throttling](/technical-documentation/technical-deep-dive/security)
* You can watch it at <https://thorchain-scheduled-tx.web.app/>
* Since Jan 2024, [Swapper Clout](https://gitlab.com/thorchain/thornode/-/issues/1723) has been enabled to optimise the Outbound Throttling.

### **Are there withdrawal fees and why is there a withdrawal fee premium?**

Yes, there is a fee for every on-chain withdrawal from THORChain, whether it is a swap outbound, withdrawing from LPs, or other network operations.

The outbound fees that THORChain levies is 1.5x t0 3x the “fast” fee recommended for the respective blockchain, depending on network load.

* See the `outbound_fee_multiplier` parameter in the [network endpoint](https://gateway.liquify.com/chain/thorchain_api/thorchain/network)
* See [ADR 008: Implement a Dynamic Outbound Fee Multiplier](https://dev.thorchain.org/architecture/adr-008-implement-dynamic-outbound-fee-multiplier.html)
* See [Technical Deep Dive](/technical-documentation/technical-deep-dive).

The outbound fees that THORChain levies could be up to 3x the "fast" fee recommended for the respective blockchain.

* See [Technical Deep Dive](/technical-documentation/technical-deep-dive).
* Standard Fee [inbound address](https://gateway.liquify.com/chain/thorchain_api/thorchain/inbound_addresses) endpoint.
* [Watch Fees and Wait Times Explained](https://www.youtube.com/watch?v=XAdaEXO-Ofg) video.

#### Is there a place where I can see the THORChain Ecosystem?

Yes, the [website](https://thorchain.org/ecosystem) or the [Ecosystem](/ecosystem) page.

### **Technical FAQs**

**How fast is THORChain?**

Transactions Per Second (TPS), can go up to 5000 TPS, but are rarely seen. The highest number of swaps in one day was 100k swaps. Current transaction data can be seen at <https://runescan.io/> and <https://gateway.liquify.com/chain/thorchain_midgard/v2/stats>

#### Why use BFT Tendermint?

THORChain uses Tendermint which is a classical BFT algorithm. 2/3 of the validators need to agree and the network values safety. The chain has instant finality and this is needed to secure cross-chain bridges.

**What is TSS and how is it used to hold network funds?**

THORChain uses Threshold Signature Scheme (TSS) as a leaderless vault to hold funds within the network. TSS works like a multi-sig wallet but there there is no one or set of private keys that can be stolen. As a collective, all node operators work together to create a TSS vault and the super majority are required to sign a transaction for funds to leave the vault. Node operators need to bond more than 1.5x in bond the vault they can secure to ensure they do not collude to steal funds.

#### **Does THORChain need external sources for price feeds, like oracles or weighted averages?**

THORChain depends on its continuous liquidity pool design and arbitrageurs to set prices. When pools become imbalanced, arbitrage bots trade to rebalance them. THORChain knows the exchange rates between external asset pairs because RUNE binds all pools together.

Unbalanced pools represent a profit opportunity for arbitrage traders -- if a trader can purchase a token at a lower price on THORChain and sell it for a profit elsewhere, they will. These trades re-balance the pool and ensure that prices accurately reflect the market value. These pool-balancing trades happen 24/7 via arbitrage bots interacting with the protocol's API directly. It's even possible to run an arbitrage bot of your own!

#### **Is there a liquidity cap?**

The Soft Cap has been removed, so there should be no limit to the amount of liquidity entered. There is a hard cap in place to ensure the total pooled cannot exceed the total bonded, making the network unsafe however the [Incentive Pendulum](/technical-documentation/technical-deep-dive/economic-model) makes this cap near impossible to reach.

#### Why does RUNE need to be the settlement asset in every pool?

If each pool is comprised of two assets (e.g. BTC:ETH) then there will be a scaling problem with n\*(n-1)/2 possible connections. By having RUNE on one side of each pool, $RUNE becomes a settlement bridging asset allowing swaps between any two other assets. Additionally, having $RUNE in a pool ensures that the network can become aware of the value of assets it is securing.

#### Why use 1-way state pegs instead of atomic swaps or 2-way asset pegs?

Simply put, Cross-chain bridges are a better solution than Atomic Swaps. Atomic Swaps involve a complex process of signing cryptographic keys between two parties that require interactivity. You also need a counter-party on all trades. Cross-chain bridges, coupled with continuous liquidity pools means you don't need a designated counter-party, and swaps can happen in less than a second. 1-way state pegs are better than 2-way asset pegs because assets don't need to be wrapped or pegged. Instead of having IOU tokens, real native assets can be used instead.

#### **How does THORChain prevent MEV?**

THORChain is designed to minimize the risk of Miner Extractable Value (MEV), which is a common issue in many blockchain networks. MEV refers to the ability of validators or miners to manipulate the order of transactions within a block, such as front-running trades or causing liquidations. Here’s how THORChain is resistant to MEV:

1. Multi-Chain Architecture: Unlike Ethereum and other EVM architectures—where MEV is more prevalent due to the single-chain structure and longer block times—THORChain operates across multiple blockchains. This makes it nearly impossible to manipulate transaction ordering simultaneously across different chains.
2. Limited Node Control: Nodes in the THORChain network cannot reorder transactions—whether observed from external chains or internal. Their only power is to censor transactions, which further limits the potential for MEV. 2/3 of Nodes need to colloude to censor a transactions.
3. Ordered Swaps, Delays and Swap Queues: Transactions (swaps) on THORChain are carefully ordered and processed with inbound and outbound delays. THORChain uses a [swap queue manager](https://gitlab.com/thorchain/thornode/-/blob/develop/x/thorchain/manager_swap_queue.go?ref_type=heads#L21) that organizes swap transactions within each block to minimize MEV. It prioritizes transactions based on two key factors:
   1. Liquidity Fee: Transactions with higher liquidity fees are prioritized.
   2. Slip (Price Impact): Transactions with higher price impacts are given priority.
   3. Scoring and Sorting: Each transaction is scored based on its liquidity fee and slip, and then sorted to determine the final order. This reduces the chances of MEV attacks like sandwiching.

#### How much RUNE do you need to run a THORNode?

The minimum bond is currently: 300K Rune ([MIMIR Override](https://thorchain.net/#/network/constants)) - Minimum Bond In Rune for current value.

The actual bond required is set by the market (node operators) - see the average bond at <https://thorchain.net/nodes>

#### How are new pools added in THORChain?

Approximately every three days, the pending pool with the deepest liquidity is churned in (becomes an active pool). This is called a Pool Churn. Note: A pending pool must have a minimum 10K RUNE to be eligible for a churn.

This means there is an open decentralised liquidity competition where the community can vote with their liquidity. N.B. Caps will prevent voting with liquidity.

There is a set max of 100 active pools, and once achieved, deeper pending pools will be able to replace shallowest active pools. See [Governance](/technical-documentation/technical-deep-dive/governance#asset-listing) for more information.

#### **What is the Contract Address of RUNE?**

There is no contract address for RUNE, as it is the native asset on its own blockchain.

## Frequent Issues

### My transaction failed, I can’t add liquidity or make swaps?

Make sure you have a sufficient amount of RUNE to process transactions. Also be sure to check if the liquidity caps are full. If so, you will not be able to add liquidity at that time. If you see errors like “No UTXOs to send” or “Need to wait for more UTXO confirmation”; likely you are trying to spend UTXO assets (BTC, LTC, BCH) that you have just transferred into your wallet. Please wait for more blockchain confirmations, and try again later!

➜ [Check Stuck transactions](https://track.thorchain.org/)

### THORYield is displaying incorrect information?

THORYield is a 3rd party app, sometimes there is a lag between sync, so yes, it may display incorrect information. In this case use THORSwap to see what liquidity you have provided.

### I deposited liquidity before Ledger and TrustWallet support but I want to migrate to those wallets without removing liquidity

You can use THORChain’s keystore wallet seed phrase for xDefi, or TrustWallet. It uses the standard BIP39 mnemonic phrase, it is compatible with all multi-coin wallets and Ledger. Simply input the seed phrase and your wallet should be imported. If you are using Ledger or cold storage, it is recommended to create a new wallet.

Please be aware of the implications of inserting seed phrase previously used in hot wallets; into a cold hardware wallet.


# Node Operators

FAQ on how to run THORChain as a node operator

This FAQ is designed to help node operators coming to THORChain to set up and manage their nodes effectively on THORChain. Below you’ll find answers to common questions, key tips, and important warnings to ensure smooth operation.

### What should I know before setting up and bonding to a node?

Make sure to read and understand the [THORNode Overview](/thornodes/overview) before you setting up a node.

Make sure you **do not** bond with the validator’s wallet. Unlike other "normal Cosmos chains", the first person to bond to the node owns the node. Ensure that you’re using the correct wallet, as ownership cannot be transferred after the bond.

### How does THORChain handle external updates?

THORChain handles external updates differently compared to Cosmos. When a Cosmos upgrade (e.g., using Gaia CLI or Ignite) occurs, you need to follow the specific THORChain process for node updates. Always refer to the latest node upgrade instructions in the documentation to ensure compatibility.

### What are common mistakes, and how can I avoid them?

Common mistakes include not syncing to the top, going offline unexpectedly which can lead to being slashed for not observing. Regular monitoring, keeping your node updated, and ensuring that it remains synced with the network can help you avoid these issues.

### How is node income calculated and what are the risks and costs?

Node income includes block rewards and swap fees. Network income sent via the Incentive Pendulum and given to Node Operators. Block Reward / Node / Month can be viewed at <https://thorchain.net/network>, See more under [Risks, Costs and Rewards](/thornodes/overview/risks-costs-and-rewards).

Swap fees contribute significantly to node income. To estimate total income per node per month, consider both block rewards and swap fees. See [THORCharts](https://thorcharts.org/thorchain_lp_node_earnings) to see the block reward and swap fee split.

### What is Churning, and how does it affect my node?

Churning is the process by which nodes are rotated in and out of the active validator set. This happens approximately every 2 1/2 days. During a churn event, new nodes may be added to the network while others are removed based on criteria such as bond size, age, and behavior. See more in [Node Operations under Churning](/technical-documentation/understanding-thorchain/roles/node-operators).

### What should I know about Bond Providers?

Node Operators can invite Bond Providers to contribute to their bond. Up to 10 Bond Providers can be added, and they will earn rewards proportional to their contribution. Operators can set a fee that is deducted from these rewards. Note that only the first wallet that bonds owns the node and can manage these providers. See more in [Pooled THORNodes](/thornodes/pooled-thornodes).

### How does early exit work for Bond Providers?

Nodes can manually signal to exit the active validator set during the next churn by sending a `MsgDeposit` with a `LEAVE` memo. During each churn, the lowest bond, worst performer, and the oldest churned-in node get automatically churned out, along with any nodes that request to leave.

Most nodes impose a penalty for bond providers requesting early exit, which results in missed rewards. However, some nodes offer this service without charge. When a node is churned out, it no longer earns rewards, which means bond providers and node operators both miss out on potential earnings. Additionally, a bond provider cannot unbond while the node is active but can add more bond if desired.

Rewards for bond providers are auto-compounded back into their bond with each churn. These rewards remain locked until the node is churned out, at which point the bond providers can unbond and access their funds. Meanwhile, node operators receive their operator fee directly to their wallet each churn. For more details, you can refer to the following resources:

• [THORChain Dev Memo Documentation](https://dev.thorchain.org/concepts/memos.html#bond-unbond-and-leave)

• [Gitlab: Leave Event Keys](https://gitlab.com/thorchain/thornode/-/blob/v1.134.0/x/thorchain/handler_leave.go#L154-155)

• [Gitlab OperationalMimirs](https://gitlab.com/thorchain/thornode/-/blob/v1.134.0/x/thorchain/manager_validator_current.go#L1368-1369)

### Why are there so many slashes, and is it normal?

Slashes can happen for various reasons, including node downtime or failing to observe or sign transactions correctly. While some slashing is normal, consistent slashing could indicate a problem with your setup. Monitoring slash points and correcting any issues immediately is essential.

### Why is Geth being used instead of Argon, given its size?

Geth is used within the [Ethereum Chain Client](https://gitlab.com/thorchain/thornode/-/blob/develop/bifrost/pkg/chainclients/ethereum/ethereum.go) as it provides Go libraires where as Erigon does not provide a native Go interface for embedding directly into Go applications. Node operators should be prepared for the increased resource requirements when using Geth.

### What are the steps to Unbond or Leave a Node?

You can only unbond when your node is in a [Standby state](/thornodes/overview/node-operations#node-statuses) and not part of a vault migration. To leave the network permanently, you must issue a LEAVE command and ensure all vaults are empty. See [Leaving ](/thornodes/leaving)for more information.

### How do I safely destroy my node after leaving?

After ensuring that your node has successfully churned out and your bond is fully returned, you can destroy your node setup. This involves using specific commands to remove all node resources securely. Destroying a node prematurely can result in significant financial loss. See [Leaving](/thornodes/leaving) for more information.


# Liquidity Providers

### **What does it mean to provide liquidity?**

Providing liquidity on THORChain creates an opportunity for holders of stagnant assets (e.g. BTC, ETH, BSC) to earn a return or yield on their asset. Traditionally, with a CEX or 0x style exchange, trades require an order book of bids/asks (buys/sells) at a specific price, because if an investor wants to trade one asset for another, you need a buyer and a seller. Decentralised exchanges like UniSwap and THORChain utilise liquidity pools to provide more fluid access to trades. Liquidity pools are the way decentralised exchanges maintain a reservoir of assets, enabling buyers and sellers to exchange assets on demand. Liquidity Providers are therefore those network participants who deposit their assets into liquidity pools in exchange for a share of the trading fees generated by the trading of buyers and sellers.

### **What assets can you swap and provide liquidity for?**

* Current Chains — BTC, ETH, LTC, BCH, DOGE, Cosmos, AVAX, BSC, BASE, TRON, XRP
* Native gas/base assets on each chain
* See full list at <https://runescan.io/pools> or <https://thorchain.net/#/pools>

### **Can I stake RUNE?**

Not quite. “Providing liquidity” in THORChain is not the same thing as staking because even if you provide only 1 asset (asymmetrically add), THORChain will automatically be separated into 2 equal parts: 50% Assets and 50% Rune. You will always have exposure to both assets.

### **Is there a lockup period if I provide Liquidity?**

There is no minimum or maximum time or amount. Join and leave whenever you wish. There is however a required confirmation time before THORChain credits you with liquidity when adding or swapping to protect against Reorgs. Wait time is based on:

* Total Asset amount (in a specific block of a specific blockchain)
* Per block reward of the chain
* Block time Required confirmations = Total Asset Amount (in a specific block of a specific blockchain) divided by the chain's per block reward Then that is multiplied by block time to get the approx "wait time". See [Confirmation-Counting](https://dev.thorchain.org/bifrost/how-bifrost-works.html#finality--pre-confirmation).

➜ [THORChain - Wait Times and Fees Explained!](https://youtu.be/XAdaEXO-Ofg)

### **Will I have Impermanent Loss Protection if I provide liquidity in THORChain?**

No. IL protection has ended on THORChain.

## **Asymmetrical / Symmetrical FAQs**

### I entered asymmetrically but received less than anticipated

Yes, because when you pool asymmetrically your asset is swapped into 50% rune and 50% asset. When swapping you are subject to slippage and fees. There are 2 types charged on asymmetrical deposits/withdrawals:

1. The on-chain deposit transaction fee (inbound tx)
2. The liquidity fee as a function of slip

Upon withdrawal, there will also be a transaction fee (outbound tx)

**Are there slippage fees for symmetrical deposits?**

No, there is only the deposit transaction fee.

### What ways can I withdraw my asymmetrical deposit?

If you deposit asymmetrically you can ONLY withdraw asymmetrically, to the same asset/address that was used for deposits.

### What ways can I withdraw my symmetrical deposit?

You can withdraw your symmetrical deposit both asymmetrically (in either asset) and symmetrically.

**Will all ERC20 assets be supported and listed on THORChain by default?**

No. Only short tail assets with high MarketCap, good velocity and economic activity would have chances to win liquidity competition to get listed.

## Adding and Removing Liquidity

### Entering and Leaving a Pool

To deposit assets on THORChain, you need a compatible wallet with your assets connected to one of the many User Interfaces. Liquidity providers can add liquidity to any of the active or pending pools. There is no minimum deposit amount, however, your deposit will have to cover the deposit and later a withdrawal fee costs. The ability to manage and withdraw assets is completely non-custodial and does not require any KYC or permission process. Only the original depositor has the ability to withdraw them (based on the address used to deposit the assets). Note, every time you add liquidity, Impermanent Loss Protection time resets.

While Symmetrically additions are recommended, Asymmetrical additions are supported, below are the rules:

If you add symmetrically first;

* You will be able to add asymmetrically with RUNE later
* You will be able to add asymmetrically with ASSET later but it would create a new LP position
* You will be able to add symmetrically later

If you add asymmetrically with ASSET first;

* You will be able to add asymmetrically with RUNE later but it would create a new LP position
* You will be able to add asymmetrically with ASSET later
* You will be able to add symmetrically later but it would create a new LP position

If you add asymmetrically with RUNE first;

* You will be able to add asymmetrically with RUNE later
* You will be able to add asymmetrically with ASSET later but it would create a new LP position
* You will not be able to add symmetrically later

![Addition Rules](https://lh3.googleusercontent.com/Vqi0wC-1dEnTGS410rXaiKpaGW5KUrzEBZPtD_jPyWOKsooVQtWZ5hZlJWuAvmuA4c22V4WGjjlDGKKhE6p4JWKXzHKt5CS4tvnKDGdNuTsEpkQr7Ual0LpMWkEH1yFIzCqzC_Do)

### Withdrawing Liquidity

Liquidity providers can withdraw their assets at any time and without any cooldown period, aside from the confirmation time. The network processes their request and the liquidity provider receives their ownership percentage of the pool along with the assets they've earned. Fees do apply when withdrawing, see [Technical Deep Dive](/technical-documentation/technical-deep-dive).

### **How to track your position**

You can see your position if you connect to THORChain via an Interface you can use [THORYield](https://app.thoryield.com/).

➜ [THORYield Guide](https://thorswap.medium.com/introducing-thoryield-v2-%EF%B8%8F-a6618c1cfcdb)

**There are four factors affecting returns:**

* **Proportion of transaction volume to pool depth** — If there is high volume compared to the depth of the pool then there will be higher rewards available to liquidity providers. If there is low volume compared to the depth of the pool then there will be lower rewards available.
* **Share of the pool** — If you have a large share of the pool, you’ll earn higher returns. If a liquidity provider has 1% of a pool they receive 1% of the rewards for that pool.
* **Fee size** — fees are determined by the underlying blockchain and the rewards from fees are proportional to the fees charged. A chain with higher fees will generate higher rewards for liquidity providers.
* **Synth leverage** — With the introduction of [Synths](https://github.com/thorchain/docs/tree/master/thorchain-finance/synthetic-asset-model/README.md) and [Savers (Deprecated)](/thornodes/archived/savers), Liquidity Pool providers underwrite the Synths' share of the pools. Thus Liquidity Pool providers has a leverage effect based on the RUNE:Asset price ratio changes and Synth utilization level

\*Of significant note is that this mechanism of providing liquidity into the protocol; creates an opportunity for holders of non-yield generating assets (e.g. BTC, ETH) to earn a return on their investments.


# Asset Types

Asset Notation within THORChain

THORChain is a liquidity protocol that is made up of multiple types of assets to provide the best experience for all types of users - from retail investors to professional traders to institutional investors.

To serve everyone, THORChain:

* [Native Assets](#native-assets)
* [Derived Assets](#derived-assets)
* [Synthetic Assets](/technical-documentation/thorchain-finance/synthetic-asset-model)
* [Trade Assets](/technical-documentation/thorchain-finance/trade-assets)

### Native Assets

Ex: BTC.BTC

Native Assets are L1 assets (eg BTC) available on its native L1 (eg Bitcoin Network).

### Derived Assets

Ex: THOR.BTC

[Derived Assets (Deprecated)](/thornodes/archived/lending#derived-assets-and-pools) are Native Assets (eg BTC) available on another L1 (eg THORChain if THOR.BTC). This allows the Native Asset to be sent, received and swapped on another L1 than it's native L1.

### Synthetic Assets

Ex: BTC/BTC

THORChain [synthetics ](/technical-documentation/thorchain-finance/synthetic-asset-model)are fully collateralized while they exist and switch to a 1:1 peg upon redemption. This unique design combines the benefits of over-collateralization and pegging, ensuring capital efficiency and stability. The system aims for 100% collateralization but can handle drops below this without losing the peg, using fees to regain balance. Collateral comes from liquidity pools, with 50% in the asset and 50% in RUNE, rebalancing as prices change. Minting involves swapping RUNE or the asset into its synthetic form using pool liquidity, maintaining equal purchasing power.

### Trade Assets

Ex: BTC\~BTC

[Trade Assets](/technical-documentation/thorchain-finance/trade-assets), a new class of primitives on THORChain, offer double the capital efficiency of synthetic assets, enhancing arbitrage and high-frequency trading. They settle with THORChain’s block speed and cost, enabling 6-second finality swaps without high fees. Redeemable anytime with no slippage, Trade Assets emulate centralized exchange trading but maintain on-chain transparency and security. Custodied by THORChain outside of liquidity pools, they provide user credits while holding funds 1:1 as L1 assets until withdrawal, making THORChain more user-friendly for active traders.

See <https://dev.thorchain.org/concepts/asset-notation.html> for more informaiton.


# RUNEPool

### **What is RUNEPool?**

RUNEPool is a feature of THORChain that allows RUNE holders to join the Protocol Owned Liquidity (POL). By participating, users get a share of the liquidity that THORChain owns across all its pools, earning Annual Percentage Rate (APR) returns and improving the protocol's liquidity efficiency, supporting THORChain's growth.

### **How does RUNEPool work?**

RUNEPool matches external capital with various pools in the system. It manages multiple pools, distributing RUNE across them to smooth out price curves and reduce volatility. This makes THORChain products more attractive to investors.

### **What are the key components of RUNEPool?**

* **PoL-Enabled Pools**: Defined via the mimir key POL-{Asset}, enabling all eight native assets and five USD stable coins.
* **RUNEPool Units (RPU)**: Represent a pooler’s share in the pool. When redeemed, the holder's share of the total POL size in RUNE is distributed.
* **Impermanent Loss Management (IL)**: Users experience aggregate IL across PoL-Enabled pools, reducing risk compared to any single pool.

### **What are the benefits to RUNE holders?**

RUNEPool simplifies user experience by focusing on the Incentive Pendulum and fees generated from the pools, allocating funds based on yield. This abstracts away complexities and enhances decision-making for users.

### **What is the use case for RUNEPool?**

RUNEPool gathers idle RUNE from centralized exchanges and custodial services, moving them into THORChain's decentralized infrastructure to generate yield. This enhances asset productivity and builds up POL through community participation.

### **How can I track RUNEPool performance?**

Multiple dashboards are available to track RUNEPool performance:

* [thorchain.network/runepool](http://thorchain.network/runepool)
* [thorchain.net/thorfi/runepool](http://thorchain.net/thorfi/runepool)
* [runescan.io/txs?type=runepool](http://runescan.io/txs?type=runepool)

### **How to add to RUNEPool?**

1. **Create a Transaction**: Use a `MsgDeposit` transaction with the memo `pool+`.
2. **RUNE Only**: RUNEPool only works with RUNE.
3. **Instructions**: Refer to the "[Deposit to the RUNEPool](https://dev.thorchain.org/concepts/memos.html#deposit-runepool)" section in the documentation for detailed steps.

### **How to withdraw from RUNEPool?**

1. **Create a Transaction**: Use a `MsgDeposit` transaction with the memo `pool-:<basis-points>:<affiliate>:<affiliate-basis-points>`.
2. **Minimum Term**: You can only withdraw after the minimum term defined by `RUNEPoolDepositMaturityBlocks`.
3. **Instructions**: Refer to the "[Withdraw from the RUNEPool](https://dev.thorchain.org/concepts/memos.html#withdraw-runepool)" section in the documentation for detailed steps.

### **How to view RUNEPool holders?**

1. **All Holders**: Use the `rune_providers` endpoint to see a list of all RUNEPool holders.
2. **Specific Holder**: Use the `rune_providers/{thor owner address}` endpoint to view the position of a specific RUNEPool holder.

### **How does RUNEPool manage Impermanent Loss (IL)?**

* **Aggregate IL**: Users experience aggregate IL across all PoL-enabled pools, reducing individual pool risks.
* **Idle RUNE**: Undeployed RUNE reduces yield but also limits exposure to impermanent loss.

### **How can I see the Profit and Loss (PnL) of RUNEPool?**

The PnL can be split into Global (for all providers) and Individual:

* **Global PnL:** The `/thorchain/runepool` endpoint returns the global PnL of RUNEPool, including details for the reserve and independent providers.
* **Individual Provider PnL:** The `/thorchain/rune_provider/{thor_addr}` endpoint provides position information for a single provider.

For more detailed instructions, refer to the [developer docs](https://dev.thorchain.org/concepts/rune-pool.html).


# Archived

This section contains documentation for deprecated THORChain features that are no longer active but are preserved for historical reference.

## Deprecated Features

### Savers and Lending

As of January 2025, both Savers and Lending features have been deprecated and are no longer available on THORChain.

* **Savers**: Single-sided asset exposure using synthetics has been discontinued
* **Lending**: Zero-interest borrowing against collateral has been deprecated

For more information about this deprecation, see the [THORFi Unwind announcement](https://medium.com/thorchain/thorfi-unwind-96b46dff72c0).

## Archived Content

* [Savers (Archived)](/thornodes/archived/savers)
* [Lending (Archived)](/thornodes/archived/lending)
* [Savers FAQ (Archived)](/thornodes/archived/savers-faq)
* [Lending FAQ (Archived)](/thornodes/archived/lending-faq)

{% hint style="warning" %}
**Important**: The features documented in this archived section are no longer available on THORChain. This content is preserved for historical reference only.
{% endhint %}


# Savers (Deprecated)

\[DEPRECATED] THORFi Savings - Single-sided asset exposure using Synthetics

{% hint style="danger" %}
**DEPRECATED FEATURE**: Savers have been permanently deprecated as of January 4, 2025. This feature is no longer available on THORChain. This documentation is preserved for historical reference only.

See the [THORFi Unwind announcement](https://medium.com/thorchain/thorfi-unwind-96b46dff72c0) for more information.
{% endhint %}

## Overview

Users could gain yield with single sided asset exposure using [Synthetics](/technical-documentation/thorchain-finance/synthetic-asset-model). See the PR [here](https://gitlab.com/thorchain/thornode/-/issues/1342) and article [here](https://medium.com/thorchain/thorchain-savers-vaults-fc3f086b4057).

The User would mint a Synthetic asset - an asset that retained 1:1 purchase rights on the underlying L1 asset. Then the User would lock this synthetic asset in a Savings vault, and they were issued Saver Units - units that tracked their ownership of the total vault balance. The protocol monitored the yield the underlying Synth liquidity was earning, and paid that yield directly into the vault. The user could then reclaim their principle and earnings at any point later.

### Synth Yield

Savers took on significantly less risk than an LP; therefore, they earned a proportion of the yield generated by the synth collateral, with the rest captured by the LP.

Savers Yield was dynamic, depending on the system utilisation. The higher the synths utilisation in the pool, the lower the Savers Yield would be.

Savers Yield was calculated as:

$$
saversYield = LPYield \* (MaxSynthsForSaversYield - SynthsPerPool) \* \frac{SynthYieldBasisPoints}{10000}
$$

* MaxSynthsForSaversYield = 60%, set by [MaxSynthsForSaversYield](https://dev.thorchain.org/mimir.html)
* SynthYieldBasisPoints = 80%, set by [SynthYieldBasisPoints](https://dev.thorchain.org/mimir.html)
* Synths Per Pool = [Synth Utilisation in the pool](/technical-documentation/thorchain-finance/synthetic-asset-model)

Every time a swap was made in the L1 pool, the fees and rewards that were meant to be added to the pool were divided against the Synth Yield Basis Points, then divided against the depth of the Savers' Vault vs. the Depth of the Pool (in terms of asset quantity), then paid directly into the vault.

### Withdrawing

At any point, the Saver could re-claim their share of the vault, which would be their principle, plus all the yield they were entitled to. The asset being claimed was a synth quantity, which was then swapped out to the L1 asset.

## Historical Questions

### Where did the yield come from?

Swap fees and liquidity rewards.

### Was Saver holding an L1 asset, or a claim on an L1 asset?

The Saver held **Saver Units**, which was a claim on a **Vault Balance**, which held **Synthetic Assets**, which was a claim on **L1 Liquidity**, which could be swapped at 1:1 purchasing power to the **L1 Asset**. So, they were holding a claim on an L1 asset.

### What were the risks?

There could be an economic bug in Synths, leading to breakdown in the accounting of the claims. There could be a technical bug leading to a loss of L1 assets in the vaults.

#### Why were there fees to enter or exit?

Savers paid a liquidity fee to enter and exit, as well as network fees to pay for gas. Liquidity fees were demand-responsive and prevented economic attacks. Network fees to pay for gas ensured the system was sustainable.

### Resources

* [Savers Vaults Live on THORChain](https://medium.com/thorchain/thorchain-savers-vaults-fc3f086b4057) - THORChain Medium
* [Under the Hood: Single Sided Yield & Protocol Owned Liquidity](https://crypto-university.medium.com/under-the-hood-single-sided-yield-protocol-owned-liquidity-a5ef725a5d7a) - LP University
* [Yield Bearing Synths and POL](https://www.youtube.com/watch?v=Up2-arSzH5k) - GrassRoots Crypto


# Lending (Deprecated)

\[DEPRECATED] THORFi Lending within THORChain

{% hint style="danger" %}
**DEPRECATED FEATURE**: Lending has been permanently deprecated as of January 4, 2025. This feature is no longer available on THORChain. This documentation is preserved for historical reference only.

See the [THORFi Unwind announcement](https://medium.com/thorchain/thorfi-unwind-96b46dff72c0) for more information.
{% endhint %}

## Overview

Lending allowed users to deposit native collateral, and then create a debt at a collateralization ratio (CR). The debt was always denominated in USD (aka `TOR`), regardless of what L1 asset the user received.

All loans had 0% interest, no liquidations, and no expiration. Since ADR 012 was implemented in Feb-2024, a flat 200% CR (or 50% Loan-to-Value, LTV) was implemented. Risk was mitigated by:

* Limits on collateral for the network and each pool
* Slip-based fees when opening and closing loans
* A circuit breaker on RUNE total supply

Lending allowed users to:

* Create a loan using native assets as collateral
* Hold a loan without the risk of liquidation
* Be short on USD and long on crypto assets such as Bitcoin

Lending benefited the protocol by:

* Increased capital efficiency of the pools which increased system income and real yield
* Increased trading volume
* Increased total bonded, allowing THORChain to scale
* Providing an attractive sink for capital

{% hint style="success" %}
[ADR 011: THORFi Lending Feature](https://dev.thorchain.org/architecture/adr-011-lending.html) with full Lending details was released and approved by Node Operators.
{% endhint %}

{% hint style="success" %}
[ADR 012: THORFi Lending Scaling](https://dev.thorchain.org/architecture/adr-012-scale-lending.html) - setting CR to flat 200%, and burning Standby Reserve to increase collateral cap.
{% endhint %}

## Lending Fundamentals

### Derived Assets and Pools

Derived assets, such as `thor.btc` and`thor.tor`, were algorithmic coins that were backed by the liquidity of RUNE, and the liquidity of that was based on the RUNE-ASSET pair. Derived assets were swapped from or swapped to L1 assets, via RUNE, using derived asset pools that were based on the equivalent L1 pools. Unlike Synthetic Assets, derived assets were independent of Liquidity Pools and all swap fees were burnt. Derived assets were for accounting and there were no plans for them to be exportable or held by users.

### TOR Explained

TOR (`thor.tor`) was a non-transferable unit of account within THORChain designed to match the value of $1 USD and had been in use since [ADR 003](https://dev.thorchain.org/architecture/adr-003-flooredoutboundfee.html). It could not be exported anywhere and always had a market cap of $0. TOR was valued by taking the median price of the active USD pools.

All collateral, debt and repayments within Lending were converted to and accounted for in TOR. To understand TOR in depth, go to the dedicated [TOR section](/technical-documentation/thorchain-finance/tor).

### Open Loan Flow

The user provided Bitcoin collateral and could receive the debt in any asset however it was all accounted for in TOR.

1. The user sent in collateral (BTC.BTC -> RUNE, RUNE -> THOR.BTC)
2. THOR.BTC was held as collateral in the Lending module
3. Convert THOR.BTC value to TOR terms
4. Calculate debt in TOR based on CR and collateral TOR value
5. Mint TOR
6. TOR -> RUNE, RUNE -> L1 out (e.g. - ETH)

### Loan Repayment / Close Flow

Users could repay loans at any time, with any amount in any asset. Repayment was converted into TOR.

1. L1 -> RUNE (optional, user could also pay back with RUNE)
2. RUNE -> Mint TOR
3. Burn TOR (amount deducted from loan debt)
4. Burn Derived Asset (THOR.BTC) (amount was the same percentage of collateral as a percentage of loan debt paid) -> Mint RUNE
5. RUNE -> BTC.BTC (loan originator)

{% hint style="success" %}
Collateral was not returned until the loan was fully repaid. The user always had the right to have their returned collateral if they repaid the loan.
{% endhint %}

## Historical Resources

### FAQs

* [General Lending FAQs](/thornodes/archived/lending-faq)

### Explainer Articles

* [Lending 101 by LP University](https://crypto-university.medium.com/under-the-hood-lending-101-f934e1c22792)

### Explainer Videos

* [How Lending Works by GrassRoots Crypto](https://youtu.be/AaqHG00RJks)
* [Lending with Numbers by GrassRoots Crypto](https://youtu.be/PVpYU5kCOHI)
* [Lending Risks & Concerns by GrassRoots Crypto](https://www.youtube.com/watch?v=glY_RVYdsfM)

### Dashboard

* [Lending Health Dashboard](https://dashboards.thorchain.org/#lending)
* [Lending Dashboard by banbannard](https://flipsidecrypto.xyz/banbannard/thorchain-lending-fOAKej)

### Design Documents

* [ADR 011: THORFi Lending Feature](https://dev.thorchain.org/architecture/adr-011-lending.html)
* [ADR 012: THORFi Lending Scaling](https://dev.thorchain.org/architecture/adr-012-scale-lending.html)
* [Original Design](https://gitlab.com/thorchain/thornode/-/issues/1412)


# Savers FAQ (Deprecated)

{% hint style="danger" %}
**DEPRECATED FEATURE**: Savers have been permanently deprecated as of January 4, 2025. This feature is no longer available on THORChain. This documentation is preserved for historical reference only.

See the [THORFi Unwind announcement](https://medium.com/thorchain/thorfi-unwind-96b46dff72c0) for more information.
{% endhint %}

### What was a Savers Vault?

Savers Vaults were a way to supply single-asset liquidity on THORChain. Users could deposit native Bitcoin, earn in-kind yield, and withdraw their principal any time since they maintained full control of their keys.

* [Original Launch Article](https://medium.com/thorchain/thorchain-savers-vaults-fc3f086b4057)

### Was Savers Vault yield fixed rate or variable rate?

Yield was variable and driven by swap fees, block rewards, pool depth, and the incentive pendulum. Annual percentage rates (APRs) were calculated using an extrapolation of past performance data from the last 30 days.

### Were there fees to enter and exit a Savers Vault?

Yes. There were slippage fees paid on entering and exiting a Savers Vault. There was a 5 bps for entry and exit fee for all savers position due to streaming swaps regardless of the size of the transaction.

### Which assets were eligible to deposit in a Savers Vault?

All L1 Assets and Selected Stables were supported.

### Where could users access Savers Vaults?

Users could manage a THORChain Savers Vault positions through many interfaces.

### Where could users track their Savers Vault yield?

Users could track their Savers Vault positions on supported interfaces including:

* RUNEScan.io
* THOR Infobot

### Should users have used THORChain Savers Vaults?

Users should have used THORChain Savings if they were planning on keeping their funds in the vault long enough for the fees accrued to offset the entry/exit costs, as well as the outbound fee(s) assessed when withdrawing.

Example: a user deposits 1 BTC in a pool 1000 BTC deep; thus pays a 0.1% slippage fee (1/1001) and is credited 0.999 BTC in the vault. If the pool is paying 3.65% APR, this is 0.1% earned every 10 days. Thus the user should plan to stay at least 20 days to pay for the entry and exit fee as a minimum.

### What were the risks associated with Savers Vaults?

Savers Vaults were not risk-free. Although Savers was designed to mitigate risk, the possibility of loss could not be eliminated completely. It was the user's responsibility to be aware of the risks before entering a Savers Vault.

### Could wallets/DEXs/DeFi products offer Savers Vaults to customers?

Yes, any person, service, or dApp could create a frontend interface to offer THORChain Savers Vaults to its users. Interested parties were directed to review the THORChain Developer Documentation.

### How did one integrate with Savers?

See the developer quick start guide [here](https://dev.thorchain.org/saving-guide/quickstart-guide.html)


# Lending FAQ (Deprecated)

{% hint style="danger" %}
**DEPRECATED FEATURE**: Lending has been permanently deprecated as of January 4, 2025. This feature is no longer available on THORChain. This documentation is preserved for historical reference only.

See the [THORFi Unwind announcement](https://medium.com/thorchain/thorfi-unwind-96b46dff72c0) for more information.
{% endhint %}

## General Questions

### What was Lending?

Lending allowed users to deposit native collateral, and then create a debt at a collateralization ratio with 0% interest, no liquidations, and no expiration.

* [More information](/thornodes/archived/lending)
* [Launch Article](https://medium.com/thorchain/lending-on-thorchain-646bbf2e6e1b)
* [Explanation Video](https://youtu.be/AaqHG00RJks)
* [Health Dashboard](https://dashboards.thorchain.org/#lending)

### What was TOR?

TOR (`thor.tor`) was a non-transferable unit of account that debt was always denominated in within THORChain. TOR maintained its stability by anchoring to a median value of a basket of USD-pegged stablecoins (USDC, USDT, BUSD), ensuring it stayed closely pegged to $1 USD. The RUNE<>TOR mechanism worked through a two-way burn process: minting TOR burned an equivalent value of RUNE, and burning TOR minted the same value of RUNE. See more under [TOR](/technical-documentation/thorchain-finance/tor).

### Could users partially repay their loan?

Debt could be partially repaid, but a borrower would only receive their collateral back when the debt was repaid in full.

### What happened if a user overpaid their debt?

Overpayments were credited towards the next loan the borrower opened.

### Was there a best time to open or close a loan?

Yes, it was best to open and close loans during times of low volatility. To protect the network from price manipulation, virtual pool depths for lending would shrink during times of increased volatility, meaning liquidity fees could greatly increase. Managing loans during times of low price volatility on THORChain would yield the most desirable results. Patient borrowers paid the least fees.

### Would users always receive their full collateral back?

Users would receive their full collateral back upon repayment minus slip-based liquidity fees incurred from the loan opening and closing process. During low volatility periods, fees would be lower. During times of high volatility, fees would be higher due to the constricting virtual pool depth.

### Which assets could users use to pay down their debt?

Debt could be repaid with any THORChain-supported asset. Assets used to repay loans would be sold for TOR to repay the debt, since debt was denominated in TOR.

### Was streaming swaps used for lending?

Yes. There was a 5 bps default fee.

### Why were there no liquidations?

In this design, if collateral fell below the debt value, it wasn't problematic since the collateral, stored as equity (RUNE), was the liability. Liability grew only when the RUNE-ASSET price dropped and the loan was repaid. Liquidating collateral posed individual loan risks, worsened user experience, and made users monitor RUNE's price, conflicting with design objectives. Rather than liquidations, the protocol could bear a slight rise in RUNE supply (around 15m or 3%) before activating a circuit breaker, pausing the lending feature.

### Why was there no interest?

Interest rates generate income on collateral but make users more likely to repay loans. THORChain's design thrived when users opted for long-term loans or never repaid. A 0% interest rate, being highly attractive, meant users seldom repaid as their principal remained intact. Users incurred slip-based fees upon entering or exiting positions, which boosted yield for network participants and permanently burned RUNE.

### Why was there no expiry?

The protocol wanted to attract as much exogenous capital as possible (L1 assets like BTC and ETH) since it converted them to equity (RUNE IOUs). This design created net buy pressure on RUNE while storing equity as liability, which THORChain did not want to be called on, thus there was no expiry.

### How did lending help THORChain scale?

THORChain had strict rules on economic security. Value at stake by the validators must always be greater than the value of the assets in the vaults, measured in RUNE. Due to Protocol-Owned-Liquidity and Savers, the network was likely to max out pooled RUNE and send all yield to nodes. The lending design bought and burned RUNE from the pools, directly affecting the relationship between liquidity and security.

### Who was the counterparty to the loans?

The THORChain protocol and all RUNE holders were the counterparty to each loan. The RUNE burn/mint mechanism meant RUNE concentration/dilution effects (among all RUNE holders) as loans were opened and closed. Liquidity providers and Savers were not directly lending their assets to borrowers. The pools were just the conduit to swap between collateral and debt.

### How did one integrate with Lending?

See the developer quick start guide [here](https://dev.thorchain.org/lending/quick-start-guide.html)

## In Depth Questions

[See this Twitter Thread](https://twitter.com/CBarraford/status/1775618463341408587)